Plant Overview
Often called the "Knife-leaf Wattle," this Australian gem is a geometric masterpiece of the plant world. Its sharp, triangular foliage creates a striking architectural silhouette that looks more like modern art than a typical garden shrub. In early spring, it transforms into a glowing golden cloud, covered in thousands of tiny, honey-scented blossoms that attract bees from miles away.
🔍 How to Identify
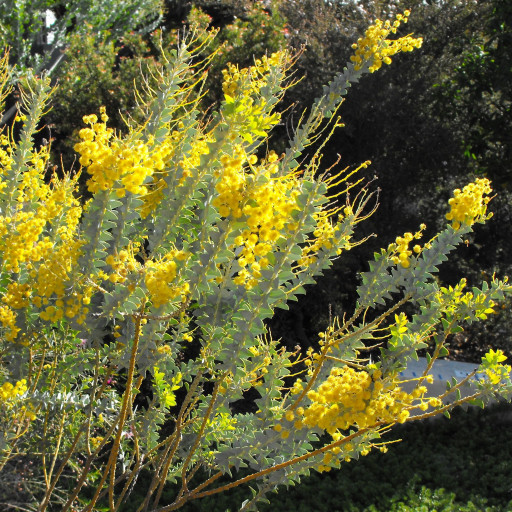
- 🍃 The "Leaves": What look like leaves are actually "phyllodes"—flattened stems. They are distinctly triangular, resembling a knife blade or a dog's tooth, and feature a beautiful dusty, silver-blue waxy coating.
- 🟡 The Blooms: Profuse, bright yellow globes that look like fuzzy miniature pom-poms. These appear in long, crowded clusters (racemes) along the ends of the branches.
- 🌿 Growth Habit: A dense, multi-stemmed evergreen shrub with a slightly weeping or "fountain" shape. It typically grows as wide as it is tall, providing a thick, structural presence.
🏡 In Your Garden
- ☀️ Sun-Driven Color: The plant produces its signature silver-blue waxy coating as a natural "sunscreen." The more sun it receives, the more intense its metallic blue hue becomes.
- 🚿 The Drainage Rule: Because it evolved in rocky, well-draining Australian slopes, it is highly susceptible to root rot in soggy soil. If you have heavy clay, plant it on a slight mound to ensure water moves away from the crown.
- ✂️ Pruning Nuance: It makes an incredible privacy hedge, but never prune it back into the thick, brown "old wood." It lacks the dormant buds to regrow from bare branches, so only trim the leafy green growth.
⚠️ Safety & Toxicity
- 🐾 Pet Safety: This Acacia is generally considered non-toxic to cats, dogs, and horses. It is a safe choice for pet-friendly landscapes.
- 👀 Physical Hazards: While not chemically toxic, the "leaves" are quite stiff and have sharp points. Avoid planting it directly next to narrow walkways where the foliage might poke the eyes of children or pets.
- 🤧 Pollen Note: While beautiful, the heavy flowering can be a trigger for those with sensitive seasonal allergies or hay fever during the spring.
✨ Fun Fact
The species name cultriformis comes from the Latin word culter, meaning "knife," and forma, meaning "shape." This perfectly describes the geometric, blade-like foliage that makes it one of the most recognizable wattles in the world!

Detailed Care Instructions
To grow Acacia Cultriformis (Knife-leaf Wattle) plants, you can follow these steps:
- Choosing a suitable location: Select a spot that receives full sunlight for at least six hours a day. The soil should be well-draining and not prone to waterlogging.
- Soil preparation: Prepare the soil by loosening it and removing any weeds or grass. Acacia Cultriformis prefers slightly acidic to neutral soil. If your soil is alkaline, you may need to amend it with organic matter or use a soil acidifier.
- Planting: Dig a hole that is twice as wide and deep as the plant's container. Gently remove the plant from its container and place it in the hole, making sure the top of the root ball is level with the soil surface. Backfill the hole with soil, firming it gently around the roots.
- Watering: After planting, water the plant thoroughly to settle the soil. The soil should be kept consistently moist but not waterlogged, especially during the plant's establishment period. Once established, Acacia Cultriformis is drought-tolerant and requires less watering.
- Mulching: Apply a layer of organic mulch around the plant to help retain soil moisture, regulate soil temperature, and suppress weed growth. Avoid piling mulch against the plant's stem to prevent rot.
- Pruning: Acacia Cultriformis generally doesn't require much pruning. However, you can trim any dead, damaged, or overcrowded branches to maintain overall plant health and shape.
- Fertilizing: Acacia Cultriformis doesn't require heavy fertilization. However, you can apply a slow-release, balanced fertilizer in early spring to encourage healthy growth. Follow the manufacturer's instructions for the correct application rate.
- Protecting from frost: This plant is not very frost-tolerant, so if you live in a colder climate, consider protecting it during freezing temperatures. Use a frost cloth or relocate potted plants indoors during winter.
- Monitoring for pests and diseases: Acacia Cultriformis is generally resistant to pests and diseases. However, keep an eye out for common issues such as aphids or leaf spot disease. Treat any problems promptly with organic or chemical controls.
- Regular maintenance: Regularly monitor your plant's growth, water it as needed, and remove any weeds that may compete for nutrients. With proper care, your Acacia Cultriformis plant should thrive and grow steadily.
Remember to check with local gardening resources or nurseries for any specific tips or recommendations tailored for your specific climate and growing conditions.

Place in a bright room that is sun drenched almost all day. Or directly in a south-facing window.

Acacia Cultriformis is a shrub that belongs to the family of Fabaceae. It is native to Australia and can grow up to 15 feet in height. The plant requires occasional watering but is drought tolerant once established. Here is how to water Acacia Cultriformis:
1. Assess the soil moisture
The first step in watering Acacia Cultriformis is to assess the soil moisture level. Stick your finger 2 inches into the soil to check for moisture. If the soil is dry, it's time to water the plant.
2. Water deeply
When you water Acacia Cultriformis, make sure to water deeply. The plant has a deep root system, and watering deeply ensures that the water reaches the roots.
3. Water in the morning
The best time to water Acacia Cultriformis is in the morning. This allows the plant to absorb the water before the heat of the day sets in.
4. Don't overwater
Acacia Cultriformis is tolerant of drought but is susceptible to root rot if overwatered. Water only when the soil is dry and avoid watering the foliage.
5. Consider the weather
During hot and dry weather, Acacia Cultriformis may require more frequent watering. Conversely, during cooler weather, the plant may require less water.
6. Mulch
Mulching around the plant helps to retain moisture in the soil and reduces the need for frequent watering. Use organic mulch such as leaves, bark, or wood chips.
7. Monitor the plant
Check the plant regularly for signs of under or over watering. Yellowing or browning leaves can indicate a lack of water, while wilting or mushy leaves can indicate overwatering.
To fertilize this plant, use a balanced, slow-release fertilizer. Apply the fertilizer in the early spring before new growth appears, making sure to follow the instructions on the package. Avoid over-fertilizing, as this can damage the plant. Water the plant well after fertilizing to help the nutrients reach the roots.
Acacia Cultriformis plant prefers a well-draining soil that is slightly acidic to neutral. It thrives in sandy or loamy soil that is not too compact, as it requires good aeration and root development. The soil should also be free from waterlogging, as this can cause root rot and other fungal diseases. It benefits from regular fertilization with a balanced fertilizer, but care should be taken not to over-fertilize as this can result in excessive vegetative growth and reduced flowering. Before planting, it is recommended to amend the soil with organic matter such as compost or well-rotted manure to improve its structure and fertility.
To propagate this plant, you will need to take cuttings of the stem. Choose a healthy stem that is about 6-8 inches long and has a few leaves attached. Make a clean cut just below a node or leaf joint. Remove the lower leaves from the cutting, leaving only a few leaves at the top.
Dip the cut end of the stem in rooting hormone and place it in a pot with well-draining soil. Water the cutting thoroughly and cover the pot with a clear plastic bag to create a humid environment.
Place the pot in a warm and bright location, but out of direct sunlight. Mist the cutting daily to keep the soil moist and prevent it from drying out.
After a few weeks, roots should start to form from the cut end of the stem. You can gently tug on the stem to check for resistance, which indicates that roots are growing. Once the roots have developed, you can remove the plastic bag and gradually expose the cutting to more light and air.
When the cutting has grown large enough, you can transplant it into a larger pot or into the ground.
Common pests of the dogtooth wattle include Scale insect, mealybugs, spider mites, thrips. Make a habit of checking your dogtooth wattle frequently for pests so that any infestations can be caught and managed early.


