Plant Overview
Known as the "Climbing Wattle" or famously as Cha-om in Southeast Asian cuisine, this woody shrub is a staple of tropical gardens. While its feathery, fern-like appearance looks delicate, it is a rugged survivor equipped with sharp defenses. It is perhaps best known for its "love it or hate it" aroma—a pungent, sulfuric scent when raw that transforms into a rich, nutty flavor once hit by a hot frying pan.
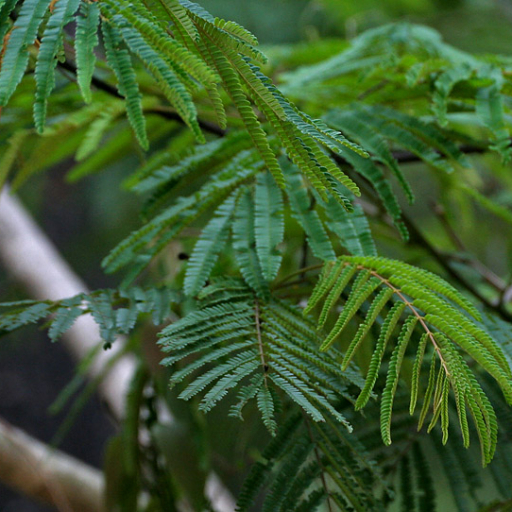
🔍 How to Identify
- 🍃 Feathery Foliage: The leaves are "bipinnate," meaning they are doubly divided into tiny, needle-like leaflets that give the plant a soft, airy texture.
- ⚔️ Hooked Thorns: Look closely at the stems; they are armed with numerous small, sharp, recurved prickles that help the plant scramble over other vegetation.
- ☁️ Pom-pom Blooms: It produces small, spherical flower heads that look like pale yellow or creamy white fuzzy balls, typical of the Acacia family.
🏡 In Your Garden
- ✂️ The Harvest Method: To keep this plant manageable and productive, gardeners regularly pinch off the tender top 10-15 centimeters of new growth. This "topping" encourages the plant to bush out rather than turning into a leggy, thorny vine.
- ☀️ Sun and Space: It thrives in full tropical sun and well-draining soil. Because it is a vigorous climber, it needs a sturdy trellis or a dedicated corner where its thorns won't snag passersby.
⚠️ Safety & Toxicity
- 🧤 Physical Hazard: The primary danger of Acacia pennata is its thorns. They are small but hooked, easily catching on skin and clothing. Always wear thick gardening gloves when pruning.
- 🍳 Edibility Note: While the young shoots are a delicacy for humans when cooked (common in Thai omelets), the raw plant contains high levels of tannins and may cause mild digestive upset if consumed in large quantities without preparation. It is generally not recommended for household pets.
✨ Fun Fact
In Thailand, Cha-om is so beloved that it is considered a "hero ingredient" for the famous Kai Jeow Cha-om (herbal omelet), even though the raw plant smells so strong it is sometimes nicknamed the "stinky leaf" by locals!

Detailed Care Instructions
Acacia pennata, also known as Thai acacia or cha-om, is a popular plant known for its edible young shoots and its use in various dishes, particularly in Southeast Asian cuisine. Here's how you can grow Acacia pennata:
1. Choose the Right Location:
- Sunlight: Acacia pennata thrives in full sun to partial shade. Aim for at least 6 hours of sunlight a day.
- Space: Ensure enough space for the plant to spread; it can grow quite bushy.
2. Soil Requirements:
- Type: Well-draining soil is essential. Sandy loam to clay loam is ideal.
- pH Level: Preferably slightly acidic to neutral pH (6.0 to 7.0).
- Fertility: Enrich the soil with organic matter like compost to promote healthy growth.
3. Planting:
- Seeds: You can grow Acacia pennata from seeds. Soak the seeds in water for 24 hours before planting to enhance germination.
- Location: Plant seeds or seedlings in the desired location in your garden or in pots.
- Depth: Plant seeds about 1 inch deep and space them 2-3 feet apart when planting multiple seeds.
4. Watering:
- Frequency: Water regularly, especially during dry spells. Keep the soil moist but not waterlogged.
- Establishment: Newly planted seedlings require more frequent watering until they are established.
5. Fertilization:
- Method: Use a balanced fertilizer or organic compost every few months to encourage healthy growth.
- Avoiding Over-fertilization: Be cautious with chemical fertilizers; too much can harm the plant.
6. Pruning:
- Timing: Prune the plant regularly to promote bushy growth and to remove any dead or diseased branches.
- Technique: Cut back the branches to encourage new shoots, which are the edible parts of the plant.
7. Pest and Disease Management:
- Monitoring: Keep an eye out for common pests such as aphids and caterpillars. Use organic insecticides or neem oil if necessary.
- Diseases: Ensure good air circulation and avoid waterlogging to prevent root rot.
8. Harvesting:
- Timing: You can start harvesting young shoots when the plant is around 6-12 months old. Pick the tender tips for the best flavor.
- Method: Cut the young leaves and shoots carefully without damaging the main plant.
9. Climate Considerations:
- Acacia pennata prefers warm tropical to subtropical climates. It's less tolerant of frost, so if you live in a cooler region, consider growing it in pots that can be moved indoors during colder months.
By providing the right conditions and care, you can successfully grow Acacia pennata and enjoy its delicious young shoots in your meals!
To water the Acacia Pennata plant effectively, follow these guidelines:
- Soil Moisture: Check the moisture level of the soil regularly. This plant prefers well-drained soil that is kept moderately moist. Avoid letting the soil dry out completely but also be cautious of overwatering, as it can lead to root rot.
- Watering Frequency: Water the plant when the top inch of the soil feels dry to the touch. During the growing season (spring and summer), you may need to water more frequently, perhaps once or twice a week, depending on the environmental conditions such as temperature and humidity.
- Watering Method: When watering, use a gentle stream to avoid disturbing the soil and root system. Ensure that the water penetrates the soil evenly, providing adequate moisture to the root zone.
- Drainage: Ensure that the pot or planting area has adequate drainage to prevent standing water. If the plant is in a container, ensure that there are drainage holes at the bottom.
- Climate Consideration: In hotter climates, or during periods of high heat, you might need to increase the watering frequency. Conversely, in cooler months or during rainy periods, reduce the frequency to avoid overwatering.
- Signs of Under/Overwatering: Watch for signs indicating watering issues. Yellowing leaves can indicate overwatering, while wilting or browning leaf tips may suggest underwatering. Adjust your watering routine based on these observations.
- Time of Day: It is generally best to water in the morning or late afternoon. This allows for better absorption and reduces evaporation loss during the hotter parts of the day.
By following these guidelines, you can maintain healthy moisture levels for your Acacia Pennata plant, supporting its growth and vitality.
To effectively fertilize Acacia pennata, follow these instructions:
- Timing: Fertilize during the growing season, which typically spans from spring to early summer, as this is when the plant is most active.
- Fertilizer Type: Use a balanced, slow-release fertilizer with an N-P-K ratio of around 10-10-10 or similar. Organic options such as well-composted manure or a balanced organic fertilizer can also be beneficial.
- Application Rate: Refer to the manufacturer's instructions for the recommended amount based on the size of the plant. Generally, a handful (approximately 1/4 to 1/2 cup) for small to medium-sized plants works well.
- Method:
- Evenly distribute the fertilizer around the base of the plant, keeping it a few inches away from the stem to avoid root burn.
- Gently rake the soil surface to incorporate the fertilizer into the top layer of soil.
- Evenly distribute the fertilizer around the base of the plant, keeping it a few inches away from the stem to avoid root burn.
- Watering: After applying the fertilizer, water the plant thoroughly to help dissolve the nutrients and promote absorption.
- Frequency: Fertilize every 4 to 6 weeks during the growing season, but reduce or stop application in the fall and winter when the plant is dormant.
- Monitoring: Observe the plant for signs of nutrient deficiency, such as yellowing leaves or stunted growth, which may indicate a need for additional supplementation.
Always adjust your fertilizing strategy based on the plant's specific needs and the conditions in your growing environment.
Acacia pennata thrives best in well-draining soil that can retain some moisture without becoming waterlogged. The ideal soil type would be:
- Texture: A loamy or sandy loam soil is optimal, as it provides a balanced mix of sand, silt, and clay. This allows for good drainage while still retaining enough moisture and nutrients.
- pH Level: A slightly acidic to neutral pH range (approximately 6.0 to 7.0) is preferred. Regularly testing the soil pH can help ensure optimal growth conditions.
- Organic Matter: Incorporating organic matter, such as compost or well-rotted manure, can improve soil fertility, structure, and moisture retention. This will also promote a healthy microbial environment.
- Drainage: Good drainage is critical to prevent root rot. If the native soil is heavy clay or tends to retain water, consider amending it with sand or perlite to enhance drainage.
- Nutrients: While this plant can tolerate a range of soil fertility, adding a balanced fertilizer during the growing season can support healthy growth. Be cautious not to over-fertilize, as this can lead to excessive leaf growth at the expense of root development.
- Location: Ideally, the plant should be sited where soil is well-aerated and receives adequate sunlight, as this can influence the overall health and growth of the plant.
In summary, a well-draining, loamy or sandy loam soil with a slightly acidic to neutral pH, enriched with organic matter and nutrients, will provide a suitable growing environment for this plant.
Acacia pennata can be propagated through several methods, including seed propagation and vegetative propagation. Here are detailed instructions for each method:
Seed Propagation
- Seed Preparation:
- Collect mature seeds from the pods, ensuring they are fully developed.
- Soak the seeds in water for 24 hours to soften the seed coat. This helps improve germination rates.
- Collect mature seeds from the pods, ensuring they are fully developed.
- Scarification (Optional):
- To enhance germination, consider scarifying the seeds. This can be done by gently rubbing the seed surface with sandpaper or nicking the seed coat with a knife.
- To enhance germination, consider scarifying the seeds. This can be done by gently rubbing the seed surface with sandpaper or nicking the seed coat with a knife.
- Sowing:
- Fill seed trays or pots with a well-draining potting mix. A mix of soil, sand, and compost can work well.
- Plant the seeds about 1-2 cm deep in the soil.
- Water gently to settle the soil around the seeds.
- Fill seed trays or pots with a well-draining potting mix. A mix of soil, sand, and compost can work well.
- Conditioning:
- Place the trays or pots in a warm, sunny location. Consistent temperatures of 18-24°C (65-75°F) are ideal for germination.
- Keep the soil moist but not soggy. Use a spray bottle to mist the surface as necessary.
- Place the trays or pots in a warm, sunny location. Consistent temperatures of 18-24°C (65-75°F) are ideal for germination.
- Germination:
- Seeds typically germinate within 1 to 3 weeks. Once the seedlings have developed at least two sets of true leaves, they can be transplanted.
- Seeds typically germinate within 1 to 3 weeks. Once the seedlings have developed at least two sets of true leaves, they can be transplanted.
- Transplanting:
- Carefully transplant the seedlings into larger pots or directly into the garden when they are about 10-15 cm tall and the risk of frost has passed.
Vegetative Propagation
- Carefully transplant the seedlings into larger pots or directly into the garden when they are about 10-15 cm tall and the risk of frost has passed.
- Cutting Selection:
- Select healthy, semi-hardwood cuttings from a mature plant. Ideal cuttings are 10-15 cm long and have at least a few nodes.
- Select healthy, semi-hardwood cuttings from a mature plant. Ideal cuttings are 10-15 cm long and have at least a few nodes.
- Preparation:
- Remove the leaves from the lower half of the cutting, leaving a few leaves at the top for photosynthesis.
- Dip the cut end in rooting hormone to promote root development (optional but can enhance success).
- Remove the leaves from the lower half of the cutting, leaving a few leaves at the top for photosynthesis.
- Planting:
- Prepare a pot with a well-draining potting mix. You can use a mixture of peat moss and perlite or sand.
- Make a small hole in the soil with your finger or a stick and insert the cutting, ensuring at least one node is buried in the soil.
- Gently press the soil around the cutting to hold it in place.
- Prepare a pot with a well-draining potting mix. You can use a mixture of peat moss and perlite or sand.
- Conditions:
- Water the cutting well, allowing excess water to drain out.
- Cover the pot with a plastic bag or a humidity dome to maintain moisture. Ensure there is some ventilation to prevent mold growth.
- Water the cutting well, allowing excess water to drain out.
- Root Development:
- Place the pot in a warm area with indirect sunlight.
- Remove the cover periodically to check for moisture levels. Keep the soil consistently moist but not waterlogged.
- Roots should begin to develop within 4-8 weeks.
- Place the pot in a warm area with indirect sunlight.
- Transplanting:
- Once sufficient roots have formed, the new plant can be transplanted into a larger pot or into the garden.
Care After Propagation
Regardless of the method used, ensure that the newly propagated plants receive appropriate care:
- Once sufficient roots have formed, the new plant can be transplanted into a larger pot or into the garden.
- Water regularly, especially during dry periods.
- Fertilize with a balanced, slow-release fertilizer to encourage growth.
- Monitor for pests and diseases, taking action as necessary.
By using these methods, you can successfully propagate new plants from Acacia pennata.


