Plant Overview
Often referred to as Virginia Three-seeded Mercury or Virginia Copperleaf, this unassuming native of North America is a quiet resident of woodlands and garden edges. While it is frequently dismissed as a common weed, it belongs to the diverse Spurge family and plays a vital role in supporting local bird populations. Its name "Mercury" is a nod to its botanical resemblance to the European herb Mercurialis.
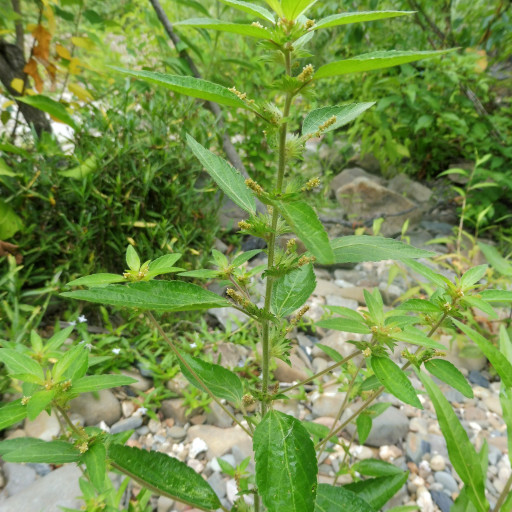
🔍 How to Identify
- 🍃 The Foliage: The leaves are lance-shaped or ovate with finely serrated (toothed) edges. They grow in an alternate pattern along a stem that can reach about 1 to 2 feet in height.
- 🌸 Leafy Bracts: The most distinctive feature is the "cup" or leafy bract (called an involucre) that surrounds the tiny, inconspicuous green flowers. These bracts usually have 5 to 9 deep lobes, looking like a fringed collar.
- 🍂 Color Shift: While green for most of the season, the stems and leaves often take on a beautiful coppery, bronze, or reddish-purple tint as the weather cools in late summer and autumn.
🏡 In Your Garden
- 🌱 Opportunistic Nature: This plant is an annual that thrives in disturbed soils. If you find it popping up in your flower beds, it is likely taking advantage of moist, fertile ground. It isn't aggressive like some invasive species, but it will self-seed readily if left alone.
- 🐦 Wildlife Value: Rather than pulling it out immediately, consider its ecological benefit. The seeds are a favorite snack for ground-feeding songbirds, such as mourning doves and various native sparrows, who rely on these high-energy "packets" during the fall.
⚠️ Safety & Toxicity
- 🐾 Mild Toxicity: Like many members of the Euphorbiaceae family, this plant contains a milky sap that can be mildly irritating.
- ✋ Skin & Ingestion: While not typically dangerous, the sap can cause contact dermatitis (redness or itching) in people with sensitive skin. It is best to wear gloves when weeding. It should not be ingested by pets or livestock, as it may cause digestive upset.
✨ Fun Fact
The "Three-seeded" part of its name is remarkably literal—if you peek inside the fringed, cup-like bracts, you will almost always find exactly three tiny seeds tucked away like hidden treasures!

Detailed Care Instructions
| Humidity | Normal |
| Lighting | Full Sun |
| Difficulty | Easy |
| Hibernation | Cold Period |
| Hardiness Zones | 5B - 8A |
To grow Acalypha Virginica, also known as Virginia copperleaf, follow these steps:
- Choose the right location: Virginia copperleaf thrives in full sun to partial shade. Ensure the spot receives at least six hours of sunlight a day.
- Prepare the soil: Copperleaf prefers well-drained soil that is rich in organic matter. Amend the soil with compost to improve its fertility and drainage.
- Planting: Dig a hole that is as deep as the root ball of the plant and twice as wide. Gently remove the plant from its container and place it in the hole. Backfill with soil, ensuring the top of the root ball is level with the ground.
- Watering: Water the plant thoroughly after planting to settle the soil. Then, water deeply once a week, providing about 1 inch (2.5 cm) of water. Adjust the frequency based on rainfall and temperature to maintain moist, but not waterlogged, soil.
- Mulching: Apply a layer of organic mulch around the plant, leaving a gap around the stem to prevent rot. Mulch helps retain soil moisture, suppresses weed growth, and regulates soil temperature.
- Fertilizing: Virginia copperleaf generally does not require much fertilization. However, you can apply a balanced, slow-release fertilizer in spring to encourage healthy growth.
- Pruning: Copperleaf can tolerate heavy pruning and responds well to it. Prune in early spring before new growth emerges to maintain a compact shape and encourage bushier growth.
- Propagation: Acalypha Virginica can be propagated by seeds or stem cuttings. Seeds should be sown in a prepared seedbed in early spring. Stem cuttings can be taken in late spring or early summer and root them in a well-draining potting mix.
- Pests and diseases: Copperleaf is generally resistant to pests and diseases. However, watch out for aphids or spider mites and treat them with insecticidal soap or neem oil if necessary.
By following these steps, you can successfully grow Acalypha Virginica and enjoy its beautiful foliage and unique flowers in your garden.

Place in a bright room that is sun drenched almost all day. Or directly in a south-facing window.

To provide proper hydration to the plant, fill a watering can with room temperature water and slowly pour it into the soil around the base of the plant. Avoid getting water on the leaves or stems as this can encourage disease. Water the plant once a week or as needed, being careful not to overwater as this can cause root rot. Check the soil moisture level by gently pressing your finger into the soil. If the top inch feels dry, it's time to water. Consider using a moisture meter for more accurate readings.
To fertilize this plant, use a balanced fertilizer with equal amounts of nitrogen, phosphorus, and potassium. Apply the fertilizer every two to three weeks during the growing season, typically from spring to fall. Be careful not to over-fertilize, as this can cause damage to the plant. Follow the instructions on the fertilizer packaging for the correct application rate. Additionally, make sure the soil is well-draining and has adequate moisture to allow for proper nutrient uptake.
The best soil for growing this particular plant is a well-drained soil that is rich in organic matter. The soil pH should be slightly acidic, between 5.5 and 6.5. It is important not to over-fertilize the plant, as it can lead to excessive growth and a decrease in overall plant health. A mix of peat moss, sand, and loam is recommended as a growing medium. This type of soil will help ensure that the plant receives the necessary nutrients and moisture while also preventing water from accumulating around the roots. Additionally, adding some compost or organic fertilizer to the soil before planting can help provide the plant with extra nutrients throughout the growing season.
To propagate this plant, first take a cutting from a healthy and mature stem that is at least four inches long. Ensure that the cutting has at least two to three leaf nodes. Remove the lower leaves and dip the cut end into rooting hormone powder.
Prepare a well-draining potting mix, and moisten it slightly. Create a hole in the potting mix with a pencil or stick and insert the cutting into it. Firm the soil around the cutting to eliminate any air pockets.
Place the pot in a warm and bright area, but away from direct sunlight. Keep the soil constantly moist by misting it regularly and covering the pot with a plastic bag to maintain humidity.
After 2-3 weeks, gently tug on the cutting, and if there is resistance, roots have likely formed. You can then remove the bag, and over time let the plant acclimate to normal humidity levels.
Once the roots are established, the plant can be transplanted to a larger pot or outside in a shaded location with rich soil.
Common pests of the virginia threeseed mercury include Mealybugs, spider mites. Make a habit of checking your virginia threeseed mercury frequently for pests so that any infestations can be caught and managed early.


