Plant Overview
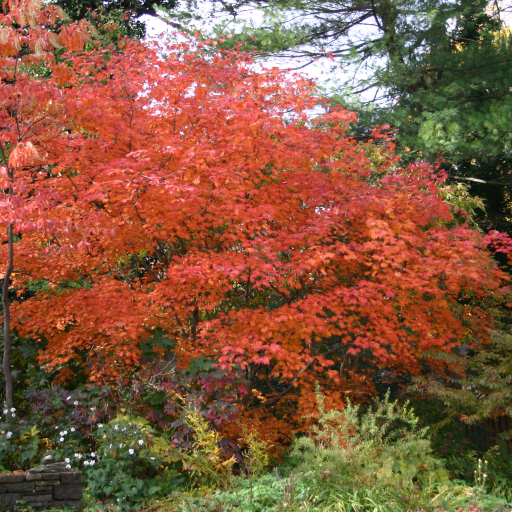
Often called the Fullmoon Maple, Acer japonicum is the sophisticated, slightly more robust cousin of the common Japanese Maple. While many maples are prized for their delicate, lace-like foliage, this species is celebrated for its large, fan-like leaves that resemble a series of rising moons. In its native Japan, it has been a staple of temple gardens for centuries, revered for its dramatic transition from soft spring greens to some of the most intense crimson and gold displays in the botanical world.
🔍 How to Identify
- 🌙 The Leaf Shape: Unlike the deeply "shredded" look of other maples, these leaves are rounded and broad, featuring 7 to 11 shallow, toothy lobes that create a perfect circular silhouette.
- 🌸 Spring Blooms: In early spring, before the leaves fully unfurl, the tree produces dainty, nodding clusters of purple-red flowers that are far more showy than those of most other maple species.
- 🌳 Growth Habit: It typically grows as a small, multi-stemmed tree or a large shrub, often reaching 15–20 feet with a spreading, architectural canopy that looks like a living sculpture.
🏡 In Your Garden
- 🌥️ Light & Shelter: This maple is a "goldilocks" plant; it dislikes the harsh afternoon sun which can scorch its soft leaves, but it needs enough light to fuel its brilliant autumn colors. A spot with morning sun and dappled afternoon shade is ideal.
- 💧 Thirsty Roots: Because it has a relatively shallow root system, it doesn't tolerate drought well. Mulching is essential to keep the root zone cool and moist, especially during mid-summer heatwaves.
- ✂️ Low Maintenance: It is a slow grower and rarely needs heavy pruning. In fact, it "bleeds" sap if pruned in late winter, so it is best to wait until the leaves are fully out in summer if you need to tidy it up.
⚠️ Safety & Toxicity
- ✅ Safe for Pets: Acer japonicum is generally considered non-toxic to dogs, cats, and humans. It is a very safe choice for family backyards.
- 🐴 Equine Note: While safe for household pets, some members of the Acer family (like Red Maples) can be toxic to horses if the leaves are wilted and ingested. It is best practice to keep all ornamental maples away from grazing livestock.
✨ Fun Fact
The most famous cultivar of this species is 'Aconitifolium,' which earned the nickname "Dancing Peacock Maple" because its deeply cut, feathery leaves look like the splayed tail feathers of a bird in mid-dance.

Detailed Care Instructions
| Humidity | Dry |
| Lighting | Full Sun |
| Toxicity | Poisonous |
| Difficulty | Hard |
| Hardiness Zones | 5 - 7 |
To grow Acer japonicum, also known as Japanese Maple, you can follow these steps:
- Choose a suitable location: Japanese maples prefer partial shade or filtered sunlight. Select a spot in your garden that receives dappled sun or some shade during the day. Avoid planting in areas with full sun or excessive wind exposure.
- Prepare the soil: Japanese maples thrive in well-drained, acidic soil. Amend the soil with organic matter, such as compost or peat moss, to improve drainage and nutrient content. Test the soil pH to ensure it is between 5.5 and 6.5, which is ideal for these plants.
- Planting: Dig a hole that is slightly wider and just as deep as the root ball. Gently remove the plant from its container, ensuring the roots are intact. Place the tree in the hole and backfill with soil, firming lightly around the base. Do not bury the trunk too deeply; the root flare should always be visible above the soil line.
- Watering: Water the newly planted Japanese maple thoroughly and frequently during the first few weeks to help establish its roots. Keep the soil consistently moist, but not overly saturated. After the tree is established, water deeply but infrequently, allowing the soil to dry slightly between waterings.
- Mulching: Apply a layer of organic mulch around the base of the tree, ensuring the mulch does not touch the trunk. This will help retain moisture, suppress weeds, and maintain a cool root environment for the tree.
- Pruning: Prune the Japanese maple during dormant periods to shape the tree and remove any dead or crossing branches. Avoid pruning heavily during the growing season, as this can stress the tree.
- Fertilizing: Japanese maples benefit from a slow-release, balanced fertilizer in early spring. Follow the manufacturer's instructions for application rates. Avoid over-fertilizing, as excessive nitrogen can lead to rapid growth, reducing the color intensity of the leaves.
- Protection from frost: If you live in an area with harsh winters, protect your Acer japonicum from frost damage by applying a layer of mulch and wrapping the trunk with burlap or tree wraps.
- Pest and disease control: Monitor the tree regularly for pests like aphids or scale insects. Treat any infestations promptly using appropriate insecticides. Japanese maples are generally disease-resistant but may occasionally encounter issues like leaf spot or powdery mildew. Adequate air circulation and avoiding overhead watering can help prevent these issues.
By following these steps and providing care specific to the needs of Acer japonicum, you can successfully grow and enjoy this beautiful plant in your garden.

Place in a window with dappled sun or a spot in the middle of a room. Or directly in a window facing west or east.

To properly water this plant, you should first check the soil's moisture level. If the soil is dry, it is time to water. When watering, aim to thoroughly saturate the soil, being careful not to leave any standing water on top. After watering, allow the soil to drain before returning the plant to its normal location. It is important not to over-water this plant as it is susceptible to root rot. Additionally, this plant prefers moist but well-draining soil, so it may be helpful to add organic matter to the soil to improve moisture retention.
To fertilize this plant, apply a balanced fertilizer in early spring before new growth starts. Use a slow-release granular fertilizer and apply it evenly around the base of the plant. Water the plant thoroughly after fertilizing. Repeat the application every 4-6 weeks during the growing season. Be careful not to over-fertilize as this can burn the plant's roots and cause damage.
When planting Acer Japonicum, it is recommended to use a well-draining soil that is rich in organic matter. The soil should be slightly acidic and have a pH between 5.5 and 6.5. Avoid using heavy clay soils as they may retain too much moisture and cause root rot. The ideal soil texture should be loamy with a good mix of sand and clay. It is also important to ensure that the soil is not compacted and has good aeration. Adding compost or organic fertilizers during planting can help provide essential nutrients for healthy growth.
To propagate this plant, you will need to take cuttings from a healthy parent plant. The cuttings should be approximately 4-6 inches long and taken from a branch that is not flowering. Make sure to use a clean, sharp tool to prevent damaging the plant tissue.
Remove the leaves from the bottom of the cutting to expose a few inches of bare stem. Dip the cut end of the cutting into rooting hormone powder, then gently tap off any excess.
Prepare a container filled with potting soil and create a hole in the soil using a pencil or similar tool. Insert the cutting into the hole and gently press the soil around the stem to secure it in place.
Water the cutting thoroughly and then place it in a warm, bright location with indirect sunlight. Cover the cutting with a clear plastic bag or dome to create a humid environment.
Check the cutting regularly and water as needed to maintain moist soil. After several weeks, the cutting should begin to form roots. Once the plant has developed a healthy root system, it can be transplanted into a larger container or planted in the ground.
Common pests of the japanese maple include Spider mites, thrips, larvae. Make a habit of checking your japanese maple frequently for pests so that any infestations can be caught and managed early.


