Plant Overview
The Italian Maple, or Acer opalus, is the Mediterranean’s sun-loving answer to the traditional maple tree. Unlike its cousins that prefer damp, cool forests, this resilient beauty thrives on limestone slopes and rocky hillsides across Southern Europe. Often called the "Opal Maple," it is celebrated for its early-season flowers that light up the landscape before most other trees have even woken up from winter.
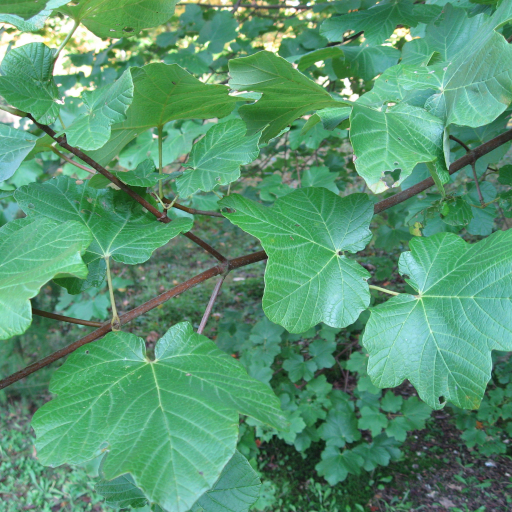
🔍 How to Identify
- 🍃 The Leaves: Look for broad, leathery leaves with five shallow, rounded lobes. They are a deep, matte green on top and slightly paler underneath, turning a warm, butter-yellow or soft orange in the autumn.
- 🌸 The Flowers: One of its most distinct features is the pendulous clusters of yellow-green flowers. They appear in early spring, hanging like delicate tassels from the bare branches before the leaves emerge.
- 🪵 The Bark: On younger trees, the bark is smooth and grey, but as the tree matures, it develops a beautiful pinkish-brown or orange tint and begins to peel away in large, square plates.
🏡 In Your Garden
- 🌱 Soil Preference: Unlike many Japanese maples that demand acidic soil, the Italian Maple is a "calcicole," meaning it absolutely loves lime-rich, alkaline soils. It is the perfect choice for gardeners who struggle with chalky ground.
- ☀️ Drought Resilience: Once its root system is established, it is remarkably drought-tolerant. It prefers a spot in full sun to partial shade and doesn't mind the summer heat that would cause other maples to scorch.
- 🌳 Growth Habit: It grows at a moderate pace into a rounded, dome-shaped canopy. Because it doesn't reach the massive heights of a Sycamore, it is a manageable and elegant choice for medium-sized suburban landscapes.
⚠️ Safety & Toxicity
- 🟢 General Safety: The Italian Maple is considered non-toxic to humans, dogs, and cats. It is a safe, family-friendly addition to any backyard.
- 🐴 Equine Warning: As with many members of the Acer family, owners of horses should be cautious. While Acer opalus isn't the primary culprit of "Atypical Myopathy," it is generally best practice to keep horses away from maple seeds and wilted leaves to prevent any potential digestive or neurological issues.
✨ Fun Fact
The wood of the Italian Maple is exceptionally dense and fine-grained. Historically, it was highly prized by cabinetmakers and even used in the Mediterranean to craft high-quality violins and lutes!

Detailed Care Instructions
To grow Acer Opalus plants, also known as Italian Maple, follow these steps:
- Choose a location: Acer Opalus plants grow best in full sun to partial shade. Ensure the area has well-draining soil.
- Planting time: Plant Acer Opalus in either spring or fall when the soil is not frozen or excessively dry.
- Soil preparation: Prepare the planting spot by loosening the soil and removing any weeds or rocks. If the soil is poor, consider adding organic matter such as compost or aged manure to improve its fertility.
- Digging the hole: Dig a hole slightly wider and deeper than the plant's root ball.
- Planting the Acer Opalus: Gently place the plant in the center of the hole, making sure the top of the root ball is level with or slightly above the ground. Backfill the hole with the soil, firming it gently around the plant.
- Watering: After planting, water the Acer Opalus thoroughly to settle the soil and provide hydration to the roots. Water deeply but avoid overwatering, as the plant prefers well-draining soil.
- Mulching: Apply a layer of organic mulch, such as wood chips or shredded bark, around the base of the plant. This helps retain moisture, control weeds, and regulate soil temperature.
- Pruning and care: Acer Opalus generally requires minimal pruning. However, you can remove any dead, damaged, or crossed branches. If needed, shape and thin out the canopy in late winter or early spring.
- Watering and fertilizing: Water the Acer Opalus regularly, especially during dry periods, but avoid waterlogging. Apply a balanced slow-release fertilizer in early spring to promote healthy growth.
- Pest and disease control: Monitor the plant for common pests like aphids, spider mites, and scale insects. If necessary, treat them with insecticidal soap or horticultural oil. Additionally, ensure good air circulation to prevent diseases like leaf spot or powdery mildew.
- Winter protection: Protect young Acer Opalus plants from harsh winter conditions by applying a layer of mulch around the base and wrapping the trunk with burlap to prevent frost damage.
Following these steps should help you successfully grow Acer Opalus plants in your garden or landscape.

Place in a bright room that is sun drenched almost all day. Or directly in a south-facing window.

To water this particular plant, it is important to ensure that the soil is not allowed to completely dry out as it prefers a consistently moist environment. The best way to achieve this is by lightly watering the plant once or twice a week, depending on the weather conditions and the humidity levels in the air. Avoid overwatering as this can lead to root rot. The plant also benefits from being misted occasionally as it can help to provide additional humidity. When watering, it is best to do so directly at the base of the plant rather than on the foliage to prevent any potential damage to the leaves.
To fertilize this plant, apply a balanced slow-release granular fertilizer in early spring before new growth emerges. Use a fertilizer with an NPK ratio of 10-10-10 or 14-14-14. Sprinkle the granules evenly around the base of the plant, being careful not to get any on the leaves or stems. Water thoroughly after application to help the fertilizer soak into the soil. Repeat the fertilization process every 4-6 weeks during the growing season, until late summer. Avoid fertilizing during the dormant season.
The ideal soil to use for Acer Opalus plant is one that is well-draining and moderately fertile. It should have a pH that ranges between slightly acidic to neutral. The soil should also be able to retain moisture without becoming waterlogged. A mixture of loamy soil, sand, and compost is often recommended for this plant. Additionally, using a layer of organic mulch around the base of the plant can help retain moisture in the soil and provide nutrients for the roots. Avoid using heavy clay soils or those that are too alkaline, as this can affect the health and growth of the plant.
To propagate this plant, you will need to take semi-ripe cuttings from the current year's growth in mid-summer to early autumn. Select a healthy stem that is about 10-15 cm (4-6 inches) long. Cut just below a node (where leaves are attached to the stem) and remove the lower leaves from the cutting.
Dip the end of the cutting in rooting hormone powder or gel, and plant it in a container filled with a mixture of peat-free potting compost and perlite. Water well and cover with a clear plastic bag to create a humid environment. Place the container in bright, indirect light, but avoid direct sunlight.
Check regularly to ensure the soil remains moist and mist the cutting as needed to keep the humidity high. After a few weeks, gently tug on the cutting to check for roots. Once roots have formed, transplant the cutting into a larger pot or to a permanent outdoor location in well-draining soil.
Note: It is important to handle the cuttings with care as this plant has delicate branches that can be easily damaged.


