Plant Overview
While most bulbs are tucked away for their winter nap, the Autumn Snowflake is just waking up. Often called the "Pink-tinged Bell," this Mediterranean native brings a touch of spring’s elegance to the cooling days of September. It is a resilient little gem that looks as though it stepped straight out of a Victorian fairy painting, offering a delicate contrast to the heavy oranges and yellows of the autumn season.
🔍 How to Identify
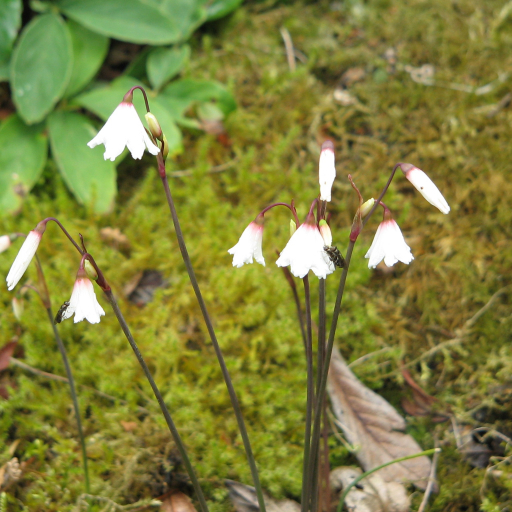
- 🔔 The Bloom: Small, nodding, bell-shaped flowers that are pure white, typically featuring a distinct pink or reddish blush at the base of the petals where they meet the stem.
- 🧵 The Stems: Remarkably thin, wiry, dark-colored stems that can reach about 6 inches tall, often appearing to emerge directly from the bare earth.
- 🌿 The Foliage: Very narrow, dark green, grass-like leaves. Interestingly, these leaves often wait to emerge until the flowers have already begun to fade.
🏡 In Your Garden
- ☀️ The Summer Bake: Unlike many woodland bulbs, Acis autumnalis loves a "summer bake." It needs a spot that stays relatively dry and warm during its dormant summer months to trigger a spectacular flower show in the fall.
- 🪨 Rockery Royalty: Because of its petite size and need for excellent drainage, it is a perfect candidate for rock gardens or the edges of gravel paths where it won't be smothered by larger, more aggressive perennials.
⚠️ Safety & Toxicity
- 🚫 Toxic if Ingested: Like many members of the Amaryllis family, this plant contains lycorine and other alkaloids. It should never be consumed by humans or livestock.
- 🐾 Pet Safety: The bulbs and foliage are toxic to cats and dogs. Ingestion can lead to vomiting, diarrhea, or heart rhythm issues, so it is best planted in areas where pets don't typically dig.
✨ Fun Fact
For over a century, this plant was known as Leucojum autumnale. However, botanists eventually moved it to the genus Acis because it has a solid stem, whereas true Leucojum (Snowflakes) have hollow stems. It’s a tiny architectural difference that changed its entire scientific identity!

Detailed Care Instructions
To grow Acis Autumnalis plants, also known as autumn snowflake or winter snowflake, follow these steps:
- Planting: Choose a location that receives partial shade to full sun, with well-draining soil. Autumn snowflake bulbs should be planted in early autumn, ideally in September or October. Dig a hole 2-3 times the height of the bulb and place the bulb in the hole, pointed end up. Space bulbs about 3-4 inches apart.
- Soil Preparation: Ensure the soil is well-draining by adding organic matter such as compost, peat moss, or well-rotted manure to improve fertility and drainage. It's best to work the soil and incorporate the organic matter before planting.
- Watering: Water the newly planted bulbs immediately, ensuring the soil is moist but not waterlogged. During the growing season, keep the soil slightly moist but avoid overwatering, as excessive moisture can cause bulbs to rot.
- Fertilizing: Apply a balanced, slow-release fertilizer or a bulb-specific fertilizer in early spring when new growth emerges. Follow the package instructions for proper dosage.
- Mulching: Applying a layer of organic mulch, such as wood chips or straw, around the base of the plants can help retain moisture and suppress weed growth. Mulch should be applied after the ground freezes in late autumn.
- Pruning: Do not cut back the foliage after the plants finish blooming. The leaves will continue to photosynthesize and provide energy to the bulb for next year's growth. Allow the leaves to wither and turn yellow naturally before removing them.
- Winter Protection: Acis Autumnalis is hardy to USDA zones 4-8. If you live in a colder climate, providing a layer of mulch or covering the planting area with a thick layer of leaves in late autumn can insulate the bulbs and protect them from freezing temperatures.
- Propagation: Autumn snowflake plants can be propagated by dividing the bulbs in early autumn, after the foliage has died back. Dig up the clump and carefully separate the small offset bulbs from the main bulb. Replant the offsets in a new location or share them with other gardeners.
By following these steps, you should be able to successfully grow Acis Autumnalis plants and enjoy their delicate flowers in the late winter or early spring.

Place in a bright room that is sun drenched almost all day. Or directly in a south-facing window.

To water this plant, first check the soil moisture level by inserting your finger into the soil up to the second knuckle. If the soil is dry, water the plant thoroughly, making sure the water reaches the roots. Water slowly and evenly, using a watering can or hose attachment with a gentle stream. Avoid getting water on the foliage or flowers as this can cause fungal diseases. Allow the soil to dry out slightly between watering, as overwatering can cause root rot. Ensure proper drainage to prevent water from accumulating in the bottom of the pot or bed. In case of prolonged dry periods, increase the frequency of watering while ensuring drainage still works.
To fertilize Acis Autumnalis, follow these instructions:
- Select a balanced fertilizer with an N-P-K (nitrogen, phosphorus, and potassium) ratio of 10-10-10 or 20-20-20.
- Dilute the fertilizer according to the package instructions, usually at a rate of 1 tablespoon per gallon of water.
- Apply the fertilizer solution around the base of the plant, avoiding direct contact with the leaves or stems.
- Water the plant thoroughly after fertilizing to help distribute the nutrients to the root system.
- Repeat the fertilization process every 4-6 weeks during the growing season, typically from spring to fall.
- Adjust the fertilization frequency or strength based on the specific needs and growth rate of the plant.
- Regularly monitor the plant's response to the fertilizer, observing for signs of over or under-fertilization, and make adjustments accordingly.
- It's important to note that excessive fertilization can damage the plant and may lead to nutrient imbalances, so it's best to follow the package instructions and not exceed the recommended dosage.
It is important to use well-draining soil when planting this species of plant. The soil should be fertile and have good moisture retention properties, but should not be overly waterlogged. A pH level of 6-7 is ideal for optimal growth. It is recommended to add organic matter to the soil, such as compost or aged manure, to improve soil structure and fertility. The plant also requires adequate sunlight to thrive, and supplemental watering may be necessary during periods of drought.
Propagation of Acis Autumnalis can be done through various methods, including seed sowing and bulb division.
- Seed Sowing:
- Collect ripe seeds from the plant. These seeds will appear as small capsules or pods.
- Prepare a well-draining potting mix, such as a combination of peat moss and perlite.
- Fill a small seed tray or pots with the potting mix, leaving some space at the top.
- Moisten the potting mix with water and allow it to drain properly.
- Sow the seeds evenly on top of the potting mix. Do not cover them entirely, as they require light to germinate.
- Place the tray or pots in a warm location with indirect sunlight.
- Regularly water the seeds to keep the potting mix moist but not overly saturated.
- Germination usually takes around 2-3 weeks. Once the seedlings develop a couple of true leaves, they can be transplanted into individual pots.
- Collect ripe seeds from the plant. These seeds will appear as small capsules or pods.
- Bulb Division:
- Wait until the plant enters its dormant stage, preferably in late summer or early autumn.
- Dig up the bulbs from the ground. Be careful not to damage them or their roots.
- Gently separate the small bulbs or bulb offsets from the main cluster. Ensuring that each section has its own set of roots.
- Dust the separated bulbs with a fungicide and let them dry for a few hours.
- Prepare a well-draining potting mix, such as a combination of peat moss and sand.
- Plant the bulbs in individual pots or directly in the ground, ensuring that they are covered with a layer of soil and their tips are slightly above the surface.
- Water the newly planted bulbs thoroughly and keep the soil consistently moist until they establish themselves.
Regardless of the propagation method chosen, it is essential to provide the newly propagated plants with adequate sunlight, a well-draining soil mix, and regular watering to ensure healthy growth.
- Wait until the plant enters its dormant stage, preferably in late summer or early autumn.


