Plant Overview
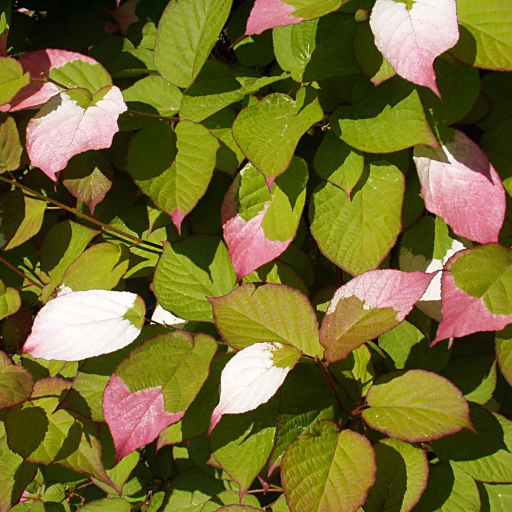
Known as the Arctic Kiwi or the Variegated Kiwi, Actinidia kolomikta is nature’s way of showing off its paintbrush. This hardy climber is famous for its "tri-color" foliage that looks as though the leaf tips were accidentally dipped in buckets of white and raspberry-pink paint. Native to the chilly forests of Eastern Asia, it brings a splash of tropical-looking drama to northern gardens where most exotic plants wouldn't survive a single frost.
🔍 How to Identify
- 🍃 The "Painted" Leaves: Large, heart-shaped leaves that start solid green but develop dramatic splashes of snowy white and rosy pink as the plant matures.
- 🧗 Twining Stems: A vigorous, woody deciduous vine that climbs by wrapping its stems tightly around trellises, fences, or nearby trees.
- 🌼 Hidden Blooms: Small, drooping white flowers that appear in late spring; they are often tucked under the foliage but give off a soft, lily-like fragrance.
🏡 In Your Garden
- 🎨 The Variegation Secret: To get the best leaf colors, the plant needs a "Goldilocks" spot—too much shade results in boring green leaves, but too much harsh afternoon sun can burn the delicate pink tips.
- 🐈 The Feline Magnet: Curiously, the wood and roots of this plant contain a compound similar to catnip. You may find local cats rubbing against the base of the vine or even trying to dig it up, so young plants often need a wire cage for protection.
⚠️ Safety & Toxicity
- 🟢 Safe for Humans: This plant is non-toxic and is primarily grown for its stunning ornamental value.
- 🥝 Edible Rewards: If you have both male and female plants, the female will produce tiny, smooth-skinned "kiwiberries" that are sweet, edible, and packed with vitamins.
- 🐾 Pet Note: While safe, the "catnip effect" can lead to over-excited behavior in cats, but it is not considered poisonous to them.
✨ Fun Fact
The Arctic Kiwi is one of the hardiest of all kiwi species, capable of surviving temperatures as low as -40°F (-40°C), making it a favorite for gardeners in Siberia and Northern Canada!

Detailed Care Instructions
To grow Actinidia kolomikta, also known as the variegated kiwi or Arctic beauty kiwi, you can follow these steps:
- Choose a suitable planting location: Actinidia kolomikta prefers full sun or partial shade, with well-draining soil. It can be grown in containers or in the ground if the climate is suitable.
- Prepare the soil: Ensure the soil is fertile, loamy, and well-draining. Add organic matter such as compost to improve soil fertility and drainage.
- Purchase plants or propagate: You can purchase Actinidia kolomikta plants from nurseries or online sources. Alternatively, you can propagate the plant by taking stem cuttings or layering.
- Planting: Dig a hole that is slightly wider and deeper than the root ball of the plant. Place the plant in the hole and backfill with soil, ensuring that the top of the root ball is level with the soil surface. Gently firm the soil around the plant.
- Watering: Water the plant thoroughly immediately after planting and continue to water regularly, especially during dry spells. Actinidia kolomikta prefers evenly moist soil.
- Mulching: Apply a layer of organic mulch around the base of the plant to help conserve moisture, suppress weeds, and protect the roots during extreme temperatures.
- Training and support: Actinidia kolomikta is a climbing vine and will require some form of support, such as a trellis or wire structure, to grow vertically. Train the vines onto the support system as they grow.
- Pruning: Prune Actinidia kolomikta during the dormant season to control its growth, remove dead or damaged branches, and promote better air circulation. Regular pruning will also help to maintain the plant's shape and appearance.
- Fertilization: Apply a balanced fertilizer in early spring and again in late spring or early summer to provide essential nutrients for healthy growth. Follow the manufacturer's instructions for dosage and application.
- Pests and diseases: Actinidia kolomikta can be susceptible to pests such as aphids and spider mites. Regularly inspect the plant for any signs of infestation and treat accordingly using organic or chemical methods. Watch out for common diseases like leaf spot and powdery mildew, and take appropriate measures to prevent or control them.
By following these steps and providing proper care, you can successfully grow Actinidia kolomikta and enjoy its beautiful variegated foliage and tasty fruits.

Place in a window with dappled sun or a spot in the middle of a room. Or directly in a window facing west or east.

Actinidia Kolomikta is a plant that requires regular watering to maintain its health and growth. One effective method to water this plant is through a drip irrigation system, which ensures that water is delivered directly to the roots without wastage. It is also important to ensure that the soil around the plant is consistently moist but not too wet or waterlogged. This can be achieved by watering the plant deeply once or twice a week, depending on the weather conditions and soil type. Avoid getting water on the leaves as this can promote the growth of fungal diseases. It is advisable to water the plant early in the morning or late in the evening when the temperatures are cooler and the plant is less likely to lose moisture due to evaporation. In addition, it is important to monitor the plant regularly for signs of over or under-watering, such as yellowing leaves, wilting, or root rot, and adjust the watering frequency accordingly.
To fertilize this plant, it is recommended to use a balanced fertilizer with equal parts nitrogen, phosphorus, and potassium. Fertilizer should be applied in the spring or early summer at a rate of one pound per 100 square feet of soil. Spread the fertilizer evenly around the plant, avoiding direct contact with the foliage. Water the plant thoroughly after fertilizing to help distribute the nutrients throughout the soil. Avoid over-fertilizing as this can lead to excess growth and reduce fruit production.
The Actinidia Kolomikta plant requires well-drained soil that is rich in organic matter. The ideal soil pH for this plant ranges from slightly acidic to neutral (pH 6.0 to 7.0). A loamy soil mixture that contains a good balance of sand, silt, and clay is preferred for this plant. It is important to avoid using heavy clay soils or soils that tend to hold moisture, as this can lead to root rot and other fungal diseases. The soil should be supplemented with compost, aged manure, or other organic fertilizers to improve fertility and nutrient availability. The Actinidia Kolomikta plant is also sensitive to chemical fertilizers and pesticides, so it is recommended to use organic methods for soil and plant care.
To propagate this plant, first select a healthy parent plant and take cuttings from it in late spring or early summer. Take cuttings that are approximately 4-6 inches long and have at least 2-3 pairs of leaves. Make sure to use a sharp, clean pair of scissors or pruning shears to make a clean cut. Remove any leaves from the bottom half of the cutting, leaving only the top leaves intact.
Dip the cut end of the cutting into rooting hormone powder to help stimulate root growth. Then, insert the cutting into a container filled with moistened soilless potting mix. Make sure the potting mix is well-draining and has good aeration.
Cover the container with a plastic bag or plastic wrap to create a humid environment for the cutting. Place the container in a bright, indirect light location. Keep the soil damp, but not overly wet.
After a few weeks, check the cutting for root development by gently tugging on it. If it resists, roots have formed and the cutting can be transplanted into a larger container or into the ground.
It is important to note that this plant is dioecious, meaning there are separate male and female plants. Therefore, if you want to propagate a female plant, make sure to select a cutting from a known female plant. Similarly, if you want fruit production, you will need both male and female plants.
Common pests of the arctic beauty kiwi include Spider mites, aphids, thrips, larvae. Make a habit of checking your arctic beauty kiwi frequently for pests so that any infestations can be caught and managed early.


