Plant Overview
Known as the "Dinner Plate Aeonium," this succulent is one of nature’s most striking geometric wonders. Native to the volcanic cliffs of Tenerife in the Canary Islands, it grows in a perfectly flat, pancake-like rosette that looks almost man-made. In its natural habitat, it clings to vertical rock faces to ensure water never pools in its center, making it a masterpiece of evolutionary engineering.
🔍 How to Identify
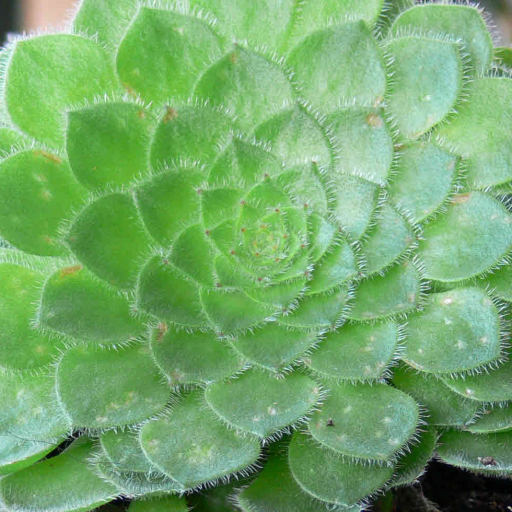
- 🍽️ Flat Rosette: The most defining feature is its extremely flat, circular shape, often reaching up to 18 inches in diameter while remaining only a few inches thick.
- 🌿 Overlapping Leaves: The bright green, fleshy leaves are packed tightly together, overlapping like shingles on a roof or scales on a fish.
- 🪶 Fringed Edges: If you look closely at the leaf margins, you’ll see tiny, soft white hairs (cilia) that give the plate a delicate, frosted outline.
🏡 In Your Garden
- 📐 The Tilt Strategy: Because it is so flat, water trapped in the center of the rosette can cause rapid rot. Hobbyists often plant them at a 45-degree angle or in "crevice gardens" to mimic their cliffside origins and let gravity handle drainage.
- 🌼 A Grand Finale: This is a monocarpic plant, meaning it blooms once and then dies. After several years, the center will rise into a massive pyramid of yellow flowers; while beautiful, it signals the end of the plant's life cycle, though it often leaves seeds behind.
⚠️ Safety & Toxicity
- ✅ Non-Toxic: Good news for pet owners—the Dinner Plate Aeonium is generally considered non-toxic to cats, dogs, and humans.
- 🚫 Physical Fragility: While not poisonous, the leaves are brittle and can snap or bruise easily. It’s best kept in a spot where curious paws or passing sleeves won't knock into its perfectly symmetrical edges.
✨ Fun Fact
The species name tabuliforme literally translates from Latin as "table-shaped." It is so committed to this flat lifestyle that in the wild, it can be found growing completely upside down under rocky overhangs to stay dry!

Detailed Care Instructions
| Lighting | Full Sun |
To grow Aeonium tabuliforme, also known as the dinner plate Aeonium, follow these steps:
- Choose a suitable location: Select a spot that receives full or partial sun. Aeonium tabuliforme prefers bright, indirect light but can tolerate some direct sunlight.
- Prepare the soil: Use well-draining soil that is slightly acidic. A mix of regular potting soil, sand, and perlite or pumice can create a suitable growing medium.
- Planting: Start by selecting a pot with drainage holes or a well-draining garden bed. Place the plant in the center of the pot or bed, ensuring its roots are covered and slightly firmed into the soil.
- Watering: Aeonium tabuliforme is a succulent plant that doesn't require frequent watering. Allow the soil to dry out between watering sessions. Overwatering can lead to root rot, so it's better to underwater than overwater.
- Temperature and humidity: The plant prefers mild temperatures between 60-75°F (15-24°C). It can tolerate slight temperature extremes but may suffer damage in freezing conditions. It can adapt to normal household humidity levels.
- Fertilization: During the growing season (spring and summer), you can apply a diluted balanced liquid fertilizer once a month. Be cautious not to over-fertilize, as too much can cause leggy growth.
- Pruning: To maintain a compact shape, trim off any leggy or damaged stems with clean, sharp scissors or pruning shears. You can also propagate these cuttings to grow new plants.
- Propagation: Aeonium tabuliforme can be propagated by stem or leaf cuttings. Allow the cuttings to dry for a few days and then plant them in well-draining, sandy soil. They should root within a few weeks.
- Pests and diseases: Watch out for common succulent pests like mealybugs and aphids. If an infestation occurs, treat it with a natural insecticide or use rubbing alcohol on a cotton swab to remove the pests. Proper air circulation and avoidance of overwatering can help prevent fungal diseases.
Remember that Aeonium tabuliforme is a slow-growing plant, so be patient and allow it time to establish and thrive.

Place in a bright room that is sun drenched almost all day. Or directly in a south-facing window.

Aeonium Tabuliforme should be watered regularly, but make sure the soil has fully dried out between waterings. When watering, add enough water to fully saturate the soil, but avoid overwatering as this can lead to root rot. If the plant is kept in a container, make sure it has proper drainage to prevent water from pooling in the bottom. When watering, aim to water at the base of the plant and avoid getting water on the leaves, as this can lead to rot and damage. In general, this plant prefers slightly drier conditions compared to other succulents, so it's important to monitor the soil moisture level carefully.
To fertilize this plant, use a balanced fertilizer with equal amounts of nitrogen, phosphorus, and potassium. Apply the fertilizer once a month during the growing season, which usually occurs in spring and summer. Avoid over-fertilizing as it can cause damage to the plant. Water the plant thoroughly before and after fertilizing.
Based on the characteristics and needs of the Aeonium Tabuliforme, it is suggested to use a well-draining soil mix. The soil should be porous, rich in organic matter, and have a balanced pH level (around 6.0-7.0). A mix of coconut coir, perlite, vermiculite, sand, and peat moss can be used to create a suitable mixture. It is essential to avoid heavy and compacted soil as it can retain moisture and cause root rot. Additionally, adding some fertilizer during the growing season can enhance the plant's growth and development.
Propagation of this plant can be achieved quite easily through cutting the stem. Cuttings should be taken from healthy plants with no visible signs of disease or damage. To propagate, take a sharp, sterile knife or pair of scissors and cut a piece of stem about 3-4 inches in length. It's essential to make a clean cut as jagged cuts could damage the plant and prevent it from rooting. The lower leaves should then be removed, leaving only the topmost set. Next, let the cutting dry for a few hours to develop a callus. This step helps prevent rotting and encourages rooting.
After the cutting is callused over, it is time to plant. The cut end of the stem should be dipped into rooting hormone powder. This powder helps stimulate root growth. Then place the cutting into a container filled with a well-draining soil mix. Water it lightly and then cover it with a plastic bag to create a mini-greenhouse environment. This will help the cutting to maintain humidity levels needed to encourage rooting. The container should be placed in a warm, bright location but out of direct sunlight.
It is essential to keep the soil lightly moist when propagating. Overwatering can cause root rot, which is a serious issue that can be difficult to recover from. Similarly, shading from direct sunlight is necessary to prevent heat stress, which can drastically affect rooting success.
After a couple of weeks, check to see if the new plant has started to root. A gentle tug will indicate whether the plant has started to develop roots. If there is resistance, it means that rooting has begun, and it's time to remove the plastic bag and let the plant grow as usual. If not, re-cover the plant and check again in another few days or a week.
Overall, propagating this plant via stem cuttings is an easy and quick method to increase their collection. With the right care and attention, these cuttings will take root in no time and eventually grow into new, healthy plants.
Common pests of the saucer plant include Scale insect, mealybugs, spider mites, aphids, thrips. Make a habit of checking your saucer plant frequently for pests so that any infestations can be caught and managed early.


