Plant Overview
Often called the "Purple Allamanda" or "Cherry Allamanda," this Brazilian beauty brings a royal touch to tropical landscapes. Unlike its famous yellow cousin, this species flaunts dramatic violet-to-wine-colored blooms that look like they were crafted from velvet. It’s a favorite for those wanting a lush, cascading vine that feels both exotic and sophisticated.
🔍 How to Identify
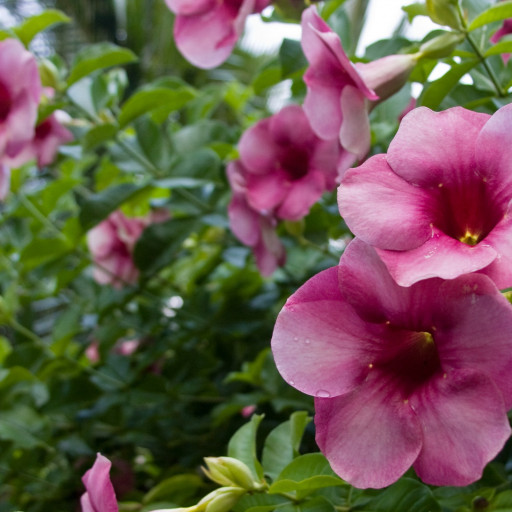
- 🌸 The Blooms: Large, funnel-shaped flowers that range from deep reddish-purple to a dusty violet, often with a darker throat.
- 🍃 The Foliage: Rich, dark green leaves that are slightly rough to the touch and usually grow in "whorls" (groups of three or four) around the stem.
- 🌿 The Form: A sprawling, evergreen shrub that can behave like a vine if given a trellis, reaching several feet in height with its woody stems.
🏡 In Your Garden
- ☀️ Sun Seeker: This plant is a dedicated sun-worshiper. To get those iconic purple trumpets to appear in abundance, it needs at least 6 hours of direct light; otherwise, it will focus all its energy on leaves.
- 🪴 Soil Nuance: While it loves humidity, it "hates wet feet." It requires a very well-draining organic mix. If the soil stays soggy, the plant is prone to sudden root decline.
- ✂️ Pruning Strategy: Because it produces flowers on new growth, a light pruning in late winter or early spring encourages a burst of fresh, flowery branches rather than a single, leggy vine.
⚠️ Safety & Toxicity
- 🚫 Toxic Status: All parts of the Allamanda are considered toxic. It contains iridoid lactones which can cause distress if eaten.
- 🧪 Irritating Sap: The plant contains a thick, milky white latex sap. This can cause significant skin irritation or "contact dermatitis" for gardeners with sensitive skin.
- 🐾 Pets & Kids: Keep this plant out of reach of curious pets and children. Ingestion can lead to nausea, vomiting, and lethargy. Always wear gloves when pruning.
✨ Fun Fact
The Purple Allamanda is named after two people: the Swiss botanist Frédéric-Louis Allamand and the French plant collector Jacques Blanchet, who discovered it in the wild landscapes of Bahia, Brazil, in the mid-1800s.

Detailed Care Instructions
| Humidity | High |
| Lighting | Part Sun |
| Difficulty | Medium |
| Temperature | 18°C - 25°C |
| Hardiness Zones | 9A - 11B |
To successfully grow Allamanda blanchetii, also known as the purple Allamanda, follow these steps:
- Choose a suitable location: The plant requires full sunlight to thrive, so select a spot that receives at least six hours of direct sunlight daily. The soil should be well-draining and rich in organic matter.
- Prepare the soil: Before planting, loosen the soil and remove any weeds or debris. Mix in compost or aged manure to improve the soil's fertility and drainage.
- Planting: Dig a hole that is slightly bigger than the plant's root ball. Place the plant in the hole and backfill with soil, gently firming it around the roots. Ensure that the top of the root ball is level or slightly above the ground.
- Watering: As newly planted Allamanda blanchetii establishes its roots, water the plant deeply but less frequently. Water thoroughly and allow the soil to dry slightly between watering sessions. Once the plant is established, it will tolerate occasional dry spells but prefers consistent moisture.
- Fertilization: Apply a balanced slow-release fertilizer, such as a 10-10-10 formula, in spring and early summer. Follow the instructions on the product label for the appropriate dosage. Avoid over-fertilizing as this can lead to excessive foliage growth and reduced flowering.
- Pruning: Allamanda blanchetii can be pruned for shape and size control. Trim back any dead, damaged, or diseased branches. Prune after flowering to remove spent flowers and encourage new growth. Additionally, lightly prune after the plant's main growth period in summer to promote branching.
- Mulching: Apply a layer of organic mulch, such as wood chips or leaf litter, around the base of the plant to conserve soil moisture, suppress weeds, and improve soil fertility. Keep the mulch a few inches away from the stem to prevent rot.
- Winter protection: In areas with frosty winters, provide protection by covering the plant with a frost cloth or moving potted plants indoors before the first frost.
- Pests and diseases: Allamanda blanchetii is generally resistant to pests and diseases. However, be on the lookout for spider mites, whiteflies, and mealybugs. Treat infestations with an appropriate insecticidal soap or neem oil following the product instructions.
By following these steps and providing the necessary care, your Allamanda blanchetii plant should grow and flourish.

Place in a window with dappled sun or a spot in the middle of a room. Or directly in a window facing west or east.

To water this plant, it is recommended to thoroughly wet the soil around the base of the plant until it drains from the bottom of the pot or reaches a depth of a few inches if planted in the ground. It is important to allow the soil to dry out slightly between waterings to prevent overwatering and potential root rot. It is also important to avoid getting water on the foliage or flowers, as this can increase the likelihood of fungal or bacterial diseases. Additionally, it is best to water in the morning or evening to reduce moisture loss from evaporation during hot daytime temperatures.
For this plant, you'll want to fertilize it once a month during the growing season with a balanced fertilizer - a 10-10-10 or 20-20-20 would work well. Make sure to dilute the fertilizer according to the instructions on the package, as over-fertilization can harm the plant. Apply the fertilizer directly to the soil around the base of the plant, and avoid getting any on the leaves. Water the plant thoroughly after fertilizing to help the nutrients reach the roots.
When planting the Allamanda Blanchetii plant, it's important to use soil that is rich in nutrients and has good drainage. A recommended soil type for this plant is a mix of 1-part peat moss, 1-part perlite or vermiculite, and 1-part sand or loam. This soil mixture provides good aeration around the roots and allows for proper drainage of excess water. Additionally, it's important to ensure that the soil pH is in the range of 5.5-6.5, as this plant prefers slightly acidic soil. It's also recommended to fertilize the plant regularly with a balanced fertilizer to provide additional nutrients for healthy growth.
Propagation of this plant can be done from stem cuttings or seeds. For stem cuttings, select a healthy stem with several nodes and cut it just below a node. Strip the leaves from the bottom of the stem, leaving a few at the top. Dip the cut end in rooting hormone and plant it in a well-draining soil mixture. Keep the soil moist and in a warm, bright location. Roots should form in a few weeks, at which point the new plant can be transplanted to a larger pot.
If propagating from seeds, wait until the seed pods have dried and turned brown. Harvest the pods and remove the seeds. Soak the seeds in water overnight and then plant them in a well-draining soil mixture. Keep the soil moist and in a warm, bright location. Germination should occur in a few weeks, at which point the new plant can be transplanted to a larger pot.
Common pests of the purple allamanda include Scale insect, mealybugs, spider mites, aphids, whiteflies. Make a habit of checking your purple allamanda frequently for pests so that any infestations can be caught and managed early.


