Plant Overview
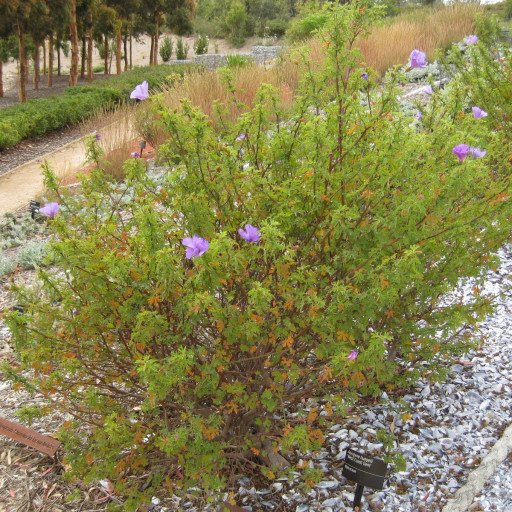
Often called the Lilac Hibiscus or Blue Hibiscus, Alyogyne huegelii is a stunning evergreen shrub that brings a touch of the Australian outback to your landscape. Despite its common name, it isn't a true Hibiscus, though its shimmering, papery blooms tell a different story. In the wild, it survives harsh, sandy coastal conditions, making it a rugged yet elegant choice for sun-drenched gardens.
🔍 How to Identify
- 🌸 The Blooms: Large, trumpet-shaped flowers usually in shades of lilac, mauve, or deep purple. The petals have a delicate, "crinkled" texture similar to crepe paper and overlap slightly.
- 🍃 Lobed Foliage: The leaves are deep green and deeply divided into three to five lobes. They have a slightly rough, hairy texture that helps the plant conserve moisture in dry climates.
- 🌿 Growth Habit: It grows as an open, upright shrub. If left to its own devices, it can become a bit "leggy" or sparse, reaching up to 6–8 feet tall.
🏡 In Your Garden
- ✂️ Pruning is Essential: This plant has a "grow fast, die young" energy. To prevent it from becoming a tangled mess of sticks, you must prune it back by about one-third after its main flowering flush. This encourages a bushy, compact shape and more flowers next season.
- 💧 The "Wet Feet" Warning: Coming from the sandy soils of Western Australia, this plant is highly susceptible to root rot. It loves a drink during a hot summer, but it must have excellent drainage. If your soil is heavy clay, consider planting it in a raised bed or a large pot.
- ☀️ Sun Seeker: To get those iconic blooms to open, it needs full sun. In shaded spots, the plant will stretch out awkwardly and produce very few flowers, which only last for a day or two anyway.
⚠️ Safety & Toxicity
- 🟢 Safe for Most: Alyogyne huegelii is generally considered non-toxic to humans and common household pets like cats and dogs.
- 🖐️ Skin Sensitivity: While not poisonous, the fine hairs on the leaves and stems can occasionally cause mild skin irritation or "itchiness" for gardeners with sensitive skin. Wearing gloves while pruning is a smart move.
✨ Fun Fact
Though it looks nearly identical to a Hibiscus, the Alyogyne is distinguished by its "style" (the central part of the flower). Unlike true Hibiscuses, which have a style that branches into five little pads at the tip, the Lilac Hibiscus has a style that remains undivided until the very end!

Detailed Care Instructions
| Humidity | Normal |
| Lighting | Full Sun |
| Difficulty | Easy |
| Hibernation | Cold Period |
| Hardiness Zones | 10 - 12 |
Alyogyne Huegelii, also known as Blue Hibiscus or Lilac Hibiscus, is a beautiful flowering plant native to Western Australia. Here's a step-by-step guide on how to grow Alyogyne Huegelii:
- Climate and soil requirements: Alyogyne Huegelii thrives in full sun and can tolerate a wide range of soil types. However, it prefers well-draining soil with a pH level between 6.5 and 7.5.
- Plant selection: Purchase healthy Alyogyne Huegelii plants from a reputable nursery or garden center. Make sure to choose plants with vibrant and green foliage.
- Planting: Choose a suitable planting location in your garden that receives at least 6-8 hours of direct sunlight per day. Dig a hole twice the width of the pot and at the same depth as the root ball. Place the plant in the hole and backfill with soil, gently firming it around the roots.
- Watering: Alyogyne Huegelii requires regular watering, especially during the first few months after planting. Water deeply once or twice a week, ensuring the soil is moist but not waterlogged. As the plant matures, it becomes more drought-tolerant.
- Mulching: Apply a layer of organic mulch around the base of the plant to help retain moisture, suppress weeds, and regulate soil temperature.
- Fertilizing: Feed your Alyogyne Huegelii with a balanced slow-release fertilizer during the spring and summer months to promote healthy growth and abundant flowering. Follow the manufacturer's instructions for application rates.
- Pruning: After the blooming season, you can prune back any dead or weak branches to maintain the plant's shape and encourage bushier growth. This can be done in early spring.
- Pests and diseases: Alyogyne Huegelii is generally pest and disease resistant. However, keep an eye out for aphids, caterpillars, or scale insects, and treat the infestation using organic insecticides if necessary.
- Propagation: Alyogyne Huegelii can be propagated through softwood cuttings taken in early summer. Dip the cuttings in a rooting hormone powder and place them in a pot with a well-draining rooting mix. Keep the soil moist and provide indirect light until roots develop.
- Winter care: In colder climates, provide protection to the plant during winter by covering it with frost cloths or moving it to a sheltered location.
By following these steps, you can successfully grow and enjoy the beautiful flowers of Alyogyne Huegelii in your garden.

Place in a window with dappled sun or a spot in the middle of a room. Or directly in a window facing west or east.

To water this plant, it is important to first check the soil moisture level by sticking your finger about an inch into the soil. If the soil feels dry, it is time to water. The plant prefers well-draining soil, so do not allow the soil to become waterlogged. It is recommended to water deeply, making sure the water reaches the bottom of the pot or soil. Allow the soil to dry out slightly before watering again, as overwatering can lead to root rot. It is also important to avoid getting water on the foliage, as this can lead to fungal diseases.
To fertilize this plant, use a balanced fertilizer with equal amounts of nitrogen, phosphorus, and potassium. Apply the fertilizer at half strength every two weeks during the growing season (spring and summer) and reduce fertilization during the dormant season (fall and winter). Avoid over-fertilization as this can lead to burnt roots and damage to the plant.
Alyogyne Huegelii plant thrives well in well-draining soil that has a pH level between 6.0 and 7.5. It prefers soil that is rich in organic matter and has moderate fertility. The soil should be well-aerated, which means it should have a good balance of air and water within it. It should not be too compact or water-logged, as this can suffocate the roots and lead to root rot. A mix of sand, loam, and compost can be used to create an ideal soil blend for this plant. Adding perlite or vermiculite to the mix can also improve drainage and aeration.
To propagate this plant, one can start by taking stem cuttings from mature healthy plants. The cutting should be at least 10 centimeters long and should include at least two pairs of leaves on it.
Next, remove all the leaves from the lower half of the cutting and dip the cut end into rooting hormone powder. Place the cutting into a pot filled with well-draining potting soil and press the soil around the cutting firmly.
Water the cutting lightly, making sure the soil is moist but not waterlogged. Cover the pot with a plastic bag and place it in a bright, warm, but not direct sunlight location.
Check the soil daily and water as needed to keep it moist. After a few weeks, the cutting will start to develop roots and new growth. Once the new growth is visible, the plastic bag can be removed and the plant can be gradually acclimatized to the normal environment.
Common pests of the lilac-hibiscus include Spider mites, aphids, thrips. Make a habit of checking your lilac-hibiscus frequently for pests so that any infestations can be caught and managed early.


