Plant Overview
Often overlooked compared to its showy ornamental cousins, Alyssum alyssoides is the resilient underdog of the rocky landscape. Commonly known as the Pale Alyssum or Small Alyssum, this modest wildling blankets dry, sun-baked ground with a delicate, honey-scented mist of tiny blooms. While it may look fragile, it is a master of survival, often choosing to grow in cracks of pavement or sandy barrens where few other plants dare to venture.
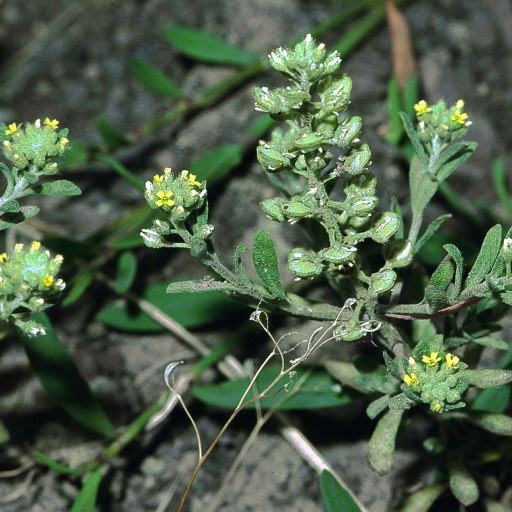
🔍 How to Identify
- 🌼 The Flowers: Look for clusters of tiny, four-petaled flowers that start as a soft primrose yellow and gradually fade to a creamy white as they age.
- 🍃 The Foliage: The leaves are narrow, grayish-green, and covered in tiny, star-shaped hairs that give the plant a slightly "fuzzy" or frosted appearance.
- 🔘 The Seed Pods: After the flowers fade, the plant produces distinctive "silicles"—small, flattened, circular pods that look like tiny green coins arranged along the stem.
🏡 In Your Garden
- ☀️ The Minimalist: This plant thrives on neglect. It prefers poor, well-draining soil and will actually suffer in rich, compost-heavy earth. It’s an ideal candidate for rock gardens or "hellstrips" near sidewalks.
- 🐝 Pollinator Magnet: Despite its small size, it provides an essential early-season nectar source for tiny beneficial insects, particularly syrphid flies (hoverflies) which help control garden pests like aphids.
⚠️ Safety & Toxicity
- 🌿 Safe Status: Alyssum alyssoides is generally considered non-toxic to humans and common household pets like cats and dogs.
- ✋ Skin Sensitivity: While not poisonous, the fine hairs on the stems and leaves can occasionally cause mild skin irritation for people with very sensitive skin if handled extensively without gloves.
✨ Fun Fact
- 📜 The "Madness" Cure: The name Alyssum comes from the Greek words a- (meaning "not") and lyssa (meaning "madness"). In ancient times, people believed that hanging bundles of these plants could cure rabies or "calm the anger" of those suffering from madness.

Detailed Care Instructions
Here are some steps to help you on how to grow Alyssum Alyssoides plant:
- Choose the right location: Alyssum Alyssoides plants prefer full sun to partial shade. Select an area with well-draining soil.
- Prepare the soil: Make sure the soil is loose, fertile, and well-draining. If the soil is heavy clay, consider adding organic matter such as compost to improve drainage.
- Start from seeds: Alyssum Alyssoides plants can be grown from seeds. Sow the seeds directly into the garden bed in early spring after the last frost date. Scatter the seeds lightly on the soil surface and cover them with a thin layer of soil. Space the seeds 8-12 inches apart.
- Watering: Keep the soil evenly moist, especially during the germination process. Once the plants are established, they are fairly drought-tolerant but appreciate regular watering during dry spells.
- Fertilizing: Alyssum Alyssoides doesn't require heavy feeding. A light application of balanced, slow-release fertilizer in early spring should be sufficient.
- Mulching: Apply a layer of organic mulch around the plants to help retain soil moisture and suppress weed growth.
- Pruning: Once the Alyssum Alyssoides plants have finished blooming, you can trim back the spent flowers to encourage further flowering and maintain a neat appearance.
- Pests and diseases: Alyssum Alyssoides plants are generally resistant to pests and diseases. However, keep an eye out for common issues like aphids or slugs. Treat any pest problems accordingly.
- Propagation: If you want to propagate more Alyssum Alyssoides plants, you can collect seeds from the mature plants and sow them in the desired areas.
By following these steps, you should be able to successfully grow Alyssum Alyssoides plants. Enjoy their lovely flowers and wonderful fragrance in your garden!

Place in a bright room that is sun drenched almost all day. Or directly in a south-facing window.

To water this plant, it is recommended to thoroughly soak the soil around it when the top inch of soil feels dry to the touch. When watering, avoid getting water on the leaves and flowers as this may cause them to rot or become damaged. Additionally, it is important to avoid overwatering as this can lead to root rot and other issues. Instead, aim for a deep and thorough watering once a week or as needed depending on the surrounding conditions and the plant's specific needs.
To fertilize this plant, apply a balanced fertilizer once a month during the growing season, which is typically from spring to early fall. Follow the instructions on the fertilizer package for application rates. Avoid over-fertilizing, as this can damage the plant and reduce its flowering. Additionally, it is recommended to incorporate organic matter into the soil prior to planting to provide the plant with additional nutrients.
The ideal soil to use with the plant commonly known as Alyssum Alyssoides is well-draining, with a slightly acidic to neutral pH level of 5.5-7.0. It should be rich in organic matter, such as compost or leaf mold, to provide a healthy growing environment. The soil should also have a good balance of sand, silt, and clay particles to promote good drainage and avoid waterlogging. It is important to avoid heavy or compacted soils, as this can lead to root rot and other fungal diseases. Additionally, adding a slow-release fertilizer to the soil before planting can help provide adequate nutrients for the plant's growth.
To propagate this plant, you can take stem cuttings or sow seeds in spring or early summer. For stem cuttings, select a healthy stem and cut a section about 4 inches long. Remove any lower leaves from the cutting and dip the cut end in rooting hormone. Plant the cutting in a container filled with moist potting soil, and keep it in a warm, bright location. Keep the soil moist and in a few weeks, roots will start to form. For seed propagation, prepare a seed tray filled with potting soil and scatter the seeds on top of the soil. Cover the seeds with a very thin layer of soil and gently water them. Place the seed tray in a warm, bright location and keep the soil moist. In about 2-3 weeks, the seeds will germinate and you can transplant them to larger containers or directly into the garden.


