Plant Overview
Known as the "Shadblow" because it traditionally blooms when the shad fish return to spawn in coastal rivers, this elegant North American native is a four-season superstar. Whether it is the cloud of white blossoms in early spring or the delicious "Juneberries" that follow, it brings a touch of wild woodland magic to any landscape. It is often the first sign that winter is finally losing its grip, offering a feast for both the eyes and the local songbirds.
🔍 How to Identify
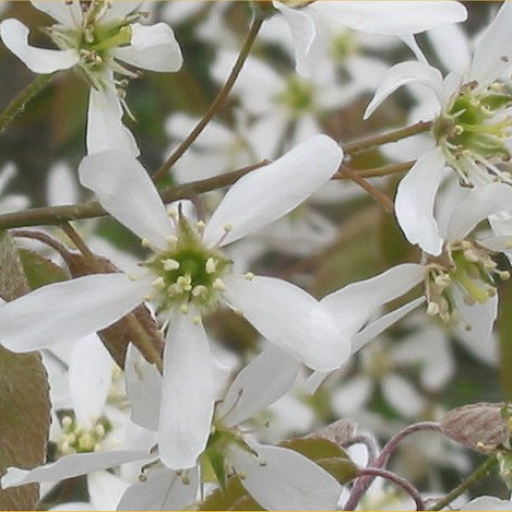
- 🌸 Starry Blooms: Clusters of delicate, five-petaled white flowers appear in early spring, often coating the branches before the leaves have fully unfurled.
- 🍃 Finely Toothed Leaves: The foliage is oval-shaped with very fine serrations along the edges; leaves emerge with a soft, fuzzy underside and turn a brilliant orange-red in the fall.
- 🍇 Jewel-Like Fruit: Small, round berries that transition from green to a rosy red, finally maturing into a deep, dusty purple-black similar to a blueberry.
🏡 In Your Garden
- 🌳 Multi-Stemmed Elegance: This species is prized for its graceful, upright, multi-stemmed growth habit, making it an excellent choice for a natural privacy screen or a focal point in a native pollinator garden.
- 💧 Moisture Tolerance: Unlike many other serviceberry varieties, Amelanchier canadensis thrives in damp soils and can handle "wet feet" better than most, making it a perfect candidate for rain gardens or low-lying areas of the yard.
⚠️ Safety & Toxicity
- 🍴 Deliciously Safe: The ripe berries are completely edible for humans, dogs, and cats, boasting a sweet flavor that many compare to a mix of blueberry and almond.
- 🐾 Woody Caution: While the fruit is a treat, the leaves and stems contain low levels of cyanogenic glycosides; while rarely a concern, it is best to discourage pets from chewing heavily on the branches or bark.
✨ Fun Fact
Early American settlers nicknamed this tree the "Serviceberry" because its spring blossoms were a signal that the frozen ground had finally thawed enough to dig graves and hold funeral services for those who had passed during the winter.

Detailed Care Instructions
To grow Amelanchier canadensis, also known as the Canadian serviceberry or shadblow, you can follow these steps:
- Planting location: Choose a well-draining spot with full sun to partial shade. The plant prefers slightly acidic to neutral soil.
- Soil preparation: Amend the soil by loosening it and adding compost or peat moss to improve its fertility and drainage. Avoid heavy clay soils or areas prone to waterlogging.
- Planting time: It's best to plant Amelanchier canadensis in early spring or late fall, when the weather is mild and the plant can establish its root system before extreme heat or cold.
- Digging the hole: Dig a hole that is wider and deeper than the plant's root ball. Ensure the hole is large enough to comfortably accommodate the roots without bending or crowding.
- Planting the tree: Place the plant in the hole, making sure the top of the root ball is level with or slightly above the soil surface. Backfill the hole with soil, gently firming it around the roots to eliminate air pockets.
- Watering: After planting, thoroughly water the tree to settle the soil and ensure good root-to-soil contact. Continue to water regularly, especially during dry periods, to keep the soil consistently moist but not waterlogged.
- Mulching: Apply a layer of organic mulch, such as wood chips or bark, around the base of the plant to conserve moisture, suppress weed growth, and maintain a consistent soil temperature.
- Pruning: Minimal pruning may be required to shape the plant or remove dead, damaged, or crossing branches. The best time for pruning is in late winter or early spring before the new growth begins.
- Fertilizing: Amelanchier canadensis generally does not require regular fertilization if planted in fertile soil. However, if the soil is poor, you can apply a slow-release, balanced fertilizer in early spring.
- Pest and disease control: Monitor the tree for any signs of pests or diseases, such as aphids, tent caterpillars, or rust spots. Treat any issues promptly using organic or chemical methods, as necessary.
- Consistent care: Provide regular care by watering, mulching, and monitoring the plant's health. Regularly check for weeds around the base to prevent competition for nutrients and water.
Remember that each plant's specific needs can vary slightly, so it's always advisable to consult local gardening resources or experts for region-specific recommendations.

Place in a bright room that is sun drenched almost all day. Or directly in a south-facing window.

To properly water this plant, first consider the soil conditions. It prefers well-draining soil that is neither too dry nor too wet. Check the soil moisture level by inserting your finger a few inches deep into the soil. If it feels dry, it's time to water.
When watering, aim to moisten the soil to a depth of at least 6 inches. Slowly and evenly apply water around the base of the plant, making sure not to let the water pool or run off. A soaker hose or drip irrigation system is a good option for keeping the soil consistently moist without overwatering.
During the growing season, water the plant about once a week, especially during times of drought or high heat. In cooler weather, reduce watering frequency to avoid overwatering.
It's important to note that overwatering can lead to root rot, which can be fatal to the plant. So be sure to monitor soil moisture levels and adjust watering frequency accordingly.
To fertilize this plant, choose a fertilizer with a balanced N-P-K ratio, such as 10-10-10 or 15-15-15, and apply it in early spring before new growth appears. Use a granular fertilizer and sprinkle it around the base of the plant, making sure not to pile it up against the trunk. Water the fertilizer in well after application. Repeat the application in early summer if desired. Avoid fertilizing in late summer or fall, as this can encourage new growth that may not have time to harden off before winter.
When planting Amelanchier Canadensis, it is important to choose a type of soil that is well-draining and retains moisture. The ideal pH level for the soil should be between 5.0 and 7.5. The soil should be rich in organic matter and nutrients, so it is recommended to add compost or manure to the soil before planting. The plant prefers slightly acidic to neutral soil. The soil should be prepared to have good drainage, and the planting hole should be dug to the same depth as the root ball. Once the plant is in the hole, the soil should be backfilled and tamped down to ensure good contact between the roots and soil. It is important to keep the soil evenly moist during the first year of growth, as the plant establishes itself in its new environment.
To propagate this plant, you will need to take a cutting from a healthy mature plant. Look for a stem that is about 4-6 inches long and has several leaves. Use a sharp, sterile blade to make a clean cut just below a node. Remove any lower leaves so that there are only a few at the top.
Prepare a pot with a well-draining potting mix and moisten it slightly. Dip the end of the cutting in rooting hormone powder and gently tap off excess powder. Insert the cutting into the soil, making sure the hormone is in contact with the soil.
Cover the pot with a clear plastic bag or wrap to create a mini greenhouse. This will keep the cutting moist and warm. Place the pot in a bright but indirect light spot, avoiding direct sunlight.
After a few weeks, gently tug on the cutting to see if it has rooted. If there is resistance, it has rooted. Remove the plastic covering and gradually expose the plant to more light. When the roots are established, transplant it to a larger pot or outside in the garden.


