Plant Overview
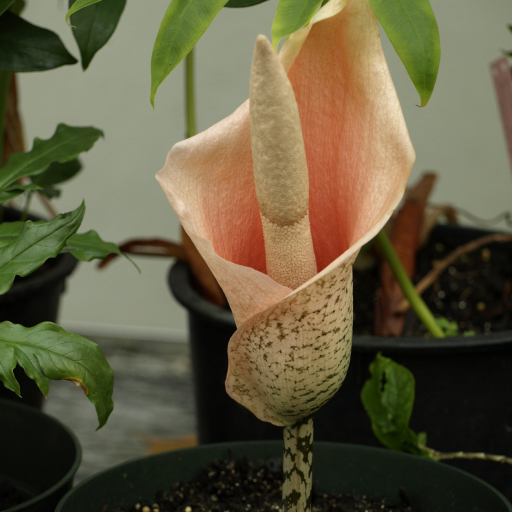
Known as the Pink Voodoo Lily, this plant looks like it was plucked straight from a prehistoric jungle. It is famous for its dramatic, flesh-colored bloom and its strange ability to grow "babies" directly on its leaves. While it carries a bit of a pungent reputation during its flowering stage, its sculptural foliage makes it a prized possession for "oddity" plant collectors.
🔍 How to Identify
- 🌿 The "Umbrella" Leaf: Unlike most plants, it usually produces just one single, large, deeply divided leaf that fans out like a green canopy.
- 🦓 The Snakeskin Stem: The thick, fleshy stalk (petiole) is covered in striking mottled patterns of silver, olive, and brown, looking remarkably like camouflage or reptile skin.
- 🥔 Leaf Bulbils: A key identifying trait is the presence of small, brown, marble-like tubers forming at the joints where the leaf segments meet—these are essentially "seeds" that grow on the foliage.
🏡 In Your Garden
- ⛱️ Dappled Shade: This is an understory species from the forests of India and the Himalayas. It despises direct afternoon sun, which will quickly scorch its delicate leaf; think of it as a "bright shade" specialist.
- 💤 The Winter Disappearance: Don't throw the pot away! The Voodoo Lily is a tuberous plant that goes completely dormant in the winter. The leaf will yellow and collapse, and the plant will "hibernate" as an underground bulb until the warmth of spring returns.
- 🥣 Rich Diet: Because it has to grow a massive leaf and a complex flower from a single bulb every year, it is a "heavy feeder." It thrives in soil rich in organic compost and leaf mold.
⚠️ Safety & Toxicity
- 🚫 Toxic Status: High. Every part of the plant contains calcium oxalate crystals, which act like tiny shards of glass if ingested.
- 🐈 Pets & Children: Keep this plant out of reach. If chewed, it causes immediate burning, swelling of the throat, and digestive distress.
- 👃 The "Stink" Factor: When the plant blooms (which only lasts a few days), it emits an odor similar to rotting meat. This isn't a "defect"—it's a clever trick to attract carrion flies for pollination!
✨ Fun Fact
The name bulbifer literally means "bulb-bearing." It is one of the few plants in the world that is "viviparous," meaning it grows miniature versions of itself (bulbils) on its elbows. When the leaf eventually dies, these bulbs fall to the ground and immediately start growing as brand-new plants!

Detailed Care Instructions
Growing an Amorphophallus Bulbifer plant involves a few specific steps. Here's a guide to help you:
- Choose a suitable location: Amorphophallus Bulbifer prefers warm temperatures and moist environments. It thrives in semi-shaded areas with indirect sunlight.
- Prepare the soil: The plant needs well-draining and fertile soil. Mix equal parts of potting soil, perlite, and compost to create a well-aerated substrate.
- Planting the bulb: Plant the bulb in a pot or directly in the ground. Ensure that the top of the bulb is level with the soil surface and cover it gently with the soil mixture.
- Watering: Keep the soil consistently moist but not soggy. Water the plant regularly, especially during the growing season. Reduce watering during the winter months, allowing the soil to dry slightly between waterings.
- Fertilizing: Use a balanced, slow-release fertilizer or a diluted liquid fertilizer every month during the growing season. Follow the instructions on the fertilizer packaging for proper dosage.
- Managing humidity: Amorphophallus Bulbifer prefers high humidity levels. To increase humidity, you can mist the leaves regularly or place a tray of water near the plant. Avoid wetting the soil excessively to prevent root rot.
- Providing support: As the plant grows, it may require support due to its tall and heavy flower stalks. Use stakes or bamboo sticks to support the plant and prevent it from toppling over.
- Protecting the plant: Amorphophallus Bulbifer can be sensitive to cold temperatures. If you live in a cooler climate, consider growing the plant indoors or in a greenhouse to provide necessary warmth. Protect it from frost and draughts.
- Repotting: In general, repotting is not required often. However, if the plant becomes root-bound or starts outgrowing its container, move it to a larger pot. Perform repotting during the dormant season for minimal disturbance.
- Dormancy: Amorphophallus Bulbifer goes through a dormant period where the leaves die back. Reduce watering during this time and allow the plant to rest. Resume regular care when new growth appears.
Remember that Amorphophallus Bulbifer is known for its distinct smell during blooming, so be prepared for that unique characteristic.

Place in a bright room that is sun drenched almost all day. Or directly in a south-facing window.

To water this plant, you should first check the moisture level of the soil by sticking your finger an inch into the soil. If the soil feels dry, water the plant thoroughly until water drips out of the drainage holes at the bottom of the pot. Make sure not to overwater the plant, as this can cause root rot. Wait until the top inch of soil is dry before watering again. Additionally, avoid getting water on the leaves, as this can cause fungal diseases.
To fertilize this plant, it is recommended to use a balanced, slow-release fertilizer with a ratio of 10-10-10. Apply the fertilizer once per month during the growing season, which typically occurs in the spring and summer months. Be careful not to over-fertilize the plant as this can lead to root burn and other issues. During the dormant season, it is not necessary to fertilize the plant. Water the plant thoroughly before and after applying fertilizer to avoid burning the roots.
The ideal soil for the plant should be loose and well-draining, with a slightly acidic pH level ranging from 5.5 to 6.5. The soil should also contain adequate amounts of organic matter, such as compost or leaf litter, to provide essential nutrients for the plant's growth.
It is recommended to avoid soils that are heavy or compact and do not allow water to drain easily as this can lead to waterlogging and prevent the roots from getting enough oxygen.
Additionally, the plant prefers a soil that is rich in potassium and phosphorus, which can be achieved by adding a balanced fertilizer or bone meal to the soil before planting.
Overall, the soil should be able to hold moisture without becoming waterlogged, be rich in organic matter, and have a slightly acidic pH with a good balance of nutrients.
To propagate this plant, first select a mature healthy specimen and carefully dig it up from the ground, being careful not to damage any of the roots. Using a sharp, sterilized knife, carefully divide the bulb into sections, ensuring that each section has at least one healthy and viable growing point. Dust the cut surfaces with a fungicide powder to prevent any fungal infections from developing.
Next, prepare a planting tray or pot with a suitable well-draining potting mix, such as a mix of peat moss, vermiculite, and perlite. Make a hole in the soil, and carefully place each bulb section into the hole with the growing point facing upwards. Gently firm the soil around the bulbs and water them thoroughly.
Place the pot or tray in a brightly lit location, but avoid direct sunlight, as this can scorch the leaves. Keep the soil moist but not waterlogged, and maintain a warm, humid environment, around 20 °C (68 °F) and 80% humidity. After a few weeks, the bulbs should start to produce new growth, and soon each section will form a new plant.
Once the new plants have a few leaves and are well established, they can be potted up into individual containers and cared for as mature plants. With good care and patience, the plants will eventually mature and produce their distinctive flowers, making a striking addition to any collection of tropical plants.


