Plant Overview
Often called the Monkey’s Comb, this vigorous woody climber is a superstar of the tropical American landscape. A member of the Bignonia family, it is famous for its ability to transform bare fences and pergolas into lush, green walls. It’s a plant of transformation, with flowers that change color daily and seed pods that look like they belong on a vanity table rather than a vine.
🔍 How to Identify
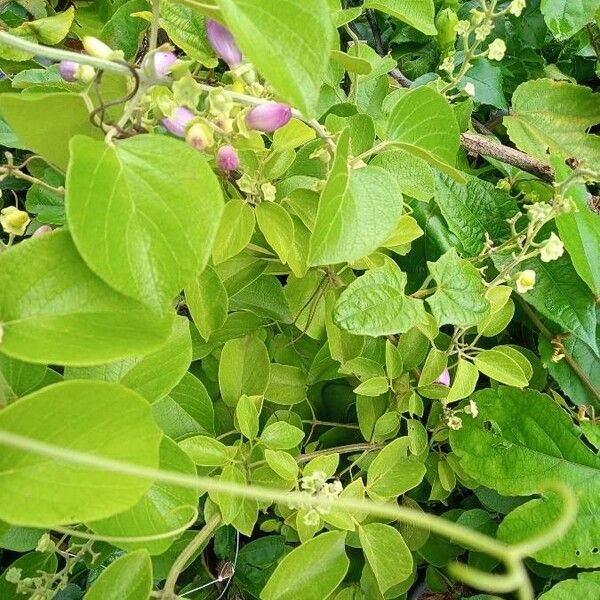
- 🌸 Changing Blooms: The trumpet-shaped flowers emerge in dense clusters. They start a pristine creamy white, gradually maturing into a buttery yellow and sometimes finishing with a soft purple or pink tint.
- 🍃 Modified Leaves: The leaves usually come in pairs. Look closely at the tips; you’ll often find a three-forked tendril that the plant uses like a tiny hand to haul itself upward.
- 🪮 The "Comb" Pod: The most distinctive feature is the seed pod. It is a woody, oblong capsule covered in soft, blunt spines, bearing a striking resemblance to a miniature hairbrush or a primate's grooming tool.
🏡 In Your Garden
- 🏗️ Heavyweight Support: As a "liana," this plant develops thick, woody stems over time. It requires a very sturdy trellis, fence, or arbor. Avoid flimsy plastic supports, as the vine’s weight can eventually collapse them.
- ☀️ Light and Space: To encourage the most prolific flowering, plant it in full sun. While it can tolerate partial shade, it will spend more energy growing long, "leggy" stems to reach the light rather than producing its beautiful blossoms.
- ✂️ Growth Management: Because it is such a fast grower in warm climates, annual pruning after the flowering season is recommended to keep it from swallowing nearby trees or gutters.
⚠️ Safety & Toxicity
- ✅ Generally Safe: Amphilophium paniculatum is not known to be toxic to humans, cats, or dogs. It is a popular choice for backyard landscaping because of this friendly profile.
- 🤚 Physical Texture: While not "thorny" in the traditional sense, the prickly texture of the dried seed pods can be mildly abrasive. Use gloves when harvesting the pods for crafts to avoid minor skin irritation.
✨ Fun Fact
The common name "Monkey’s Comb" isn't just a metaphor—in various indigenous cultures across Central and South America, the dried, woody seed pods were historically used as actual hair combs and scrubbing tools!

Detailed Care Instructions
To grow Amphilophium paniculatum, also known as the Mexican umbrella tree or Dombeya, follow these steps:
- Climate and soil requirements: Amphilophium paniculatum thrives in tropical and subtropical climates. It prefers well-draining soil with a pH range of 6.0 to 7.5.
- Choose a suitable location: Find a spot that receives full to partial sunlight. If you live in an area with hot summers, partial shade during the hottest hours of the day can be beneficial.
- Propagation: The plant can be propagated from seeds, stem cuttings, or air layering. Seeds should be soaked in water for 24 hours before sowing. Cuttings should be taken from healthy, disease-free stems.
- Planting from seeds: Sow the seeds about ¼ inch deep in a small pot filled with well-draining soil. Keep the soil consistently moist but not soggy. Seedlings should appear within a couple of weeks.
- Planting from cuttings or air layering: Dip the cuttings in a rooting hormone powder and plant them in a potting mix with good drainage. Keep the soil moist until roots develop, which usually takes several weeks.
- Watering: Amphilophium paniculatum prefers regular watering. Keep the soil evenly moist but avoid overwatering, as this can lead to root rot. During dry periods, increase the frequency of watering.
- Fertilization: Apply a balanced, slow-release fertilizer during the growing season (spring to fall) to promote healthy growth and flowering. Follow the instructions on the fertilizer package for the correct dosage.
- Pruning: Regular pruning is beneficial to shape the plant and promote bushy growth. Remove any dead or damaged growth, and cut back long stems to encourage branching.
- Pests and diseases: Monitor the plant for any signs of pests such as spider mites or aphids. Treat infestations with organic or chemical controls as appropriate. Ensure good air circulation to prevent fungal diseases.
- Support: As the plant grows, provide a sturdy support, such as a trellis or stakes, to help it climb and maintain an upright form.
- Winter care: If you live in an area with cold winters, bring the plant indoors or provide protection during the colder months. Ensure it is placed in a well-lit area away from drafts.
By following these steps, you can successfully grow the Amphilophium paniculatum plant and enjoy its beautiful foliage and flowers.

Place in a bright room that is sun drenched almost all day. Or directly in a south-facing window.

To water the Amphilophium Paniculatum plant, you need to provide a consistent and adequate amount of moisture. Follow these steps:
1. Observe the soil: Before watering, check the moisture level of the soil. Insert your finger about an inch deep into the soil to feel its moisture content. If it feels dry, it's time to water the plant.
2. Choose the watering method: There are various ways to water the plant, including using a watering can, hose, or drip irrigation system. Select the method that best suits your preferences and the specific needs of the plant.
3. Water frequency: Water the Amphilophium Paniculatum plant about once a week or whenever the top inch of the soil feels dry. It's important to avoid overwatering, as it can lead to root rot. Adjust the frequency based on the plant's environment and the rate at which the soil dries out.
4. Watering amount: When watering, aim to moisten the soil thoroughly. Water until you see it draining out of the drainage holes at the bottom of the pot. This ensures that water reaches the entire root system. Avoid leaving the plant sitting in standing water, as it can cause root problems.
5. Water temperature: Use room temperature water when watering the plant. Avoid using excessively cold or hot water, as extreme temperatures may shock the plant's roots.
6. Watering technique: To ensure the water is evenly distributed throughout the root zone, water the Amphilophium Paniculatum plant close to the base of the plant rather than directly on the leaves. This helps prevent leaf damage and reduces the risk of fungal diseases.
7. Consider the environment: Factors such as temperature, humidity, and sunlight exposure can affect the watering needs of the plant. In hotter and drier conditions, the plant may require more frequent watering, while in cooler or humid environments, it may need less frequent watering.
8. Monitor plant health: Pay attention to any signs of over or underwatering, such as wilting or yellowing leaves. Adjust your watering routine accordingly. Additionally, observe the plant's growth and health overall to determine if any changes in watering habits are needed.
Remember, proper watering is essential for the health and well-being of the Amphilophium Paniculatum plant. By following these guidelines, you can help ensure it receives the necessary moisture to thrive.
To fertilize Amphilophium Paniculatum, also known as a flowering vine plant, follow these instructions:
- Choose a balanced, water-soluble fertilizer with equal amounts of nitrogen (N), phosphorus (P), and potassium (K).
- Dilute the fertilizer according to the manufacturer's instructions to avoid overdosing the plant.
- During the growing season, apply the diluted fertilizer every two weeks or as recommended by the package instructions.
- Water the plant thoroughly before fertilizing to prevent root burn.
- Apply the fertilizer around the base of the plant, making sure to distribute it evenly.
- Avoid direct contact between the fertilizer and the plant's foliage as it may cause damage.
- After fertilizing, water the plant again to help the nutrients reach the roots.
- Monitor the plant's response to the fertilizer and adjust the frequency or strength of application if needed.
- During the dormant season or winter months, reduce or stop fertilizing, as the plant's growth slows down.
- Always follow the recommended dosage and schedule to maintain a healthy and well-nourished Amphilophium Paniculatum plant.
When selecting soil for Amphilophium paniculatum, it is important to consider the natural habitat of the plant. This plant is typically found growing in various soil types in its native region. However, it generally prefers a specific type of soil that provides optimal growing conditions.
The ideal soil for Amphilophium paniculatum should be well-draining, as excessive moisture can lead to root rot and other issues. Therefore, a soil mix that contains a good amount of organic matter is beneficial, as it helps improve drainage while retaining adequate moisture levels for the plant. A well-draining soil also prevents waterlogged conditions that can negatively impact the health of the plant.
Additionally, the soil should be rich in nutrients, especially nitrogen, phosphorus, and potassium, which are essential for healthy growth and flowering. The inclusion of organic matter in the soil mix can also help provide a steady supply of nutrients and promote overall soil fertility.
Amphilophium paniculatum plants thrive in slightly acidic to neutral soil pH levels. Ideally, the pH range should be between 6.0 and 7.0. Regular monitoring of soil pH levels is recommended to ensure that it remains within the desired range.
To summarize, the preferred soil for Amphilophium paniculatum is one that is well-draining, rich in organic matter, and provides essential nutrients necessary for healthy growth.
Amphilophium Paniculatum is a flowering plant that can be propagated through various methods, including cuttings and seeds. Here are the details on how to propagate this plant:
- Cutting Propagation:
- First, select a healthy, mature stem from the parent plant. Look for a stem that is disease-free, with no signs of damage.
- Using clean, sharp pruning shears, cut a 6-8 inch (15-20 cm) section of the stem, making sure to include at least two to three leaf nodes.
- Strip the leaves from the lower half of the cutting, leaving only a couple of leaves at the top to allow photosynthesis.
- Optionally, you can dip the cut end of the stem in a rooting hormone powder or gel to encourage root development.
- Prepare a potting mix comprising well-draining soil or a mixture of peat moss and perlite.
- Make a hole in the potting mix and insert the cutting, ensuring that at least one or two leaf nodes are buried in the soil.
- Water the cutting thoroughly to settle the soil around it, but avoid overwatering as excessive moisture can lead to rot.
- Place the potted cutting in a location that receives bright, indirect light. Avoid direct sunlight as it may burn the cutting.
- Maintain a consistently moist soil by watering when the top inch of the soil feels dry. Mist the cutting occasionally to provide humidity.
- After a few weeks, the cutting should develop roots. You can gently tug on the stem to check for resistance, indicating root growth.
- Once the roots are well-established, typically after a couple of months, you can transplant the cutting into a larger pot or the desired growing location in your garden.
- First, select a healthy, mature stem from the parent plant. Look for a stem that is disease-free, with no signs of damage.
- Seed Propagation:
- Collect mature seeds from the parent plant. The seeds are typically enclosed in small capsules or pods.
- Soak the seeds in water for 24 hours to soften their hard outer coating and improve germination rates.
- Fill seed trays or small pots with a well-draining potting mix or a mixture of peat moss and perlite.
- Sow the seeds on the soil surface and lightly press them in, ensuring they are in contact with the soil.
- Water the seeds gently to avoid displacing them.
- Place the seed trays or pots in a warm location that receives indirect light. Maintain a temperature of around 70-80°F (21-27°C).
- Keep the soil consistently moist by watering whenever the top layer feels dry. Ensure the pots have drainage holes to avoid waterlogging.
- Germination may take a few weeks to a couple of months. Once the seedlings have developed a couple of true leaves, they can be transplanted into larger pots or directly into the garden.
Remember to provide adequate care and attention to the propagated plants, including regular watering, appropriate lighting, and suitable growing conditions, to ensure their healthy growth and development.
- Collect mature seeds from the parent plant. The seeds are typically enclosed in small capsules or pods.


