Plant Overview
Often called the Japanese Anemone or the Windflower, this elegant perennial is the "swan song" of the garden. While most summer flowers begin to fade under the August heat, the Anemone hupehensis rises on tall, graceful stems to announce the coming of autumn. Despite its common name, it actually originated in Hupeh Province, China, and was discovered by plant hunters in Japanese temple gardens centuries ago.
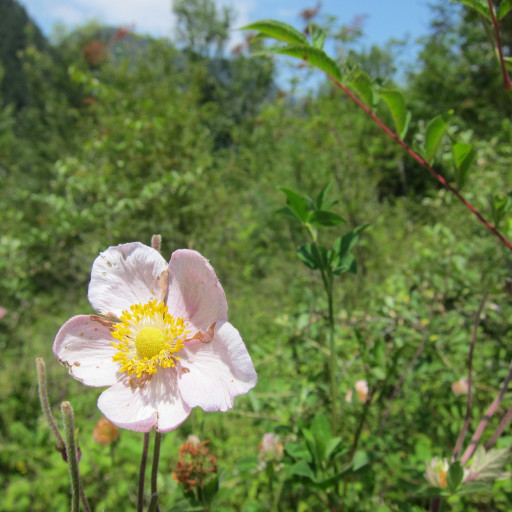
🔍 How to Identify
- 🌸 The Bloom: Large, saucer-shaped flowers featuring silky sepals (which look like petals) in shades of soft rose-pink or creamy white, centered around a prominent ring of golden-yellow stamens.
- 🍃 The Foliage: Deep green, tri-lobed leaves with a slightly fuzzy texture and serrated edges that form a lush, low-growing mound before the flower stalks shoot upward.
- 🌬️ The Stems: Exceptionally wiry and slender stalks that can reach up to 4 feet high, allowing the flowers to dance and sway in the slightest breeze without snapping.
🏡 In Your Garden
- 🌱 Root Stability: These plants are notorious for hating "moving day." Because they possess long, thin taproots, they are difficult to transplant once established. It is best to choose their "forever home" carefully to avoid root shock.
- 🏃 Spreading Habit: They spread via underground runners (rhizomes). In the right conditions—moist, organic-rich soil and dappled shade—they can become quite vigorous, eventually creating a beautiful, billowing "drift" of color.
- ⛅ The Light Balance: While they can handle full sun in cooler climates, they perform best in partial shade. Protection from the harsh afternoon sun is vital to prevent the delicate petals from wilting or scorching.
⚠️ Safety & Toxicity
- 🚫 Toxic if Ingested: Like most members of the Buttercup family (Ranunculaceae), all parts of the plant contain protoanemonin, which is poisonous to humans, cats, dogs, and horses if eaten.
- 🧤 Skin Sensitivity: The milky sap can cause "anemone dermatitis"—a mild skin rash or blistering—in sensitive individuals. It is recommended to wear gardening gloves when pruning or dividing the clumps.
✨ Fun Fact
The name Anemone is derived from the Greek word anemos, meaning "wind." According to ancient folklore, the wind sends the spirits of the forest to open the flowers, and once the wind stops blowing, the petals eventually fly away with it.

Detailed Care Instructions
| Humidity | Normal |
| Lighting | Part Sun |
| Toxicity | Poisonous |
| Difficulty | Easy |
| Hardiness Zones | 5 - 9 |
To grow Anemone Hupehensis plant, also known as Chinese or Japanese Anemone, follow these steps:
- Choose a suitable location: Select a spot in your garden that receives partial shade to full sun. Anemone Hupehensis prefers slightly acidic, well-drained soil.
- Prepare the soil: Before planting, ensure that the soil is loose and fertile. Add organic matter, like compost or well-rotted manure, to improve its nutrient content. Break up any clumps of soil to ensure good drainage.
- Planting: Dig a hole that is slightly larger than the root ball of the plant. Place the root ball in the hole, making sure it sits at the same level as it was in the pot. Backfill the hole with soil, firming it gently around the plant.
- Watering: After planting, water the Anemone Hupehensis thoroughly to settle the soil and ensure good root establishment. Keep the soil consistently moist but not waterlogged throughout the growing season.
- Mulching: Apply a layer of organic mulch, such as wood chips or shredded leaves, around the base of the plant. Mulching helps retain moisture, suppresses weed growth, and maintains a more even soil temperature.
- Maintenance: Regularly water the plants during dry periods, and remove weeds that may compete with the Anemone Hupehensis for nutrients. Apply a balanced fertilizer in early spring and again in late summer to encourage healthy growth.
- Pruning: Anemone Hupehensis tends to spread vigorously, so it's recommended to divide the plants every three to four years. To divide, dig up the clump carefully, separate the root sections, and replant them in desired areas.
- Pests and diseases: Anemone Hupehensis is relatively resistant to common pests and diseases. However, keep an eye out for aphids, slugs, and snails. Treat any infestations promptly to prevent widespread damage.
By following these guidelines, you can successfully grow Anemone Hupehensis plants in your garden and enjoy their beautiful flowers in late summer and fall.

Place in a bright room that is sun drenched almost all day. Or directly in a south-facing window.

The Anemone Hupehensis plant requires regular watering to thrive. However, it is important not to overwater the plant as it can lead to root rot. It is recommended to water the plant deeply once a week during the growing season. The best time to water the plant is in the morning or evening when the temperature is cooler. Avoid watering the leaves of the plant as it can increase the risk of fungal infections. If grown in pots, make sure the pot has drainage holes to prevent water from accumulating at the bottom. During the dormant season, reduce watering to once every two weeks. Monitor the soil moisture level by checking the top layer of soil before watering. If it feels dry to the touch, it's time to water the plant.
To fertilize this plant, use a balanced fertilizer with equal amounts of nitrogen, phosphorus, and potassium. Apply the fertilizer during the spring or early summer when the plant is actively growing. Use a slow-release fertilizer and apply it according to the instructions on the label. Avoid over-fertilizing, as this can cause damage to the plant. Water the plant after fertilizing to help the nutrients reach the roots.
It is recommended to use well-draining soil with a pH level between 6.0 and 7.0 for the Anemone Hupehensis plant. The soil should be rich in organic matter such as compost or well-rotted manure. Adding sand or perlite to the soil can improve drainage. The plant prefers moist soil but does not tolerate waterlogged conditions. It is important to avoid using heavy clay soils or soils with high salinity. Additionally, the plant prefers a location with partial shade to full sun exposure.
The process of propagating this plant involves taking stem cuttings from a mature plant. Select a healthy stem that is free of disease or damage, and make a clean cut just below a node. The cutting should be around 6 inches in length. Remove any leaves from the lower half of the stem.
Prepare a propagation medium of equal parts peat moss and perlite. Moisten the mixture and fill a small pot. Make a hole in the center of the pot with a pencil or stick.
Dip the cut end of the stem into rooting hormone, tapping off any excess powder. Insert the stem into the hole in the potting mix and firm the mix around the stem.
Cover the pot with a plastic bag to create a humid environment. Place the pot in a warm, bright location, away from direct sunlight.
Check the pot daily and mist the cutting and propagation medium to keep it moist. After 2-3 weeks, gently tug on the stem. If it resists, roots have developed and the cutting has successfully rooted. Gradually acclimate the new plant to lower humidity and bright, indirect light.
Transplant the new plant to a larger container once it has outgrown its original container. This plant can also be propagated by division in the spring, separating the rhizomes and replanting them in their own containers.
Common pests of the hubei anemone include Aphids, whiteflies. Make a habit of checking your hubei anemone frequently for pests so that any infestations can be caught and managed early.


