Plant Overview
Often called the Snowdrop Anemone, this woodland gem looks like a delicate spring secret captured in white petals. Native to the meadows and open forests of Central and Eastern Europe, it is beloved for its "nodding" habit, where the heavy flower heads lean gracefully like melting snowdrops. It bridges the gap between early spring bulbs and summer perennials with its ethereal, wild elegance.
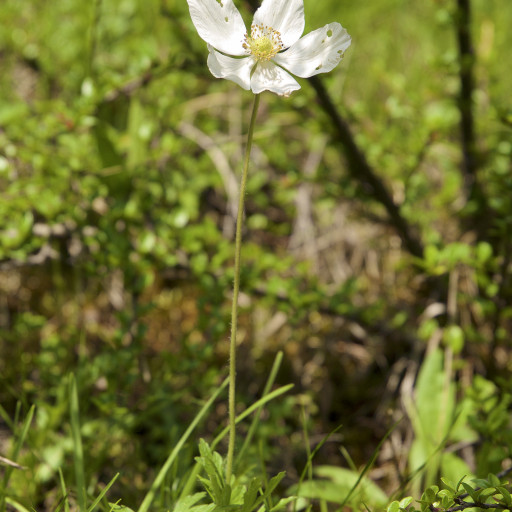
🔍 How to Identify
- 🌼 The Blooms: Pure white, bowl-shaped flowers roughly 2 inches wide. They feature a prominent cluster of bright yellow stamens in the center and often have a silky, slightly violet tint on the underside of the petals.
- 🍃 The Foliage: Deeply lobed, medium-green leaves that form a lush, mounded carpet. The leaves have a soft, matte texture compared to the shiny leaves of other garden anemones.
- ☁️ The Seed Heads: After the flowers fade, they transform into curious, white woolly seed clusters that look like tiny tufts of cotton or clouds stuck to the stems.
🏡 In Your Garden
- 🌱 The Wanderer: Unlike many fussy perennials, the Snowdrop Anemone spreads via underground runners (rhizomes). This makes it an excellent "living mulch" or groundcover for woodland gardens, though you should give it space where it won't overwhelm smaller, weaker neighbors.
- 🌥️ Light & Moisture: It thrives in the "dappled" light of a forest edge. While it loves moist soil, it is surprisingly drought-tolerant once established compared to its hybrid cousins, thanks to its deep-reaching root system.
⚠️ Safety & Toxicity
- 🐾 Status: Toxic to pets and humans.
- 🚫 Details: Like all members of the Buttercup (Ranunculaceae) family, it contains protoanemonin. Ingestion can cause mouth irritation, drooling, and digestive upset in dogs and cats. The sap can also cause mild skin irritation or "phytophotodermatitis" in sensitive individuals, so wearing gloves while pruning is a smart move.
✨ Fun Fact
The name Anemone comes from the Greek word "anemos," meaning wind. Ancient legends claimed that the Windflower would only open its petals when the spring winds blew upon them. In the case of Sylvestris, the wind also helps carry its fluffy, cotton-like seeds to new forest clearings!

Detailed Care Instructions
| Humidity | Normal |
| Lighting | Part Sun |
| Difficulty | Easy |
| Hibernation | Cold Period |
| Hardiness Zones | 3 - 8 |
To grow Anemone sylvestris (Snowdrop anemone), follow these steps:
- Choose a suitable planting location: Anemone sylvestris prefers partial shade to full sun, and well-draining soil. It can tolerate a range of soil types but prefers moist, fertile soil.
- Start with healthy plants: Purchase Anemone sylvestris plants from a reputable nursery or garden center. Look for plants with vibrant green leaves and no signs of pests or disease.
- Prepare the soil: Before planting, loosen the soil and remove any weeds or debris. Incorporate organic matter, such as compost, to improve soil fertility and drainage.
- Planting: Dig a hole that is slightly larger than the root ball of the plant. Place the plant in the hole, making sure the top of the root ball is level with the soil surface. Backfill the hole with soil and gently firm it around the plant.
- Watering: Provide adequate water to establish the plant. Keep the soil moist but not waterlogged. After the plant is established, water when the top inch of soil feels dry.
- Mulching: Apply a layer of organic mulch, such as straw or wood chips, around the base of the plant. Mulch helps conserve moisture, suppress weeds, and regulate soil temperature.
- Fertilizing: Anemone sylvestris typically does not require heavy fertilization. However, you can apply a balanced, slow-release fertilizer in spring to promote healthy growth. Follow the package instructions for application rates.
- Pruning: After the flowering period, you can deadhead the spent flowers to encourage the growth of new blooms and prevent self-seeding. Additionally, cut back the leaves and stems to ground level in late fall or early spring to promote new growth.
- Pest and disease control: Anemone sylvestris is relatively resistant to pests and diseases. However, keep an eye out for slugs and snails, which may feed on the foliage. You can protect the plants by using organic slug and snail bait or creating barriers around the plants.
- Propagation: Anemone sylvestris can be propagated through division. Dig up and separate the clumps in spring or early fall. Replant the divisions in well-prepared soil, ensuring they have enough space to grow and develop.
Remember to provide ongoing care, including regular watering, mulching, and occasional fertilization, to ensure the healthy growth of the Anemone sylvestris plant.

Place in a window with dappled sun or a spot in the middle of a room. Or directly in a window facing west or east.

Anemone Sylvestris is a flowering plant that requires regular watering for optimal growth and development. To water this plant, it is important to follow a few guidelines to ensure proper hydration:
1. Determine the soil moisture level: Before watering, check the soil moisture level by inserting your finger into the soil up to two inches deep. If the soil feels dry, it is time to water.
2. Water thoroughly: When watering, ensure that the water reaches the root zone of the plant. Use a watering can or a hose to water the soil around the base of the plant. Avoid getting water on the leaves and flowers as this can cause damage and disease.
3. Water at the right time: Watering should be done early in the morning or in the evening to reduce evaporation and allow the plant to absorb the water.
4. Avoid overwatering: Overwatering can lead to root rot and other diseases, so it is important to avoid watering too frequently or too much at one time. Allow the soil to dry out slightly between waterings.
5. Mulch the soil: Adding mulch around the base of the plant can help to retain moisture in the soil and reduce the need for watering.
By following these guidelines, you can keep your Anemone Sylvestris plant hydrated and healthy.
For optimal growth and flowering, fertilize the Anemone Sylvestris plant with a balanced fertilizer, such as a 10-10-10 or 15-15-15 formula, in early spring before the leaves emerge. Apply the fertilizer evenly around the base of the plant and water thoroughly to help nutrients penetrate the soil. Repeat the application every four to six weeks during the growing season, taking care not to over-fertilize, which can lead to excessive foliage growth at the expense of flowers. In late summer or fall, stop fertilizing to allow the plant to prepare for winter dormancy.
The ideal soil for the plant in question is a well-draining soil that is rich in organic matter. It prefers a soil pH that is slightly acidic to neutral. The soil should be moist but not waterlogged, as the plant does not tolerate standing water. Some gardeners prefer to mix a sandy soil with organic matter to increase drainage. It is also important to avoid planting in heavy, clay-like soil as it can lead to root rot and other plant diseases.
To propagate this particular plant, one can take stem cuttings either in the summer or early autumn. The cuttings should be around 10cm in length and include a few leaves. Remove the lower leaves and dip the cut end into rooting hormone powder. Plant the cutting into a small pot filled with a well-draining soil mix and water well. Keep the pot in a warm, bright location but out of direct sunlight. It should take 2-3 weeks for the cutting to root and begin to produce new growth. Once the new plant is established, it can be transplanted into a larger pot or directly into the garden.
Common pests of the snowdrop anemone include Aphids, whiteflies. Make a habit of checking your snowdrop anemone frequently for pests so that any infestations can be caught and managed early.


