Plant Overview
Often called the Strap-leaf Anthurium, Anthurium bakeri is a tropical showstopper prized more for its elegant, dangling silhouette and jewel-like berries than for its subtle flowers. Native to the rainforests of Central and South America, this plant is a true "epiphyte," meaning it naturally grows tucked into the crooks of trees rather than in the ground. It is the perfect choice for enthusiasts who want a sophisticated, pendulous look for a hanging basket or a tall pedestal.
🔍 How to Identify
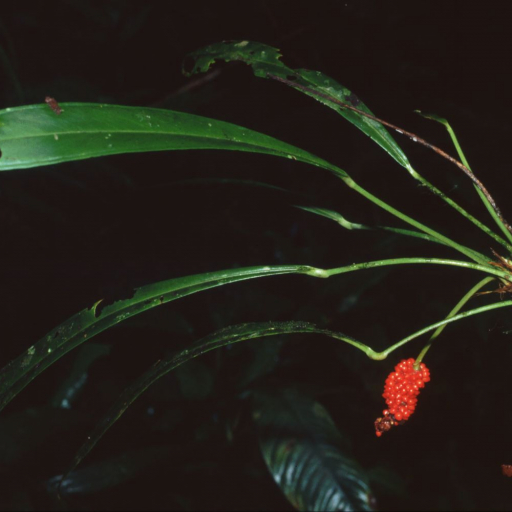
- 🌿 Foliage Shape: Long, narrow "strap" leaves that are leathery to the touch. They feature a prominent midrib and can grow over two feet in length while remaining quite slender.
- 🔴 The Berries: Its most striking feature! After flowering, the spadix transforms into a dense cluster of brilliant, ruby-red berries that persist for weeks.
- 📏 Growth Habit: This is a pendulous plant. As it matures, the heavy leaves and fruit spikes drape downward gracefully rather than standing upright.
🏡 In Your Indoor Garden
- ☁️ Humidity is Essential: Coming from the misty rainforest, it craves high humidity (60%+). In dry household air, the elegant leaf tips will quickly turn brown and crispy.
- 🪵 The "Airy" Secret: Because this plant grows on trees in the wild, it hates heavy potting soil. It thrives in a "chunky" mix of orchid bark, charcoal, and sphagnum moss which allows the roots to breathe and prevents rot.
- 💧 Watering Nuance: It prefers to stay consistently moist but never "wet." Think of a damp sponge; if you squeeze the soil and water pours out, it’s too heavy for these sensitive epiphytic roots.
⚠️ Safety & Toxicity
- 🚫 Toxic Status: Toxic to both humans and pets.
- 🐾 Irritant Details: Like most members of the Araceae family, it contains calcium oxalate crystals. If chewed or swallowed, it causes immediate mouth pain, swelling of the throat, and digestive distress. Keep it hanging high and out of reach of curious cats or toddlers.
✨ Fun Fact
Unlike many of its Anthurium cousins that require specific tropical insects for pollination, Anthurium bakeri is "self-fertile." This means a single plant can pollinate itself, which is why indoor growers are often surprised to see those iconic red berries appear without any help from bees or paintbrushes!

Detailed Care Instructions
To grow an Anthurium bakeri plant, follow these steps:
- Choose a suitable location: Anthurium bakeri prefers bright, indirect sunlight. Keep the plant in a spot where it receives bright, filtered light throughout the day. Avoid placing it in direct sunlight, as it can scorch the leaves.
- Provide the right temperature and humidity: Anthurium bakeri thrives in temperatures between 68-85°F (20-30°C). Maintain a consistently warm environment, and avoid exposing the plant to drafts or cold temperature fluctuations. Additionally, these plants prefer high humidity levels, so misting the leaves regularly or placing a humidifier nearby can help create a suitable environment.
- Select the appropriate potting mix: Anthurium bakeri prefers a well-draining, loose potting mix that holds some moisture. A mixture of peat moss, orchid bark, and perlite can work well for these plants.
- Planting the Anthurium bakeri: Select a pot with drainage holes to allow excess water to escape. Fill the pot with the prepared potting mix, and place the plant in the center. Gently pat down the soil around the base of the plant to ensure stability. Avoid burying the crown of the plant, as it can lead to rotting.
- Watering routine: Anthurium bakeri appreciates consistently moist soil, but overwatering can lead to root rot. Water the plant when the top inch of soil feels slightly dry. Water thoroughly until water drains out of the bottom of the pot. Empty any excess water from the saucer to prevent waterlogged roots.
- Fertilize regularly: Use a balanced, slow-release fertilizer or a water-soluble fertilizer formulated for flowering houseplants. Follow the instructions on the fertilizer packaging for the correct dosage and application frequency. Fertilize every two to four weeks during the growing season (spring and summer) and reduce or stop fertilizing during the dormant period (fall and winter).
- Prune as needed: Remove any yellow or wilted leaves and trim back leggy or overgrown stems to maintain a compact, healthy plant. Use clean, sterile pruning shears to prevent the spread of diseases.
- Propagation: Anthurium bakeri can be propagated by division or stem cuttings. To propagate by division, carefully separate the plant into smaller sections, making sure each division has roots attached. To propagate from stem cuttings, select a healthy stem and remove a 3-4 inch cutting just below a node. Remove any leaves on the lower half of the cutting and place it in a container with moist, well-draining soil. Provide warmth and indirect light until roots develop.
By following these steps, you should successfully grow an Anthurium bakeri plant.

Place in a window with dappled sun or a spot in the middle of a room. Or directly in a window facing west or east.

To properly water the Anthurium Bakeri plant, ensure that you follow these guidelines:
1. Observe the moisture level: Before watering, assess the moisture content of the soil. Insert your finger about an inch into the soil to check its dampness. Only proceed with watering if the top inch of soil feels dry to the touch.
2. Choose the right container: Select a container with drainage holes at the bottom to prevent waterlogging. This will allow excess water to escape, preventing root rot.
3. Watering method: Slowly pour water onto the soil until it starts to drain out from the bottom of the pot. Avoid wetting the leaves or flowers as this may cause damage or fungal issues. Try to distribute the water evenly across the pot to ensure all parts of the root system receive moisture.
4. Water quality: Anthurium plants prefer slightly acidic water with a pH range of 5.5 to 6.5. Consider using filtered or distilled water to avoid the potential adverse effects of tap water containing chlorine or other chemicals.
5. Frequency of watering: These plants thrive in a humid environment, so it is essential to maintain consistent moisture. Watering frequency largely depends on the specific conditions of your home, but typically watering every 1-2 weeks is sufficient. Ensure the top inch of soil is dry before re-watering.
6. Room for air circulation: Avoid overwatering the plant as it may lead to root rot or fungal diseases. It is crucial to provide proper air circulation around the plant's base and roots to assist in drying out the soil faster.
7. The foliage's shape as a guide: Observe the appearance of the Anthurium Bakeri's foliage. Wilted or drooping leaves may indicate underwatering, while yellowing or browning leaves might signify overwatering. Adjust your watering routine accordingly.
By following these guidelines, you can effectively water your Anthurium Bakeri plant, providing it with the appropriate moisture it needs for healthy growth.
Here are the fertilizing instructions for Anthurium Bakeri:
- Choose a balanced, water-soluble fertilizer specifically formulated for indoor plants.
- Dilute the fertilizer according to the instructions provided on the package.
- Water the Anthurium Bakeri thoroughly before applying fertilizer to prevent any potential root burn.
- Apply the diluted fertilizer to the soil around the base of the plant, avoiding direct contact with the leaves or flowers.
- Use a watering can or spray bottle to distribute the fertilizer evenly.
- Repeat this fertilizing process every four to six weeks during the plant's active growing season (typically spring and summer).
- During the plant's dormant period (usually fall and winter), reduce fertilizing frequency to every two to three months.
- Keep in mind the Anthurium Bakeri's overall health and growth rate to adjust the fertilizing frequency if necessary.
- Finally, always follow the package instructions and avoid over-fertilizing, as it can harm the plant.
Anthurium bakeri plant thrives in well-draining soil that is rich in organic matter. It prefers a slightly acidic to neutral pH level. The ideal soil for this plant should retain moisture while allowing excess water to drain away, as the roots are susceptible to rotting if exposed to soggy conditions. A mix that is composed of peat moss, perlite, and a small amount of organic compost or orchid bark is often recommended. This combination provides good aeration and drainage for the plant's roots while also retaining enough moisture for healthy growth. It is important to avoid using soils that are heavy or compacted, as they may lead to waterlogging and hinder the plant's overall health. Regularly inspecting the soil's moisture level and adjusting watering accordingly will help prevent over-watering, which can be detrimental to the Anthurium bakeri plant.
To propagate Anthurium Bakeri plant, follow these steps:
- Choose a healthy and mature Anthurium Bakeri plant for propagation purposes. Look for a plant that has a well-developed root system and several stems.
- Prepare a clean and sharp pair of pruning shears or a knife. It is essential to use sterilized cutting tools to prevent the transmission of diseases or infections to the plant.
- Identify a suitable stem on the Anthurium Bakeri plant for propagation. Look for a stem that is sturdy and has a few nodes or aerial roots. Nodes are the points on the stem where roots or leaves emerge.
- Make a clean and sharp cut just below a node, ensuring that the cutting is 4-6 inches in length. The length of the cutting may differ depending on personal preference or the availability of plant material.
- Remove any excess leaves from the lower part of the cutting, leaving a few leaves towards the top intact. This helps the cutting focus its energy on root development rather than sustaining excessive foliage.
- Dip the cut end of the Anthurium Bakeri cutting into a rooting hormone powder or gel. This step is optional but can increase the chances of successful rooting.
- Prepare a suitable planting medium or potting mix for the cutting. Opt for a well-draining mixture that retains some moisture but does not allow waterlogging. A mix of peat, perlite, and orchid bark is often recommended.
- Create a hole in the planting medium using a pencil or finger. Insert the cutting into the hole, burying it deep enough so that at least one node or aerial root is covered.
- Gently firm the soil around the Anthurium Bakeri cutting to ensure good contact and stability. Avoid compacting the soil excessively, as it can hinder the movement of water and air.
- Place the potted cutting in a warm and humid location with indirect or filtered light. Keep it away from direct sunlight or drafts, as they might damage the tender cutting.
- Mist the cutting and the surrounding environment regularly to maintain humidity. Alternatively, you can cover the cutting and its container with a clear plastic bag to create a mini greenhouse effect.
- Water the cutting only when the topsoil feels dry. Overwatering can lead to root rot, so it is crucial to find the right balance. Monitor the moisture levels by gently sticking a finger into the soil.
- Be patient, as Anthurium Bakeri cuttings can take several weeks or even months to develop roots. Once you see new growth or roots emerging from the cutting, it is an indication of successful propagation.
- After the cutting has established a healthy root system and a significant amount of new foliage, it can be transplanted into a larger pot or suitable growing location. Ensure the new environment provides the necessary light, temperature, and humidity levels for Anthurium Bakeri plants.
By following these steps, you can propagate Anthurium Bakeri plants and enjoy the beauty of these unique and visually appealing houseplants.
Common pests of the baker's anthurium include Mealybugs, spider mites, thrips. Make a habit of checking your baker's anthurium frequently for pests so that any infestations can be caught and managed early.


