Plant Overview
Known as the Velvet Cardboard Anthurium, this Mexican native is the ultimate "statement piece" for indoor jungles. Its dark, heart-shaped leaves look almost like they were crafted from expensive suede, topped with bright, geometric veins that glow against the deep green background. It’s a slow-growing aristocrat that rewards patient plant parents with some of the most dramatic foliage in the botanical world.
🔍 How to Identify
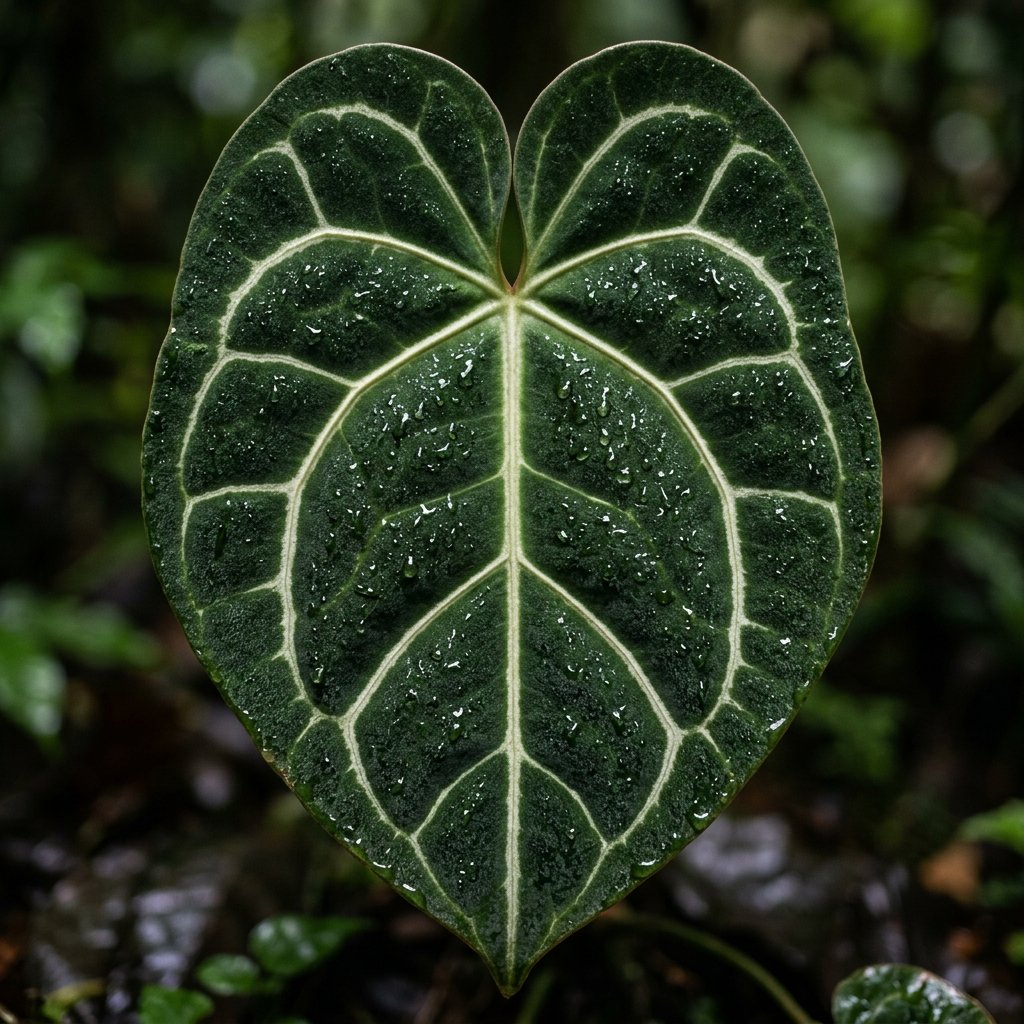
- 🍃 The Leaves: Large, deeply lobed heart-shaped (cordate) leaves that feel surprisingly stiff and leathery, much like a piece of thick cardboard.
- 🕸️ The Veining: Striking, bright white or silvery-green veins that create a high-contrast, spider-web pattern against the dark emerald surface.
- ✨ The Texture: A luxurious matte, velvety sheen that absorbs light, giving the plant a "deep" look compared to its glossy cousins.
🏡 In Your Garden
- 🪴 The Epiphytic Edge: In its natural Mexican habitat, this plant often grows on rocks or trees. Because of this, it hates dense, muddy soil. It requires a "chunky" potting mix (think orchid bark and perlite) to ensure its thick, fleshy roots can breathe.
- 🌡️ Humidity Hero: While it is hardier than other velvet-leaf Anthuriums, it thrives when humidity is kept above 60%. Without enough moisture in the air, you may notice the magnificent leaf tips turning brown and crispy.
- 🐢 Slow and Steady: This is not a fast-growing vine. It puts its energy into producing high-quality, long-lasting leaves, so don't be discouraged if you only see a few new leaves per year.
⚠️ Safety & Toxicity
- 🚫 Toxic Status: Highly toxic to cats, dogs, and humans if ingested.
- 🧪 The Details: The plant contains insoluble calcium oxalate crystals. If chewed, these crystals act like "tiny needles," causing immediate mouth pain, swelling of the throat, and digestive upset. It is best displayed on a high shelf or plant stand.
✨ Fun Fact
While most collectors grow it for the foliage, the Anthurium clarinervium produces a very unusual flower—a thin, brownish-purple spike (spadix)—that actually emits a faint, spicy scent similar to peppermint to attract specific pollinators!

Detailed Care Instructions
| Soil Ph | 5.5 To 6.5 (Slightly Acidic) |
| Humidity | High |
| Lighting | Part Sun |
| Toxicity | Poisonous |
| Soil Type | Coarse, Moist Potting Mix |
| Difficulty | Medium |
| Plant Type | Herbaceous Perennial |
| Mature Size | The Leaves Will Grow To About 6″ |
| Native Area | Central America, Northern South America, Caribbean |
| Temperature | 18°C - 25°C |
| Sun Exposure | Bright Indirect Light |
| Hardiness Zones | 11-12 |
To grow Anthurium clarinervium plant, you can follow the following steps:
- Choose the right location: Anthurium clarinervium prefers bright, indirect light. Place it in a location where it receives filtered sunlight or in a spot away from direct sunlight.
- Use well-draining soil: Use a well-draining potting mix that retains some moisture but does not hold water. You can use a mix of perlite, peat moss, and orchid bark.
- Choose the right container: Select a pot that has drainage holes at the bottom to prevent waterlogged soil. Anthurium clarinervium prefers to be slightly root-bound, so choose a pot that is just slightly larger than the current root ball.
- Watering: Water the plant when the top inch of soil feels dry. Anthurium clarinervium prefers to be kept slightly moist but not soggy. Avoid overwatering, as it can lead to root rot.
- Humidity: Anthurium clarinervium requires high humidity. You can increase humidity by misting the leaves regularly or placing a tray of water near the plant. Alternatively, you can use a humidifier.
- Temperature: Anthurium clarinervium prefers temperatures between 60-85°F (15-29°C). Avoid exposing the plant to temperatures below 60°F (15°C), as it can cause the leaves to yellow and hinder growth.
- Fertilizing: Use a balanced houseplant fertilizer diluted to half strength during the growing season (spring and summer). Fertilize every 4-6 weeks. Do not fertilize during winter.
- Pruning: Remove any yellow, damaged, or dead leaves regularly. Anthurium clarinervium can also benefit from occasional pruning to maintain its shape and promote new growth.
- Propagation: Anthurium clarinervium can be propagated through stem cuttings or division. Use a sterile, sharp knife or shears to take a cutting with at least two leaves and a stem. Place the cutting in a moist potting mix and cover it with a plastic bag to create a greenhouse effect. After a few weeks, roots will start to form, and you can transplant it to its own pot.
By following these steps, you can successfully grow and care for Anthurium clarinervium plant.

Place in a window with dappled sun or a spot in the middle of a room. Or directly in a window facing west or east.

To water this plant, you should first check the soil moisture level by sticking your finger about an inch into the soil. If the top inch of soil feels dry, it's time to water. Fill a watering can with room temperature water and slowly pour it over the soil until excess water starts to drain out of the bottom of the pot. Do not let the plant sit in standing water as this can lead to root rot. Allow the soil to drain completely before placing the pot back in its saucer. It's important to note that this plant prefers moist soil, but does not tolerate wet feet, so be careful not to overwater. The frequency of watering will depend on factors such as humidity levels, temperature, and the size of the pot and plant.
To fertilize this plant, use a balanced fertilizer with equal amounts of nitrogen, phosphorus, and potassium. Dilute the fertilizer to half strength and apply every 2-3 weeks during the growing season (spring and summer). During the dormant season (fall and winter), decrease fertilization to once per month. Do not over-fertilize as this can cause leaf burn and harm the plant.
Anthurium Clarinervium requires a well-draining soil mix that is rich in organic matter. It is recommended to use a mixture of peat moss, perlite, and small pieces of bark, which will provide good aeration and drainage while retaining moisture. The soil pH should be slightly acidic, ranging from 5.5 to 6.5. It is important to avoid heavy, compacted soils as they can lead to root rot and other issues. Adding a slow-release fertilizer to the soil mix can also help provide the necessary nutrients for healthy growth.
To propagate this plant, you will need to carefully select a mature and healthy parent plant from which to take a cutting. Use a sharp and sterilized cutting tool to take a section of the stem with at least one node. Remove any excess leaves from the cutting, leaving only one or two leaves at the top.
Prepare a pot of good quality soil that will hold moisture and provide adequate drainage. Create a small hole in the soil using your finger or a pencil and gently place the cutting into the hole. Cover the stem with soil, leaving the leaves exposed.
Water the soil thoroughly and place the pot in a warm, humid location with bright, indirect light. Keep the soil moist but not waterlogged, and mist the leaves regularly to maintain a humid environment.
Within a few weeks, the cutting should begin to root and produce new growth. Once the roots are well established, you can transplant the new plant to a larger pot with fresh soil and continue to care for it as you would a mature plant.
Common pests of the velvet cardboard anthurium include Mealybugs, spider mites, thrips. Make a habit of checking your velvet cardboard anthurium frequently for pests so that any infestations can be caught and managed early.


