Plant Overview
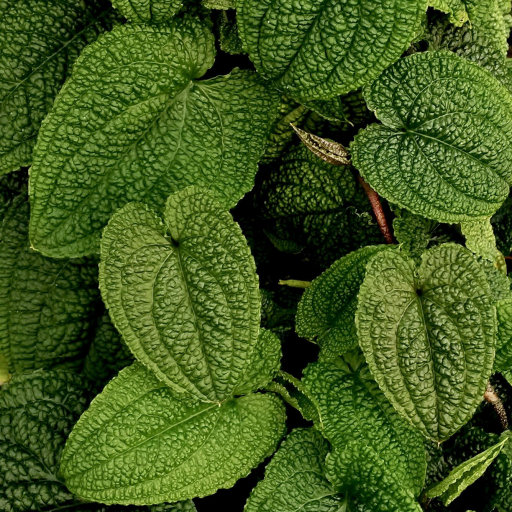
Often called the Crinkle Leaf Anthurium, this botanical treasure looks like a prehistoric relic or a fossil come to life. Originating from the humid lowland rainforests of Costa Rica and Panama, Anthurium clidemioides is a showstopper for collectors who love deep textures. Unlike the glossy, heart-shaped leaves many associate with this genus, this plant offers a rugged, matte, and deeply quilted appearance that stands out in any indoor jungle.
🔍 How to Identify
- 🍃 Bullate Texture: The most striking feature is its "bullate" leaves—meaning they are deeply puckered or blistered between the veins, giving them a heavy, 3D crinkled look.
- 🧗 Scandent Growth: Unlike many Anthuriums that grow in a rosette, this species is a climber (scandent). It has long internodes and will naturally seek a vertical surface to scale.
- 🟢 Matte Finish: The leaves lack the waxy sheen of common houseplants, featuring a velvety, deep forest-green matte finish that absorbs light beautifully.
🏡 In Your Garden
- ☁️ Humidity is Non-Negotiable: Because of its thin, highly textured leaves, this plant is prone to browning if the air is too dry. It thrives in high-humidity environments (70%+) and is a perfect candidate for a large terrarium or a dedicated plant room.
- 🪵 The Moss Pole Advantage: In the wild, it grows up tree trunks. Providing a moss pole or a cedar plank isn't just for aesthetics; it allows the plant to root into the support, which leads to larger leaves and a much healthier growth habit.
⚠️ Safety & Toxicity
- 🚫 Status: Toxic to humans and pets.
- 🐈 Details: Like all members of the Araceae family, it contains insoluble calcium oxalate crystals. If chewed or ingested, it can cause immediate mouth irritation, swelling of the throat, and digestive distress. Keep it on a high shelf away from curious cats or toddlers.
✨ Fun Fact
The name clidemioides is actually a tribute to another plant! It was named because its leaves bear a striking resemblance to the genus Clidemia (in the Melastomataceae family), making it a master of botanical mimicry in the rainforest understory.

Detailed Care Instructions
To successfully grow an Anthurium Clidemioides plant, you can follow these steps:
- Choose a suitable location: Anthurium Clidemioides prefers bright indirect light. Place the plant in a spot that receives filtered sunlight or in a room with bright but indirect light.
- Select the right pot: Use a well-draining pot with drainage holes to prevent waterlogging. Anthurium Clidemioides prefers a slightly acidic soil mix, so choose a soil that retains moisture but does not become waterlogged.
- Watering: Water the plant when the top inch of soil feels dry. Avoid over-watering or letting the plant sit in water, as this can lead to root rot. Anthurium Clidemioides prefers moderate humidity, so misting the leaves occasionally or placing a tray of water nearby can help maintain the desired humidity level.
- Temperature: Anthurium Clidemioides thrives in a warm environment with temperatures between 65-85°F (18-29°C). Keep the plant away from drafts and sudden temperature changes.
- Fertilizing: Apply a balanced liquid fertilizer once every 2-4 weeks during the growing season (spring and summer). Follow the package instructions for the dosage. Avoid over-fertilizing, as it can burn the plant's roots.
- Pruning: Remove yellow or damaged leaves regularly to maintain the plant's health and appearance. You can also prune leggy stems to promote bushier growth.
- Propagation: Anthurium Clidemioides can be propagated through division or stem cuttings. To divide, carefully separate the plant into smaller clumps, ensuring each clump has roots attached. For stem cuttings, take a healthy stem section with a node, remove any leaves from the lower portion, and place it in a well-draining soil mix. Keep the cuttings moist until roots develop.
- Pests and diseases: Watch for common houseplant pests like mealybugs, aphids, and spider mites. Treat any infestations promptly with organic insecticides or insecticidal soap. Ensure good airflow around the plant to prevent fungal diseases.
By following these guidelines, you should be able to successfully grow Anthurium Clidemioides and enjoy its beautiful foliage and flowers.

Place in a window with dappled sun or a spot in the middle of a room. Or directly in a window facing west or east.

Anthurium Clidemioides plants should be watered regularly, but not overly saturated. Before watering, always check the moisture level of the soil by inserting your finger into the soil up to the first knuckle. If the soil feels dry, it is time to water the plant.
When watering, use room temperature water and pour it slowly into the soil, avoiding splashing water onto the leaves or flowers. Water until it starts to drain out of the bottom of the pot, but be sure to empty any excess water from the saucer underneath the pot.
It is important not to let the Anthurium Clidemioides plant sit in standing water as this can lead to root rot. Allow the soil to partially dry out between waterings, but do not let it become completely dry.
In addition to watering, misting the leaves with a spray bottle can help to improve humidity levels, which is important for the plant's overall health and growth.
To fertilize your plant, use a balanced fertilizer with a 10-10-10 NPK ratio. Dilute the fertilizer to half strength and apply it to the plant's soil once a month during the spring and summer growing season. During the fall and winter, reduce fertilizing to once every two months. Be sure to water the plant before fertilizing to avoid root burning.
Anthurium Clidemioides plant prefers soil that is well-draining and rich in organic matter. It likes soil that is slightly acidic with a pH between 5.5 and 6.5. A good soil mix for this plant would incorporate perlite, peat moss, and sphagnum moss to promote moisture retention while also allowing drainage. Avoid using heavy clay soils as they do not provide adequate drainage. Adding compost or organic fertilizers to the soil can provide additional nutrients for the plant. It is important to maintain the soil moisture without causing waterlogging, which can lead to root rot.
Anthurium Clidemioides is a plant species that can be propagated through stem-cutting. To do this, choose a healthy stem with at least one node and a few leaves. Cut the stem at an angle of 45 degrees using a sharp and sterilized knife.
Remove the lowest leaves and dip the cut end of the stem in rooting hormone powder or gel. Then, place the stem in a pot with well-draining soil and water it thoroughly. Cover the pot with a clear plastic bag to retain moisture and create a humid environment.
Keep the pot in a warm, bright location but out of direct sunlight. Mist the soil and the leaves regularly to maintain humidity levels. After a few weeks, new growth should appear, indicating successful rooting. At this point, remove the plastic bag and continue to care for the new plant as you would normally.
Common pests of the tomato anthurium include Mealybugs, spider mites, thrips. Make a habit of checking your tomato anthurium frequently for pests so that any infestations can be caught and managed early.


