Plant Overview
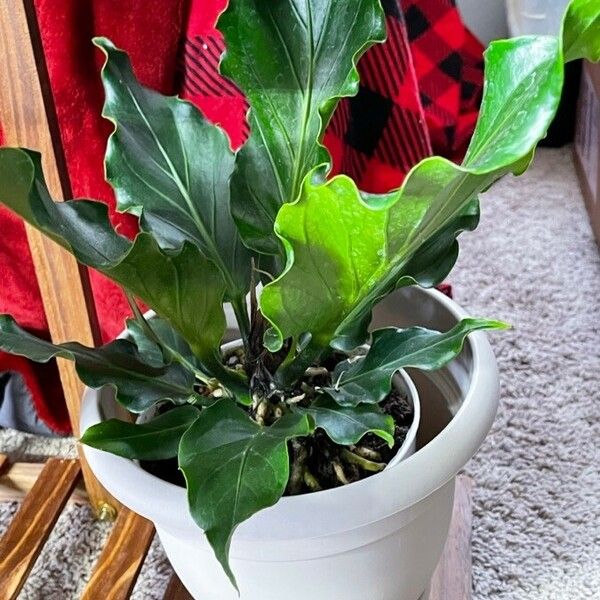
Often called the "Bird’s Nest Anthurium," this architectural giant is a true showstopper hailing from the tropical dry forests of South America. Unlike its cousins that sport delicate, velvet leaves, the Anthurium plowmanii is a rugged survivor with leathery, ruffled foliage that looks more like a prehistoric relic than a common houseplant.
🔍 How to Identify
- 🍃 Ruffled Edges: The most striking feature is the "crenulated" or wavy leaf margins, which give the plant a dramatic, rippled silhouette.
- 🪵 Leathery Texture: The leaves are incredibly thick and "coriaceous" (leathery), a specialized adaptation that helps the plant survive in environments with fluctuating humidity.
- 🦅 Rosette Growth: It follows a "Bird's Nest" growth habit, where leaves radiate upward and outward from a central base, creating a structural, bowl-like shape.
🏡 In Your Garden
- 🪴 The "Chunky" Secret: While it looks like a typical potted plant, it behaves like an epiphyte. It thrives best in a "trash-basket" soil mix—think orchid bark, perlite, and charcoal—to ensure the roots are never suffocated by heavy, wet dirt.
- 🌤️ Light & Resilience: This species is significantly more sun-tolerant and drought-resistant than its thin-leaved relatives. It can handle brighter spots and won't wilt the moment you forget to water it, making it a perfect "entry-level" exotic.
⚠️ Safety & Toxicity
- 🚫 Toxic if Ingested: Like all members of the Araceae family, this plant contains insoluble calcium oxalate crystals which act like tiny needles.
- 🐾 Pets & Kids: If chewed, it causes immediate oral pain, drooling, and swelling of the throat. It is best placed on a sturdy plant stand out of reach of curious nibblers.
✨ Fun Fact
In the wild, the Anthurium plowmanii uses its "bird's nest" shape as a literal garbage collector. It traps falling leaves and forest debris within its center; as this organic matter decays, it provides the plant with a constant source of nutrients, even when growing high up in a tree!

Detailed Care Instructions
| Humidity | Normal |
| Lighting | Part Sun |
| Difficulty | Medium |
| Temperature | 21°C - 32°C |
| Hardiness Zones | 10 - 11 |
To grow an Anthurium plowmanii plant, follow these steps:
- Choose the right location: Anthurium plowmanii thrives in bright, indirect light. Place the plant near a north or east-facing window where it can receive filtered sunlight. Avoid direct sunlight as it can scorch the leaves.
- Provide the ideal temperature and humidity: Anthurium plowmanii prefers temperatures between 60-80°F (15-27°C). Maintain a humidity level of 60-80%. You can increase the humidity by placing the plant on a tray filled with pebbles and water or using a humidifier.
- Use well-draining soil: Use a well-draining potting mix rich in organic matter. A mix of peat moss, perlite, and orchid bark works well for Anthurium plowmanii.
- Watering: Water the plant thoroughly when the top inch of soil feels dry. Anthurium plowmanii prefers slightly moist soil but does not tolerate sitting in water. Overwatering can lead to root rot. Avoid letting the plant completely dry out between waterings.
- Fertilization: Fertilize the plant once a month during the growing season (spring and summer) using a balanced, water-soluble fertilizer. Dilute the fertilizer to half the recommended strength. Avoid fertilizing during the winter months.
- Pruning and grooming: Prune any yellow or dead leaves to maintain the overall health and appearance of the plant. Grooming involves wiping the leaves with a soft, damp cloth to remove dust and maintain their glossy appearance.
- Repotting: Anthurium plowmanii prefers to be slightly root-bound, so repotting is not required frequently. Repot only when the plant has outgrown its current container, typically every 2-3 years. Use a pot that is slightly larger and has drainage holes.
- Pest control: Check the plant regularly for pests like aphids, mealybugs, and spider mites. If an infestation occurs, treat the plant with an appropriate insecticidal soap or neem oil.
Remember, Anthurium plowmanii is toxic to both humans and pets, so keep it out of reach of children and animals.

Place in a window with dappled sun or a spot in the middle of a room. Or directly in a window facing west or east.

Anthurium Plowmanii is a plant that requires specific watering techniques to thrive. To water this plant properly, you should first ensure that the soil is completely dry between waterings. This plant prefers to be watered using a bottom watering method, where water is applied to the base of the pot and allowed to soak up into the soil. This helps prevent overwatering and promotes healthy root growth.
When watering Anthurium Plowmanii, it is important to use room temperature water and avoid using chlorinated water, as this can damage the plant. You should also avoid allowing water to sit in the tray beneath the pot for an extended period of time, as this can lead to root rot.
Overall, Anthurium Plowmanii is a relatively low-maintenance plant when it comes to watering. By following these simple guidelines, you can help ensure that your plant remains healthy and happy for years to come.
- Choose a well-draining potting mix: Anthurium Plowmanii plants prefer a well-draining soil mix. Use a high-quality potting mix that contains components like perlite or vermiculite to improve drainage.
- Select a suitable pot: Ensure the pot has drainage holes at the bottom to prevent waterlogging. Anthurium Plowmanii plants typically thrive in slightly smaller pots, so choose one that accommodates the size of the plant without being too large.
- Watering routine: Water the plant thoroughly, allowing the excess water to drain out from the pot. Anthurium Plowmanii plants prefer moist but not overly soggy soil. Water the plant when the top inch of soil feels slightly dry to the touch.
- Fertilize regularly: Feed your Anthurium Plowmanii plant with a balanced liquid fertilizer that is diluted to half the recommended strength. Apply the fertilizer every two to four weeks during the growing season (spring and summer). Reduce fertilization frequency to once every two months during the dormant season (fall and winter).
- Avoid over-fertilization: Anthurium Plowmanii plants are sensitive to excess fertilizer, which can lead to salt buildup in the soil. If you notice burnt tips or leaf discoloration, reduce the frequency or strength of the fertilizer solution.
- Consider using organic fertilizers: If you prefer organic options, you can use a slow-release organic fertilizer or compost as a top dressing to provide essential nutrients gradually.
- Maintain appropriate lighting: Anthurium Plowmanii plants thrive in bright, indirect light. Place the plant near a window with filtered sunlight or provide artificial grow lights if natural light is limited.
- Monitor humidity levels: Anthurium Plowmanii plants prefer higher humidity levels. If the air in your home is dry, consider using a humidifier or placing the pot on a tray filled with water and pebbles to elevate humidity levels around the plant.
- Pruning and cleaning: Regularly inspect your Anthurium Plowmanii plant for any dead, damaged, or yellowing leaves. Prune these off at their base to maintain the plant's overall health. Additionally, gently wipe the leaves with a damp cloth to remove dust and improve their appearance.
- Propagation: If desired, propagate new Anthurium Plowmanii plants through stem cuttings. Take a healthy stem cutting with a few leaves attached and place it in a moist potting mix. Ensure the cutting receives indirect light and maintain consistent moisture until roots develop.
Anthurium Plowmanii plant requires well-draining soil that is rich in organic matter. The soil should have a pH between 5.5 and 6.5. It is important to use a soil mix that provides good aeration and drainage to prevent waterlogging and root rot. The soil mix can be a combination of peat moss, perlite, and coarse sand. Adding in some pine bark can also help to improve drainage. It is important to ensure that the soil is moist but not waterlogged, as Anthurium Plowmanii plants do not tolerate soggy soil.
To propagate Anthurium plowmanii, follow these steps:
- Start by selecting a healthy parent plant with mature leaves. This will ensure successful propagation.
- Prepare a clean work surface and gather the necessary tools, including a sharp and sterilized knife or shears, rooting hormone (optional), well-draining potting mix, a small pot or container, and clear plastic or a propagation bag.
- Fill the pot or container with well-draining potting mix. Anthurium plowmanii prefer a mix rich in organic matter such as peat moss or coconut coir.
- Identify a suitable stem or leaf node on the parent plant. Nodes typically appear as small bumps or indentations on the stem or at the base of the leaf.
- Using the sterilized knife or shears, carefully make a clean cut just below the chosen node. Ensure the cutting is at least 2-3 inches (5-7.5 cm) in length and that it includes one or two nodes.
- If desired, gently dip the cut end of the cutting into rooting hormone powder. This can improve the chances of successful root development, although it is not necessary for Anthurium plowmanii propagation.
- Make a small hole in the prepared potting mix using a pencil or finger. Insert the cutting into the hole, ensuring that at least one node is buried beneath the surface.
- Firmly press the potting mix around the base of the cutting to provide stability and promote proper contact between the cutting and the soil.
- Mist the cutting and the surrounding soil with water, ensuring the potting mix is evenly moist. Avoid overwatering, as this can lead to rotting.
- Cover the pot or container with clear plastic or use a propagation bag to create a humid environment. This will help retain moisture and boost the chances of successful propagation.
- Place the container in a warm, brightly lit location, but away from direct sunlight. Anthurium plowmanii prefer indirect light during the propagation process.
- Check the cutting regularly for signs of new growth and root development. This may take several weeks to a couple of months, so be patient.
- Once the cutting has developed several new leaves and a well-established root system, it can be slowly acclimated to more direct light and eventually transplanted into a larger pot with standard Anthurium care guidelines.
Remember, propagating plants can be a delicate process, and success may vary. However, with proper care and attention to detail, you can increase your chances of successfully propagating Anthurium plowmanii and enjoy the beauty of this unique plant.
Common pests of the bird's nest anthurium include Mealybugs, spider mites, thrips. Make a habit of checking your bird's nest anthurium frequently for pests so that any infestations can be caught and managed early.


