Plant Overview
Often called Sea Celery or Prostrate Celery, this hardy coastal survivor is the wild, salty cousin of the celery you find in the grocery store. Native to the coastlines of Australia, New Zealand, and South America, it was famously used by early explorers like Captain Cook to keep scurvy at bay. It is a rugged beauty that brings a lush, green carpet to salty, windswept environments where other plants would wither.
🔍 How to Identify
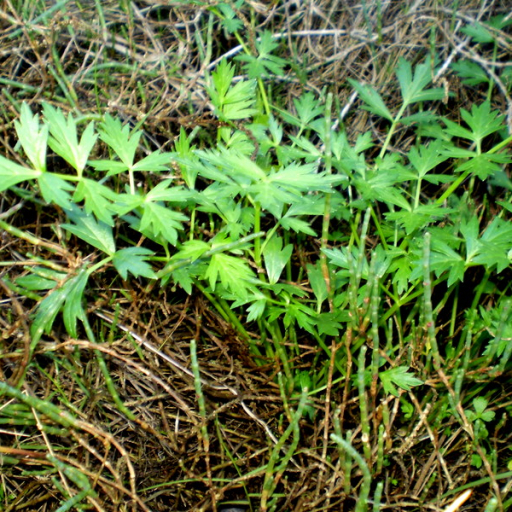
- 🌿 Folliage: The leaves are glossy, dark green, and deeply divided into leaflets, looking remarkably like miniature versions of garden celery.
- 🌱 Growth Habit: True to its name "prostratum," it grows low to the ground, spreading out in a creeping mat rather than growing tall and upright.
- 🌸 Flowers: It produces tiny, creamy-white flowers arranged in "umbels" (flat-topped clusters) that appear like delicate lace scattered across the foliage.
🏡 In Your Garden
- 🌊 Coastal Specialist: This plant is an absolute champion for seaside gardens because it thrives on salt spray and can handle intense coastal winds that would shred more delicate leaves.
- 💧 Moisture Balance: While it loves a bit of lime and sandy soil, it prefers to keep its "feet" slightly damp; in a garden setting, it works beautifully near ponds or in rockeries with consistent moisture.
- 🥗 Culinary Use: It can be used as a garnish or herb, offering a flavor that is much more intense, peppery, and salty than commercial celery.
⚠️ Safety & Toxicity
- ✅ Status: Generally considered edible and safe for human consumption in small amounts as a culinary herb.
- 🚫 The Deadly Double: WARNING: If foraging in the wild, you must be extremely careful. Sea Celery belongs to the Apiaceae family, which includes the Deadly Hemlock. Hemlock has purple splotches on its stem and a repulsive smell, whereas Sea Celery smells like fresh parsley or celery.
- 🐾 Pets: While not listed as highly toxic to pets, the high essential oil content in wild celery can cause stomach upset in cats or dogs if consumed in large quantities.
✨ Fun Fact
Captain Cook’s crew didn't just stumble upon this plant; they actively harvested bags of it during their stops in New Zealand and Australia. By boiling it into stews and salads, they managed to stay healthy and vitamin-C-rich during their long voyages across the Pacific!

Detailed Care Instructions
To grow an Apium Prostratum plant (also known as Water Celery or Australian Water Parsley), follow these steps:
- Choose a suitable location: Apium Prostratum thrives in moist, well-draining soil and requires full sun to partial shade. Select a spot in your garden that receives around 4-6 hours of direct sunlight per day.
- Sow the seeds: Start by sowing the seeds indoors during early spring or sow directly in the garden after the last frost. The seeds are small and should be sprinkled lightly over the soil surface. Gently press them into the soil but avoid covering them too deeply. Maintain a spacing of about 6-8 inches between each seed.
- Watering and moisture: Apium Prostratum plants love water and require consistently moist soil. Water them regularly, especially during dry spells or hot weather. Ensure the soil doesn't dry out completely, but avoid overwatering, as excessive moisture can lead to root rot.
- Fertilization: Apply a balanced, slow-release fertilizer to the soil before planting or use a water-soluble fertilizer monthly during the growing season to provide necessary nutrients. Follow the instructions on the fertilizer packaging for appropriate dosage.
- Weeding and pest control: Regularly check for weeds around the plants and promptly remove them to prevent competition for nutrients and space. Monitor for common garden pests like aphids, slugs, or snails and take appropriate measures to control them if necessary.
- Harvesting: Once mature, Apium Prostratum can be harvested by cutting off the outer leaves or branches as needed. This plant is known for its edible leaves and stems which have a celery-like flavor. Regular harvesting stimulates further growth and ensures a continuous supply.
- Pruning: Trim back any excessive growth or to maintain a desired shape. Pruning also prevents the plants from becoming overly bushy and encourages fresh growth.
- Winter care (for colder climates): In areas with harsh winters, Apium Prostratum may not be winter hardy. If you want to preserve the plants, either move them indoors to a container with adequate sunlight or harvest the healthy leaves and stems before frost arrives.
By following these guidelines, you can successfully grow Apium Prostratum plants. Remember to adapt the care instructions based on your specific climate, as growing conditions may vary.

Place in a bright room that is sun drenched almost all day. Or directly in a south-facing window.

The Apium Prostratum plant should be watered regularly but not excessively. It is important to keep the soil moist but not saturated, as this can cause root rot and harm the plant. When watering, make sure to water the soil around the base of the plant rather than directly on the leaves. This will help prevent fungal diseases and other issues. The plant may require more frequent watering during hot and dry weather, but be sure to monitor the soil moisture level and adjust accordingly. It is also important to avoid getting water on any flowers or developing seed heads, as this can cause them to rot.
To fertilize this plant, use a balanced fertilizer that contains equal amounts of nitrogen, phosphorus, and potassium. Apply the fertilizer every two weeks during the growing season, starting in early spring and ending in late summer. Mix the fertilizer according to the label instructions and apply it evenly around the base of the plant, avoiding direct contact with the foliage. Water the plant thoroughly after fertilizing to distribute the nutrients evenly in the soil. Avoid over-fertilizing as this can lead to leaf burn and damage to the plant's roots.
The ideal soil for Apium Prostratum plant should be rich in nutrients and well-draining. It should contain a balanced mix of sand, silt, and clay particles to provide good drainage and aeration while retaining enough moisture for the plant's root system to develop properly. Additionally, adding organic matter such as compost or leaf litter to the soil mix will help to provide valuable nutrients and promote healthy microbial activity. The soil should be slightly acidic with a pH range of 6.0 to 7.0. Overall, the soil used for Apium Prostratum plant should provide a fertile growing environment that supports vigorous growth and development.
To propagate this plant, you will need to find a healthy and mature stem. Cut the stem into several sections, making sure each cutting has at least one node. Remove any leaves or flowers from the bottom half of each cutting.
Once you have your cuttings prepared, fill a small pot with well-draining soil and water it thoroughly. Dip the bottom of each cutting in rooting hormone, then insert it into the potting soil.
Cover the pot with a clear plastic bag or plastic wrap to create a humid environment. Place the pot in a bright but indirect light location and keep the soil moist but not waterlogged.
After a few weeks, check for signs of new growth such as sprouting leaves or root development. Once the cuttings have established roots and new growth, you can remove the plastic cover and gradually expose the plant to more light.
Continue to care for the plant as you normally would, which includes regular watering, fertilization and pruning, to encourage healthy growth.


