Plant Overview
The Broadleaf Arnica, often called the "Mountain Tobacco" or "Daffodil Arnica," is a golden gem of the high-altitude wilderness. Native to the damp, subalpine meadows of western North America, it acts as a vibrant indicator of pristine mountain ecosystems. Historically, while it looks like a friendly daisy, it has been both revered and feared in herbal folklore for its potent chemical properties.
🔍 How to Identify
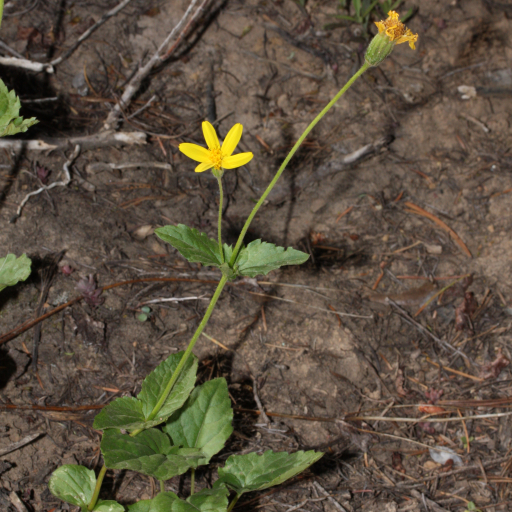
- 🌼 The Blooms: Features bright yellow, daisy-like flower heads that usually appear singly or in small clusters. The petals (ray florets) are notched at the tips, giving them a slightly ragged, rustic charm.
- 🍃 The Leaves: True to its name, the "Broadleaf" variety has wide, heart-shaped (cordate) leaves. They grow in opposite pairs along the stem, often with a slightly fuzzy texture and distinct serrated edges.
- 📏 The Stature: Unlike some sprawling wildflowers, this plant stands upright, usually reaching between 8 to 24 inches. Its stems are often tinged with a reddish hue near the base.
🏡 In Your Garden
- 💧 The Moisture Connection: This plant is a "hydrophile" at heart. In a garden setting, it thrives near water features or in spots that mimic a mountain seep. It cannot tolerate drying out completely, as its shallow root system expects the consistent dampness of melting snow or forest springs.
- ⛰️ Cool Roots, Sun-Kissed Tops: Broadleaf Arnica struggles in sweltering lowland heat. To keep it happy, use a heavy organic mulch to keep the soil temperature low while allowing the foliage to soak up the morning sun. It is a slow-grower that prefers "settling in" rather than being moved frequently.
⚠️ Safety & Toxicity
- 🚫 Status: Toxic if ingested. While Arnica is a famous name in the world of homeopathic salves, the raw plant contains helenalin, which can cause severe gastrointestinal distress and heart irregularities if eaten.
- 🐾 Pets & Kids: Keep this plant away from curious nibblers. Ingestion by dogs, cats, or children can lead to vomiting and dizziness.
- 🧴 Skin Sensitivity: Some people experience "contact dermatitis" (a red, itchy rash) just from handling the leaves or stems without gloves.
✨ Fun Fact
In many mountain cultures, Arnica was nicknamed "The Mountain Healer." While it is dangerous to eat, crushed leaves were historically used by mountaineers as a topical poultice to treat bruises and sore muscles after a long trek—a tradition that led to the modern Arnica gels we see in pharmacies today!

Detailed Care Instructions
To grow Arnica Latifolia, also known as broadleaf arnica, you can follow these steps:
- Choose the right location: Arnica Latifolia prefers moist, well-drained soil and partial shade. Select a spot in your garden or your desired planting area that meets these requirements.
- Prepare the soil: Remove any weeds or debris from the planting area. Loosen the soil with a garden fork or tiller and mix in organic matter such as compost or well-rotted manure to improve the soil's fertility and drainage.
- Purchase or collect seeds: Arnica Latifolia can be grown from seeds. Purchase seeds from a reputable nursery or collect them from existing plants if available. Collecting seeds typically involves waiting for the plant to flower and develop seed heads, then carefully collecting and drying the seeds.
- Sow the seeds: Sow the Arnica Latifolia seeds in early spring to late summer. Scatter the seeds lightly on the soil surface, then lightly press them into the soil or cover them with a thin layer of vermiculite or fine soil. Water gently after sowing.
- Watering and care: Keep the soil moist but not waterlogged to ensure successful germination. Once the seedlings emerge, water regularly and ensure the soil remains consistently moist. Mulching around the plants can help retain moisture and suppress weed growth.
- Thin out seedlings: If the seedlings are too crowded, thin them out to provide adequate space for each plant to grow. The ideal spacing is typically around 10-12 inches apart.
- Protect from extreme cold: Arnica Latifolia is a hardy perennial. However, if you live in an area with severe winters, you may want to provide some protection by mulching the plants or covering them with burlap during the coldest months.
- Pruning and fertilizing: Arnica Latifolia does not require extensive pruning. However, you can remove any dead or damaged stems to maintain the plant's health and appearance. Fertilization is generally not necessary unless your soil is particularly poor. In that case, you can apply a balanced, slow-release fertilizer in early spring.
- Enjoy the blooms: Arnica Latifolia typically blooms from summer to early fall, producing bright yellow flowers. Once established, the plant should continue to grow and bloom for several years.
Remember to check your local regulations before collecting seeds from wild populations, as some areas may have restrictions on plant harvesting.

Place in a bright room that is sun drenched almost all day. Or directly in a south-facing window.

Watering the plant requires moistening the soil around the roots without creating waterlogged conditions. Allow the soil to dry out slightly between watering sessions. Use a watering can or a hose with a gentle spray to avoid damaging the plant, and water it thoroughly until water emerges from the drainage holes. Check the soil moisture level frequently to avoid over or under watering. Avoid splashing water on the leaves, as this can cause leaf spots and fungal diseases. Watering schedules depend on various factors like humidity, temperature, type of soil and pot size.
To fertilize this plant, use a balanced all-purpose fertilizer with equal amounts of nitrogen, phosphorous, and potassium. Apply the fertilizer during the growing season, every two weeks, in a dilution of 1 tablespoon per gallon of water. Avoid over-fertilization as it can damage the plant. Water the plant thoroughly after fertilizing to ensure the nutrients reach the root zone.
When growing Arnica Latifolia plants, it is important to use a well-draining soil mix. The soil mix should be comprised of a combination of peat moss and perlite or vermiculite. Avoid using heavy, clay-based soils, as they can cause the plant's roots to rot. Additionally, the soil should be kept consistently moist, but not overly wet, as Arnica Latifolia plants prefer soil that is evenly moist.
It is also important to ensure that the soil is rich in organic matter, as this will help to provide the necessary nutrients that the plant needs to grow healthy and strong. Adding compost or aged manure to the soil mix can help to improve its nutrient content.
When planting Arnica Latifolia plants, it is recommended to place them in a location that receives partial shade, as this will help to protect them from intense sunlight that could cause damage or stunted growth. Additionally, it is important to provide the plant with regular watering during periods of drought or dry weather to prevent the soil from becoming too dry.
Overall, growing Arnica Latifolia plants requires a well-draining, moist, and nutrient-rich soil mix, along with regular watering and partial shade to promote healthy growth.
To propagate this particular plant, you will need to follow the steps below:
- First, identify a healthy and mature plant from which you want to take cuttings.
- Choose a stem that is around 10-15 cm long and has at least 2-3 nodes (the point on a stem where the leaf is attached).
- Using sharp and clean scissors or pruning shears, make a clean cut at a 45-degree angle just below a node. Avoid crushing or damaging the stem while cutting.
- Remove the lower leaves from the stem, leaving only the top few leaves on the stem.
- Dip the end of the stem in a rooting hormone powder to encourage root growth. Make sure to apply the powder only to the cut end of the stem and avoid touching the leaves.
- Prepare a pot filled with well-draining soil mix. Make a hole in the soil with a pencil or your fingertip.
- Insert the stem cuttings into the prepared hole, making sure the lower end is buried at least 2-3 cm deep in the soil.
- Firmly press the soil around the stem to ensure good contact between the stem and the soil.
- Water the cuttings gently so that the soil is moist but not waterlogged.
- Cover the pot with a clear plastic bag or a propagation dome to create a humid environment.
- Place the pot in a bright, indirect light location and maintain a constant temperature between 20-25°C.
- Keep the soil moist and mist the cuttings regularly with a spray bottle to prevent them from drying out.
- After a few weeks, check for root growth by gently tugging on the stem. If you feel resistance, roots have developed. At this stage, you can remove the plastic bag or dome and gradually expose the cuttings to normal indoor conditions.
- Once the cuttings have rooted well and have produced new leaves, you can transplant them into separate pots and continue caring for them as you would for mature plants.


