Plant Overview
Known as the "White Mugwort" or "Ghost Plant," this elegant perennial stands out in the garden like a luminous spire. Unlike its silver-leaved cousins that crave desert-like drought, this species brings a sophisticated, creamy glow to the damp, shady corners of your landscape. It is the refined aristocrat of the Artemisia family, prized for its architectural height and airy texture.
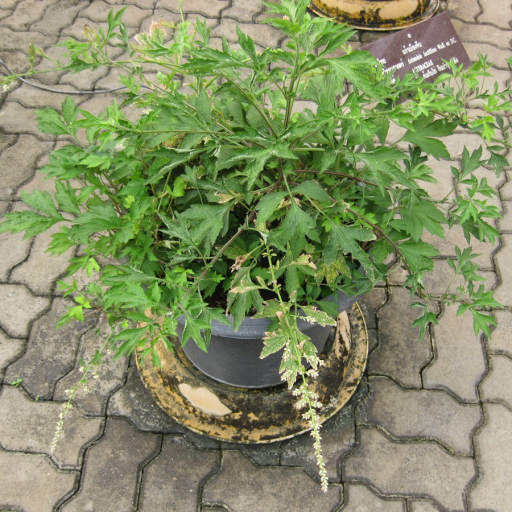
🔍 How to Identify
- 🌼 Flower Panicles: Features delicate, foaming sprays of tiny, creamy-white blossoms that resemble miniature clouds or "milky" stars.
- 🌿 Deep Foliage: Unlike the usual silver-grey Artemisia, these leaves are a rich, dark forest green with a jagged, deeply lobed, fern-like texture.
- 📏 Stately Stature: A tall, upright grower, often reaching 4 to 5 feet in height, providing a strong vertical element to the back of a flower bed.
🏡 In Your Garden
- 💧 The Thirsty Cousin: Most Artemisias hate "wet feet," but Artemisia lactiflora is the exception. It thrives in moist, fertile soil and is a perfect choice for pond edges or boggy spots where other plants might struggle.
- 🌤️ The Twilight Glow: While it handles full sun in cooler climates, it truly shines in partial shade. The white flowers catch the fading evening light, making it a staple for "Moon Gardens" designed to be enjoyed at night.
- 🛡️ No-Stake Support: Despite its impressive height, the stems are remarkably sturdy and woody. It rarely needs staking, standing tall even after summer rainstorms.
⚠️ Safety & Toxicity
- 🐾 General Safety: This plant is generally considered non-toxic to cats, dogs, and horses, making it a safe choice for pet-friendly landscapes.
- 🤧 Allergy Warning: Because it is a relative of common mugwort and ragweed, its pollen can be a trigger for hay fever sufferers during its late summer bloom period.
- 🧤 Skin Sensitivity: The foliage contains aromatic essential oils that may cause mild skin irritation or "contact dermatitis" in sensitive individuals. It is best to wear gloves when pruning large clumps.
✨ Fun Fact
In its native regions of China, this plant isn't just an ornamental beauty—it has been used for centuries in traditional medicine and even as a flavorful culinary herb to season meat dishes and soups!

Detailed Care Instructions
To grow Artemisia lactiflora, also known as white mugwort, you can follow these steps:
- Choose the right location: Artemisia lactiflora thrives in full sun to partial shade. Select a location with well-draining soil that is not overly fertile.
- Prepare the soil: Before planting, loosen the soil and remove any weeds or rocks. If the soil is heavy clay or poorly drained, consider incorporating organic matter like compost or peat moss to improve drainage.
- Planting: Dig a hole slightly larger than the root ball of the plant. Place the root ball in the hole and backfill with soil. Gently firm the soil around the plant to ensure it is securely planted.
- Watering: Water the plant thoroughly after planting, and continue to water consistently throughout the growing season. Artemisia lactiflora prefers moist soil, but be careful not to overwater, as it can lead to root rot.
- Mulching: Applying a layer of organic mulch around the base of the plant can help retain moisture, suppress weed growth, and regulate soil temperature.
- Pruning: Artemisia lactiflora benefits from regular pruning to maintain its shape and encourage bushier growth. Cut back the stems in early spring or late fall to around 6 inches above the ground.
- Fertilization: Artemisia lactiflora generally does not require heavy fertilization. However, incorporating slow-release organic fertilizer once a year in early spring can provide additional nutrients.
- Pests and diseases: White mugwort is relatively resistant to pests and diseases, but occasionally it may be susceptible to powdery mildew or aphids. Monitor the plant regularly and take necessary steps to control any issues that may arise.
- Division: Every few years, you can divide Artemisia lactiflora to propagate new plants. Dig up the mature plant, separate the root clumps, and replant the divided sections in prepared soil.
Remember to check your local gardening guidelines for any specific requirements or recommendations for growing Artemisia lactiflora in your area.

Place in a bright room that is sun drenched almost all day. Or directly in a south-facing window.

- The Artemisia Lactiflora plant requires regular watering to thrive and maintain its overall health.
- To water the plant effectively, it is important to strike a balance between not overwatering it and ensuring it receives enough moisture.
- Use room temperature or slightly warm water when watering the Artemisia Lactiflora, as using cold water can shock the plant and hinder its growth.
- Avoid watering the foliage of the plant, as this can lead to the development of fungal diseases. Direct the water at the base of the plant, targeting the soil around the roots.
- Prioritize deep watering rather than frequent light watering. It is best to water the Artemisia Lactiflora thoroughly but infrequently to encourage deep root growth.
- Check the moisture level of the soil before watering to avoid overwatering. Stick your finger about an inch deep into the soil – if it feels dry, it is time to water. However, if the soil still feels moist, wait a few more days before watering again.
- When watering, ensure that the excess water drains out from the bottom of the pot or container. Artemisia Lactiflora plants do not tolerate standing water, which can lead to root rot.
- During hot summer months, when the plant may require more frequent watering due to increased evaporation, consider mulching the soil around the Artemisia Lactiflora. Mulch helps retain moisture in the soil, reducing the need for frequent watering.
- Keep an eye on the plant's overall appearance and health. If the leaves start to wilt or turn yellow, it may be a sign of underwatering. Conversely, if the leaves become mushy or discolored, it may indicate overwatering. Adjust your watering routine accordingly.
- While regular watering is essential, avoid creating excessively damp conditions for the Artemisia Lactiflora, as this can lead to root issues or invite pests. Strive for a balance that provides moisture without saturating the plant's roots.
To fertilize Artemisia Lactiflora, follow these instructions:
- Choose a balanced, slow-release fertilizer specifically designed for perennial plants.
- Apply the fertilizer in early spring, just as new growth begins to emerge.
- Sprinkle the fertilizer evenly around the base of the plant, avoiding direct contact with the stems.
- Use a rake or your hands to lightly work the fertilizer into the top layer of soil.
- Water the plant thoroughly after fertilizing to activate the release of nutrients into the soil.
- Repeat the fertilization process every spring, or as directed by the fertilizer packaging or plant care guidelines.
- Monitor the plant for signs of nutrient deficiency or excessive fertilization, such as yellowing or wilting leaves. Adjust the fertilizer application accordingly.
Remember to always follow the specific instructions provided by the fertilizer manufacturer and consider the needs of your individual plant if additional care guidelines are available.
Artemisia lactiflora, a perennial flowering plant belonging to the Asteraceae family, thrives in various types of soil, provided certain conditions are met. When selecting soil for Artemisia lactiflora, there are specific factors to consider to ensure optimal growth and development of the plant.
Firstly, it is important to note that Artemisia lactiflora prefers a well-draining soil. Poorly drained or waterlogged soil can lead to root rot and other related issues. Therefore, a loose and well-draining soil composition should be chosen. This type of soil aids in maintaining proper moisture levels while allowing excess water to drain away.
In terms of soil texture, Artemisia lactiflora typically prefers a loam or sandy loam soil blend. Loamy soil is a balanced mixture of sand, silt, and clay, which offers a good balance of drainage and water retention. Sandy loam soil tends to have larger particles, allowing easy drainage while still retaining some moisture and nutrients.
pH levels are also essential when considering soil requirements for Artemisia lactiflora. The plant prefers neutral to slightly acidic soil pH levels ranging from 6.0 to 7.5. This pH range provides an ideal environment for nutrient availability and absorption by the plant's roots.
Along with adequate drainage and balanced pH levels, Artemisia lactiflora benefits from nutrient-rich soil. Organic matter, such as well-composted manure or garden compost, can be added to enrich the soil and provide essential nutrients. Additionally, incorporating slow-release fertilizer can provide a steady supply of nutrients throughout the growing season.
Lastly, it is worth mentioning that Artemisia lactiflora appreciates soil that is slightly moist, but not overly wet. While it is essential to avoid waterlogged conditions, maintaining consistent soil moisture by regular watering is crucial, especially during dry periods.
In summary, when selecting soil for Artemisia lactiflora, a well-draining soil blend with a loamy or sandy loam texture, a pH range between 6.0 and 7.5, and the inclusion of organic matter for nutrient enrichment will help ensure optimal growth and health of the plant. Regular watering to maintain consistent moisture levels will also contribute to its overall well-being.
Here's a detailed description of how to propagate Artemisia lactiflora plant without commonly known names:
- Selecting a healthy parent plant: Choose a mature and healthy Artemisia lactiflora plant to harvest cuttings from. Look for a plant that has strong and disease-free foliage, with no signs of pests or damage.
- Preparing the tools and materials: Gather all the necessary tools and materials before starting the propagation process. You will need a pair of sharp and sterile gardening shears, clean pruning scissors, a clean cutting board, a clean container or pot, and a suitable potting mixture.
- Taking the cuttings: Identify a healthy stem on the parent plant that is suitable for propagation. Using the shears, make a clean cut just below a leaf node. Ideally, the cutting should be around 4-6 inches in length.
- Removing lower leaves: Carefully remove the lower set of leaves from the cutting, leaving only a few leaves at the tip. This helps reduce water loss through transpiration and prevents rotting.
- Hormone treatment (optional): To enhance the success rate of rooting, you may dip the bottom end of the cutting into a rooting hormone powder, following the manufacturer's instructions. This step is optional but can increase the chances of successful propagation.
- Preparing the container: Fill a clean container or pot with a well-draining potting mixture suitable for herbaceous plants. Make sure the soil is moist but not waterlogged.
- Inserting the cutting: Create a small hole in the potting mixture using a stick or your finger. Carefully place the cutting into the hole, ensuring that the bottom leaf node is in contact with the soil.
- Watering and care: Gently water the potting mixture around the cutting to settle it in place. Maintain a consistent level of moisture in the soil, ensuring it doesn't dry out completely or become overly saturated. Place the container in a warm and well-lit area with indirect sunlight.
- Monitoring and transplanting: Monitor the cutting regularly for signs of new growth, indicating successful rooting. It may take several weeks for roots to develop. Once the roots have established themselves, and the new plant has grown a sufficient size, it can be transplanted to a larger pot or directly into the garden, following proper spacing guidelines.
- Continued care: Provide proper care for the propagated plant by ensuring it receives adequate sunlight, regular watering, and protection from extreme weather conditions. Regularly monitor and address any potential pest or disease issues.
Remember, propagation success may vary depending on several factors, including the health of the parent plant, environmental conditions, and proper care.


