Plant Overview
Known as the Woolly Milkweed, this California native looks as though it has been wrapped in a soft, silver-white sweater to protect itself from the intense sun. Found primarily in dry, grassy hills and scrublands, it is a hardy survivor that plays a quiet but vital role in the ecosystem. Unlike its bright orange cousins, this milkweed opts for a more subtle, ethereal aesthetic that blends beautifully into a moon garden or a native meadow.
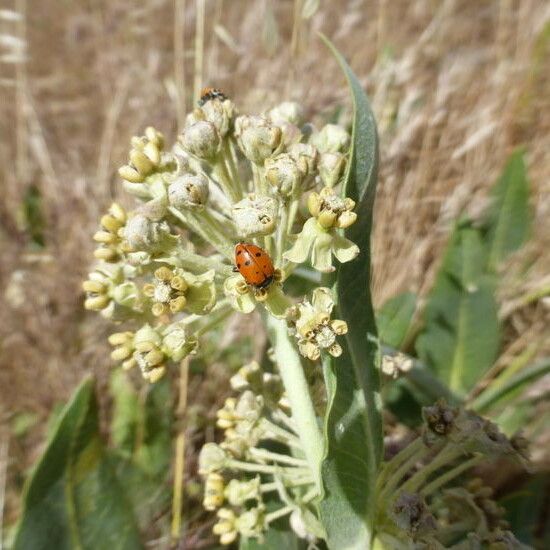
🔍 How to Identify
- ☁️ Velvety Texture: The most striking feature is the dense, woolly "felt" covering the stems and leaves, giving the plant a silvery-green or grayish appearance.
- 🌼 Creamy Clusters: It produces globose clusters of star-shaped flowers that range from pale yellow to creamy green, sometimes tinged with a hint of purple.
- 🍃 Broad Foliage: The leaves are thick, oval-shaped, and grow in opposite pairs along the stem, often appearing wavy or crinkled at the edges.
🏡 In Your Garden
- 🏜️ Drought Specialist: This plant is a true "set it and forget it" species for dry climates. It has evolved to thrive in rocky, poor-quality soil and requires very little supplemental water once established.
- 🦋 Monarch Magnet: While many gardeners plant Tropical Milkweed, Asclepias vestita is a superior native choice for supporting Monarch butterflies, providing essential food for larvae without disrupting their migration patterns.
- 🚫 The Taproot Rule: Because it grows a deep, carrot-like taproot to find water underground, it absolutely hates being moved. Choose its "forever home" carefully, as transplanting adult plants usually results in failure.
⚠️ Safety & Toxicity
- ☠️ Poisonous Sap: Like all members of the Asclepias genus, it contains cardiac glycosides. If ingested in large quantities, it can be toxic to humans, poultry, and livestock.
- 🐾 Pet Safety: Keep a close eye on dogs or cats that like to chew on greenery. Ingestion can lead to nausea, drooling, or more serious heart-related symptoms.
- 🧤 Skin Irritant: The milky white latex sap that leaks when a leaf is broken can cause skin irritation or rashes for those with sensitive skin. It is highly recommended to wear gloves when pruning.
✨ Fun Fact
The specific epithet vestita is Latin for "clothed" or "dressed." This refers to the plant’s thick coating of hairs, which acts like a biological sunblock, reflecting heat and trapping moisture against the leaf surface to survive the blistering heat of the San Joaquin Valley.

Detailed Care Instructions
To grow Asclepias vestita (Woolly Milkweed) plants, follow these steps:
- Climate and Sunlight: Determine if your climate is suitable for growing Asclepias vestita, as it thrives in dry and sunny environments. It is native to the western United States, especially California. It prefers full sun exposure (6-8 hours of direct sunlight per day), but it can tolerate partial shade as well.
- Soil Preparation: Asclepias vestita prefers well-draining soil. Prepare the soil by removing any weeds or grass from the planting area. You may also add organic matter, such as compost or aged manure, to improve the soil's fertility and drainage.
- Planting Seeds: Asclepias vestita seeds can be sown directly into the ground either in the spring or fall. Scarify the seeds by gently rubbing them with sandpaper or soaking them in warm water for a day to help improve germination rates. Then, sow the seeds about 1/8 inch deep in the soil. Leave enough space between each seed (4-6 inches) to accommodate the future growth of the plants.
- Watering: Keep the soil consistently moist until the seeds germinate. After germination, water the plants sparingly, as they are drought-tolerant once established. Allow the soil to dry out slightly between watering sessions. Overwatering can lead to root rot and other issues.
- Maintenance: Asclepias vestita plants do not require frequent maintenance. Remove any weeds that may compete with the plants for nutrients and water. Mulching around the base of the plants can help conserve moisture and suppress weed growth.
- Pests and Diseases: In general, Asclepias plants are relatively pest and disease resistant. However, keep an eye out for common garden pests like aphids or milkweed bugs. If necessary, you can manually remove pests or use organic insecticides as a last resort.
- Support: Asclepias vestita may require staking or support as it grows taller to prevent bending or breaking under its own weight. If necessary, gently tie the plant to a stake using soft plant ties or twine.
- Monarch Butterfly Considerations: Asclepias vestita is a host plant for monarch butterfly caterpillars, so growing it can help support butterfly populations. However, avoid using pesticides or insecticides near the plants, as they can harm caterpillars and butterflies. Provide ample resources like nectar-rich flowers for adult butterflies to further enhance their habitat.
- Winter Care: Asclepias vestita is a perennial plant, meaning it comes back year after year. In regions with freezing temperatures, the plants may die back in winter, but they will regrow from their roots in the following spring. Consider adding a layer of mulch around the plants in the winter to protect the roots from extreme cold.
By following these steps, you can successfully grow Asclepias vestita and contribute to the conservation of monarch butterflies.

Place in a bright room that is sun drenched almost all day. Or directly in a south-facing window.

To properly water this plant, it is important to take into account the soil and environmental conditions in which it is growing. Asclepias Vestita requires a well-draining soil that is kept moist but not waterlogged. Overwatering can lead to root rot and damage the plant. It is important to avoid letting the soil dry out completely between waterings, but also to avoid waterlogging the soil.
When watering, it is best to aim for the soil around the plant's roots and avoid getting water on the leaves or flowers. Watering early in the morning or late in the evening when temperatures are cooler can help prevent water from evaporating too quickly and allow the plant to better absorb moisture.
During periods of high heat or drought, the plant may require more frequent watering. It is important to watch the plant closely for signs of stress or dehydration, such as wilting leaves or drooping stems.
In summary, to water Asclepias Vestita plant, ensure that the soil is well-draining and kept moist but not waterlogged. Water around the roots, avoid getting water on the leaves or flowers, and water more frequently during periods of high heat or drought.
To fertilize this plant, apply a balanced fertilizer with an N-P-K ratio of 10-10-10 in early spring before new growth appears. Apply the fertilizer at a rate of 1 tablespoon per square foot of soil and work it into the topsoil. Water the plant deeply after applying the fertilizer. Avoid applying too much fertilizer as it can damage the plant.
Asclepias Vestita is a plant that grows well in soil that is well-draining and fertile. The soil should be moist but not waterlogged, and it should have a pH level of 6.5 to 7.5. Good soil for this plant may include a mixture of organic matter such as compost or peat moss, along with a sandy loam soil. It is important to avoid using heavy clay soils or soils that are consistently wet, as this may cause root rot or other diseases. Additionally, it is important to plant Asclepias Vestita in an area that receives plenty of sunlight, as it requires full sun to thrive.
To propagate this plant, start by removing a stem from the parent plant that is at least 4 inches long and has at least 2 leaves growing on it. Cut the stem at a 45-degree angle so that there is plenty of surface area for rooting hormone to be applied.
Next, dip the cut end of the stem into rooting hormone powder and shake off any excess. Place the stem into a pot that has well-draining soil and water it thoroughly. Cover the pot with a plastic bag or plastic wrap to create a humid environment for the cutting.
Place the pot in a warm, bright area where it will receive indirect sunlight. Do not place it in direct sunlight as this can cause the cutting to wilt or dry out.
Monitor the soil regularly and water as needed to keep it moist but not waterlogged. After 2-3 weeks, gently tug on the cutting to see if it has taken root. If it resists being pulled out, it has rooted successfully.
At this point, remove the plastic covering and gradually expose the cutting to more sunlight over the course of a few days. Continue to water as needed and transplant the cutting into a larger pot or outdoors in a sunny location once it has grown large enough and established a strong root system.


