Plant Overview
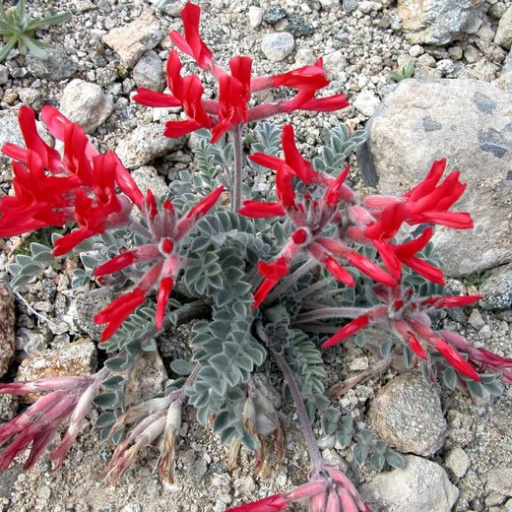
Known as the Scarlet Milkvetch or Scarlet Locoweed, this desert treasure is a stunning sight to behold against the dusty backdrop of the American Southwest. Unlike many of its cousins with muted purple or white blooms, this plant is famous for its "electric" red flowers that look like tiny torches rising from the sand. It is a hardy survivor that thrives where most plants wither, turning rocky slopes into a gallery of brilliant color.
🔍 How to Identify
- 🌺 The Flowers: Large, tubular blossoms in a striking shade of scarlet or crimson. They are unusually long for a milkvetch, often reaching up to 1.5 inches in length.
- 🥈 The Foliage: The leaves are a soft, silvery-grey color and are covered in fine, velvety hairs. This "fuzz" helps the plant reflect intense desert sunlight and trap moisture.
- ☁️ Growth Habit: It grows in low, rounded clumps close to the ground, rarely exceeding a few inches in height, which protects it from harsh desert winds.
🏡 In Your Garden
- 🏜️ The Taproot: Like many desert specialists, the Scarlet Milkvetch grows a very deep taproot to find water. This makes it incredibly drought-tolerant, but it also means it hates being moved—once you plant it, leave it there!
- 🪨 Soil Preference: It demands "lean" and gritty soil. If the soil is too rich or stays wet for too long, the plant will likely succumb to root rot. Think of it as a rock garden champion that loves the heat.
- 🐦 Avian Attraction: Because of the long, tubular shape and bright red color of the flowers, this plant is a primary target for hummingbirds, who are its chief pollinators.
⚠️ Safety & Toxicity
- 🛑 Status: Toxic (Locoweed).
- 🐾 Details: Many species in the Astragalus genus are known as "locoweeds" because they contain alkaloids or accumulate selenium from the soil. If eaten by horses, cattle, or pets, it can cause "locoism," a serious neurological condition. It is not safe for human consumption and should be kept away from curious pets.
✨ Fun Fact
The Scarlet Milkvetch is one of the few plants in its genus that has evolved specifically to be pollinated by birds rather than bees. Its red color is almost invisible to most bees, but it acts like a neon "Open for Business" sign for hungry hummingbirds!

Detailed Care Instructions
Growing Astragalus coccineus, commonly known as scarlet locoweed or crimson astragalus, can be a rewarding endeavor due to its attractive red flowers and drought tolerance. Here are steps and tips for cultivating this plant:
1. Obtaining Seeds or Plants
- Seeds: You can purchase seeds from reputable suppliers, particularly those specializing in native or xeriscape plants.
- Plants: Nurseries specializing in native plants may offer young plants for transplant.
2. Soil Preparation
- Well-Draining Soil: Astragalus coccineus prefers well-draining soil. Sandy or rocky soils are ideal. If your garden has heavy clay, consider amending it with sand or organic matter to improve drainage.
- pH: This plant tolerates a wide range of soil pH but performs best in neutral to slightly alkaline soils.
3. Location
- Sunlight: Choose a location that receives full sun. Astragalus coccineus thrives in high light conditions.
- Spacing: Allow enough space for air circulation to prevent fungal diseases. Each plant should be spaced about 18 inches apart.
4. Planting Seeds
- Scarification: To improve germination rates, scarify the seeds. This can be done by gently rubbing the seeds with sandpaper or soaking them in hot (not boiling) water for a few hours.
- Sowing: Sow the seeds in early spring. Plant them about 1/4 inch deep in the soil and keep the soil lightly moist until germination.
- Germination: Seeds typically take 2-4 weeks to germinate, depending on environmental conditions.
5. Watering
- Initial Watering: Keep the soil lightly moist until seedlings are established.
- Drought-Tolerance: Once established, Astragalus coccineus is drought-tolerant and requires minimal watering. Water occasionally during prolonged dry periods.
6. Maintenance
- Weeding: Keep the area around the plants free of weeds to reduce competition for nutrients and water.
- Pruning: Remove any dead or damaged foliage as needed to maintain plant health and appearance.
- Pests and Diseases: Astragalus coccineus is relatively pest-resistant. However, keep an eye out for any signs of trouble and address them promptly with appropriate methods.
7. Fertilization
- Minimal Fertilization: These plants do not require much feeding. If needed, a light application of a balanced, all-purpose fertilizer in early spring can be beneficial, but avoid over-fertilizing, as it can harm the plant.
8. Winter Care
- Cold Tolerance: Astragalus coccineus is hardy in USDA zones 5-9. In colder regions, mulching around the base can help protect the roots from severe frost.
9. Growing in Containers
- Container Size: Use a spacious container with good drainage holes.
- Cactus/Succulent Mix: A cactus or succulent potting mix works well, as it provides the drainage these plants require.
- Position: Place containers in a location receiving full sun.
Summary
Growing Astragalus coccineus involves planting in well-draining soil in a sunny location, proper seed preparation, and minimal watering once established. With the right care, you can enjoy this vibrant and resilient plant in your garden.

Place in a bright room that is sun drenched almost all day. Or directly in a south-facing window.

Astragalus coccineus, a member of the legume family, is a drought-tolerant plant that thrives in arid and semi-arid environments. Proper watering practices are crucial for maintaining its health and promoting robust growth. Here's a detailed guide on how to water this plant effectively:
1. Initial Watering:
- When first planting, ensure the soil around the roots is thoroughly moistened. This helps the plant establish itself in its new environment.
2. Frequency:
- Once established, water sparingly. This species is adapted to low water conditions and prefers infrequent, deep watering over regular, shallow watering.
- During the growing season (spring and early summer), it may need watering every two to four weeks, depending on rainfall and soil conditions.
- In dormancy periods (typically in the colder months), reduce or completely halt watering to mimic its natural dry season.
3. Method:
- Use a slow, deep watering method. Drip irrigation or a slow-flow hose placed at the base of the plant works well. This ensures water reaches the deep roots and encourages them to grow downward.
- Avoid overhead watering to reduce the risk of fungal infections and leaf burn, which can occur if water sits on the leaves in strong sunlight.
4. Soil and Drainage:
- Plant it in well-draining soil to prevent waterlogging, which can lead to root rot. Sandy or gravelly soils are ideal.
- A raised bed or a sloped planting area can further enhance drainage.
5. Mulching:
- Apply a layer of mulch around the base of the plant to help retain soil moisture and keep the roots cool. However, keep the mulch a few inches away from the stem to prevent rot.
6. Monitoring:
- Regularly check the soil moisture by probing around the root zone. If the soil feels dry to a depth of about 3-4 inches, it is time to water.
- Be attentive to the plant’s appearance. Wilted or yellowing leaves can indicate insufficient watering, while soft, rotten roots suggest overwatering.
By following these guidelines, you can ensure that Astragalus coccineus receives the appropriate amount of water, promoting a healthy and vibrant plant.
Sure, here are the fertilizing instructions for Astragalus coccineus:
- Soil Preparation: Ensure your soil is well-draining. This plant prefers sandy or gravelly soils with good aeration.
- Soil Testing: Conduct a soil test to determine nutrient levels and pH. Ideal pH for Astragalus coccineus is slightly alkaline to neutral, ranging from 7.0 to 8.5. Adjust soil pH as needed using lime (to raise pH) or sulfur (to lower pH).
- Organic Matter: Incorporate organic matter such as compost or aged manure into the soil before planting. This will improve soil structure and nutrient availability.
- Base Fertilization: At planting time, you may add a balanced, slow-release fertilizer to the soil. A general-purpose formula like 10-10-10 (N-P-K) can be used, but ensure it is applied according to the manufacturer's instructions to avoid over-fertilization.
- Nitrogen Fixation: Astragalus coccineus is a legume and can fix nitrogen from the air with the help of symbiotic bacteria. To encourage this natural process, avoid high nitrogen fertilizers. Instead, focus on phosphorus and potassium if soil tests indicate deficiencies.
- Growing Season Fertilization: During the growing season, if the plant shows signs of nutrient deficiency (e.g., yellowing leaves), a light application of a balanced fertilizer or compost tea can be applied. Avoid over-fertilization as it can harm the plant.
- Watering and Fertilizing: Water the plant deeply after applying any fertilizer to help dissolve and distribute nutrients to the root zone.
- Mulching: Use organic mulch around the base of the plant to help conserve moisture, regulate soil temperature, and slowly add nutrients as it decomposes.
By following these guidelines, you should be able to provide the necessary nutrients for Astragalus coccineus to thrive.
Astragalus coccineus thrives best in well-drained soil, typically found in arid and semi-arid regions. Here are some key details about the soil requirements for cultivating this plant:
- Soil Type: Preferably sandy or gravelly soils. These types of soils ensure good drainage, which is crucial for preventing root rot in arid-climate plants.
- pH Level: It can tolerate a range of pH levels, but it typically performs best in slightly acidic to neutral soils, around pH 6.0 to 7.5.
- Nutrient Content: This plant doesn't require highly fertile soil. Excessive nutrients, especially nitrogen, can actually hinder its growth. A lean, slightly nutrient-poor soil can help it thrive and maintain its natural balance.
- Organic Matter: Limited organic matter is preferable. If you're amending the soil, use well-aged compost sparingly to avoid creating overly rich conditions.
- Drainage: Excellent drainage is critical. Raised beds or slopes can help improve soil drainage if your native soil tends to retain water.
By ensuring these soil conditions, you can support the healthy growth of Astragalus coccineus, mimicking its natural habitat as closely as possible.
Propagating Astragalus coccineus can be a rewarding endeavor, though it does require some patience and specific conditions for success. Here are detailed steps for propagating this plant:
Propagation by Seeds:
- Seed Collection:
- Collect the seeds when the pods have matured and started to dry on the plant. This typically occurs in late summer or early fall.
- Collect the seeds when the pods have matured and started to dry on the plant. This typically occurs in late summer or early fall.
- Seed Cleaning:
- Open the pods and extract the seeds. Clean any debris from the seeds to ensure they are free from any pathogens or contaminants.
- Open the pods and extract the seeds. Clean any debris from the seeds to ensure they are free from any pathogens or contaminants.
- Scarification:
- Astragalus coccineus seeds have a hard outer coat that needs to be scarified to promote germination. You can scarify the seeds by:
- Lightly rubbing them with fine sandpaper.
- Soaking them in hot (not boiling) water for several hours, allowing the water to cool naturally.
- Lightly rubbing them with fine sandpaper.
- Astragalus coccineus seeds have a hard outer coat that needs to be scarified to promote germination. You can scarify the seeds by:
- Stratification:
- After scarification, the seeds benefit from cold stratification. Place the seeds in a damp paper towel, then seal them in a plastic bag and refrigerate them for about 4 to 6 weeks.
- After scarification, the seeds benefit from cold stratification. Place the seeds in a damp paper towel, then seal them in a plastic bag and refrigerate them for about 4 to 6 weeks.
- Sowing Seeds:
- After stratification, sow the seeds in a well-draining seed-starting mix. Plant the seeds at a depth of about 1/4 inch.
- Maintain soil moisture but do not let the soil become waterlogged. Place the seed trays or pots in a location with full sun exposure.
- After stratification, sow the seeds in a well-draining seed-starting mix. Plant the seeds at a depth of about 1/4 inch.
- Germination:
- Germination can take several weeks to months. Ensure consistent moisture and temperature conditions to enhance the chances of germination.
Propagation by Cuttings:
- Germination can take several weeks to months. Ensure consistent moisture and temperature conditions to enhance the chances of germination.
- Selecting Cuttings:
- Take cuttings from healthy, vigorous plants in late spring or early summer. Choose young, non-flowering shoots around 4-6 inches long.
- Take cuttings from healthy, vigorous plants in late spring or early summer. Choose young, non-flowering shoots around 4-6 inches long.
- Preparing Cuttings:
- Remove the lower leaves from the cuttings, leaving only the top few leaves.
- Optionally, dip the cut end of the cutting in rooting hormone powder to encourage root development.
- Remove the lower leaves from the cuttings, leaving only the top few leaves.
- Planting Cuttings:
- Plant the cuttings in a well-draining soil mix or sand. Insert the cuttings deep enough so that they stand upright.
- Water the soil lightly to settle it around the cuttings but avoid waterlogging.
- Plant the cuttings in a well-draining soil mix or sand. Insert the cuttings deep enough so that they stand upright.
- Creating a Humidity Tent:
- Cover the cuttings with a plastic bag or a clear plastic container to create a humid environment, which is crucial for rooting.
- Ensure the cover does not touch the leaves to prevent rot. You can use stakes to keep the plastic off the leaves.
- Cover the cuttings with a plastic bag or a clear plastic container to create a humid environment, which is crucial for rooting.
- Placement:
- Place the cuttings in a bright, indirect light location. Avoid direct sunlight, which can scorch the cuttings.
- Place the cuttings in a bright, indirect light location. Avoid direct sunlight, which can scorch the cuttings.
- Root Development:
- Keep the soil consistently moist but not waterlogged.
- Roots should form within a few weeks to a couple of months. You can check for root development by gently tugging on the cuttings. If you feel resistance, roots have likely formed.
General Care for Young Plants:
- Keep the soil consistently moist but not waterlogged.
- Transplanting:
- Once seedlings or rooted cuttings have developed a healthy root system, transplant them into individual pots or directly into the garden.
- Choose a location with well-drained soil and full sun exposure.
- Once seedlings or rooted cuttings have developed a healthy root system, transplant them into individual pots or directly into the garden.
- Watering:
- Water the young plants regularly, but allow the soil to dry slightly between watering. Overwatering can lead to root rot.
- Water the young plants regularly, but allow the soil to dry slightly between watering. Overwatering can lead to root rot.
- Mulching:
- Applying mulch around the base of the plants can help retain soil moisture and suppress weeds.
- Applying mulch around the base of the plants can help retain soil moisture and suppress weeds.
- Protection:
- Protect young plants from extreme weather conditions and pests to ensure healthy growth.
By following these detailed steps, you should be able to successfully propagate Astragalus coccineus and enjoy its unique beauty in your garden or landscape.
- Protect young plants from extreme weather conditions and pests to ensure healthy growth.


