Plant Overview
Often called "Deadly Nightshade," the Atropa belladonna is a plant shrouded in dark folklore and ancient history. From its use as a lethal poison in the Roman Empire to its role in medieval "flying ointments," it is perhaps the most famous member of the Solanaceae family. Despite its ominous reputation, it possesses a haunting, gothic beauty that makes it a subject of fascination for botanists and historians alike.
🔍 How to Identify
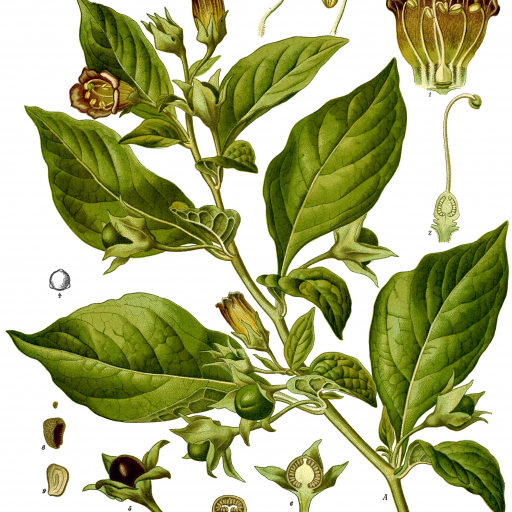
- 🔔 The Flowers: Look for drooping, bell-shaped blossoms that are a muted, brownish-purple or dull violet, often appearing in late spring.
- 🍒 The Berries: Shiny, jet-black berries that look remarkably like cherries but sit atop a distinct, star-shaped green calyx (the leaf-like base).
- 🍃 The Leaves: Dull green, oval-shaped leaves that grow in pairs of unequal size—one leaf is always noticeably larger than its partner.
🏡 In Your Garden
- 🌳 Wild Roots: This plant is rarely cultivated intentionally; it prefers the dappled shade of limestone-rich woodlands and disturbed chalky soils.
- 🌱 Growth Habit: It is a branching perennial that can grow quite large and bushy, often reaching up to 4 or 5 feet in height. It produces a thick, fleshy taproot that makes it very difficult to remove once it has established itself.
⚠️ Safety & Toxicity
- 🚫 Status: DEADLY TOXIC. Every part of this plant—from the roots to the sweet-tasting berries—contains potent alkaloids (atropine, scopolamine, and hyoscyamine) that can cause paralysis and death.
- 🐾 Pets & Kids: The berries are particularly dangerous because they are juicy and lack a bitter "warning" taste, making them highly attractive to children. Even touching the plant can cause skin irritation, and the juice should never come into contact with the eyes or mouth.
✨ Fun Fact
- 👁️ The Gaze of Beauty: The name "Belladonna" translates to "Beautiful Lady" in Italian. During the Renaissance, women used extracts of the plant as eye drops to dilate their pupils, as wide, "bedroom eyes" were considered a sign of intense beauty and seduction.

Detailed Care Instructions
| Color | Purple/Lavender |
| Humidity | Normal |
| Lighting | Full Sun |
| Toxicity | Poisonous |
| Bloom Time | June Through Early September |
| Difficulty | Medium |
| Plant Type | Perennial |
| Mature Size | Three To Four Feet Height And Width |
| Native Area | England Through Central And Southern Europe, North Africa To Iran |
| Temperature | 20°C - 25°C |
| Sun Exposure | Full Sun, Part Shade |
| Hardiness Zones | 6 - 9 |
To grow Atropa Bella-donna (also known as Deadly Nightshade), follow these steps:
- Choose the right location: Atropa Bella-donna thrives in partial shade or full sunlight. Select a spot with well-draining soil and shelter from strong winds.
- Prepare the soil: Remove any weeds, rocks, and debris from the planting area. Improve the soil's fertility by mixing in compost or aged manure.
- Sow the seeds: Scarify the seeds (lightly scrape the outer surface) to enhance germination. Sow them about 1/4 inch deep in the prepared soil, spacing them 6-12 inches apart.
- Watering: Keep the soil moist but not waterlogged. Regularly water the plants, especially during dry periods.
- Mulch: Apply a layer of organic mulch, like wood chips or straw, around the plants to help conserve moisture, suppress weeds, and regulate soil temperature.
- Fertilization: Bella-donna doesn't require heavy fertilization. However, a light application of balanced organic fertilizer or compost in spring can promote healthy growth.
- Pruning: To maintain a tidy and compact shape, prune the plant in early spring or late winter. Remove any dead, damaged, or overcrowded stems.
- Harvesting: The plant typically produces berries in its second or third year. Harvest the berries when they are shiny and black. Be cautious while handling them, as all parts of the plant are poisonous.
Note: Atropa Bella-donna is highly toxic, and its cultivation should be done with extreme care. It's essential to keep the plant away from children and pets and be familiar with the local regulations regarding its growth and possession.

Place in a bright room that is sun drenched almost all day. Or directly in a south-facing window.

To ensure proper hydration for this plant, it is important to be mindful of several key aspects. First, it is crucial to regularly check the soil moisture levels to ensure that they remain consistently moist without becoming waterlogged. When watering, it is best to use a gentle, steady stream that allows the water to penetrate deeply into the soil. Additionally, it is generally recommended to water this plant in the morning or early afternoon, as watering in the evening can increase the risk of fungal growth. Finally, it is important to avoid getting water on the plant's leaves, as this can lead to leaf spot and other issues.
To properly fertilize this plant, it is recommended to use a balanced, slow-release fertilizer during the growing season. This should be applied once every 4-6 weeks, in small amounts, to avoid over-fertilization. It is important to also ensure that the soil is well-draining and rich in organic matter. Avoid fertilizing during the winter months or when the plant is not actively growing.
Atropa Bella-donna plant prefers soil that is rich in organic matter and well-draining. The soil should be slightly acidic with a pH level between 5.5 to 7.5. A mixture of loam and sand is ideal for this plant. It is recommended to add some organic matter to the soil before planting to improve its fertility. Avoid using heavy clay soils as they can cause waterlogging, which can lead to root rot. Additionally, ensure the soil is moist but not waterlogged, as too much water can damage the plant.
To propagate this plant, you will need to obtain a mature plant which has a well-established root system. Once you have the parent plant, divide it into smaller sections with a sharp, clean knife. Each section should have several stems and a healthy root system.
Prepare a container with well-draining soil and moisten it with water. Place each section into the soil, making sure that the soil covers the roots and the stems are above the surface.
Water the newly planted sections gently, being careful not to disturb the soil or the roots. Place the container in a bright, warm location, but out of direct sunlight.
Keep the soil moist but not waterlogged, and monitor the plant over the coming weeks for signs of new growth. Once new leaves and stems emerge, you can gradually acclimate the plant to brighter light and eventually, move it outdoors if desired.
Common pests of the deadly nightshade include Spider mites, aphids, whiteflies, larvae. Make a habit of checking your deadly nightshade frequently for pests so that any infestations can be caught and managed early.


