Plant Overview
Known as the "Deadly Nightshade," Atropa belladonna is perhaps the most famous plant in the history of poisons. Rooted in both ancient medicine and dark folklore, this perennial herb was once rumored to be the main ingredient in "witches' flying ointment." Despite its sinister reputation, it has a haunting, understated beauty with its dark foliage and glossy, jewel-like berries.
🔍 How to Identify
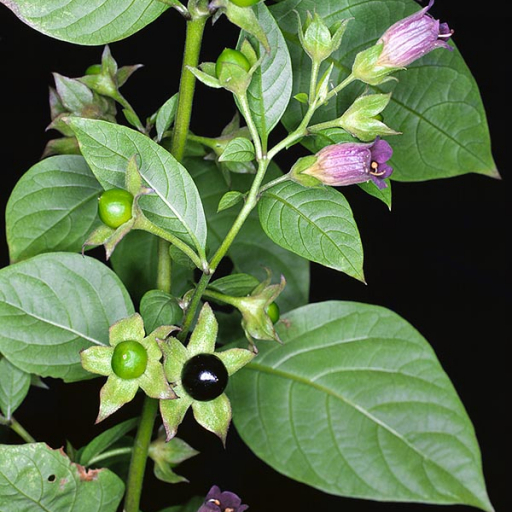
- 🌿 The Foliage: The leaves are dull green and ovate, often growing in unequal pairs on many-branched stems. They have a slightly fuzzy texture when young.
- 🔔 The Blooms: It features nodding, bell-shaped flowers that are a somber, brownish-purple with greenish tinges. They appear tucked away under the leaves.
- 🌑 The Berries: The most distinctive (and dangerous) feature is the fruit—glossy, jet-black berries that sit atop a star-shaped green calyx, looking strikingly like small cherries.
🏡 In Your Garden
- 🌱 Soil Nuance: Belladonna is a "calciphile," meaning it thrives in lime-rich, alkaline soils. It is often found growing wild in old quarries or near limestone ruins where the soil is disturbed.
- 🌑 Light & Space: While it enjoys partial shade, it requires a surprising amount of room to grow. It possesses a thick, fleshy root system that dislikes being moved, so it usually stays exactly where it first seeds itself.
⚠️ Safety & Toxicity
- 💀 Status: EXTREMELY TOXIC. Every single part of this plant—from the roots to the nectar—contains tropane alkaloids like atropine and scopolamine.
- 🚫 Human Risk: The berries are deceptively sweet-tasting, which makes them a high risk for children who might mistake them for edible fruit. Ingestion causes hallucinations, rapid heart rate, and can be fatal.
- 🐾 Pets & Livestock: It is highly toxic to dogs, cats, and horses. Even small amounts can lead to severe neurological distress or respiratory failure.
✨ Fun Fact
The name "Belladonna" translates to "Beautiful Lady" in Italian. During the Renaissance, women would use drops made from the plant to dilate their pupils, as wide eyes were considered a sign of intense attraction and beauty—essentially risking blindness for the sake of fashion!

Detailed Care Instructions
Growing Atropa Belladonna, also known as deadly nightshade, requires specific care and precautions due to its toxic nature. Here is a step-by-step guide on how to grow Atropa Belladonna:
- Selecting a suitable location: Choose a space that receives partial shade to full sun with well-draining soil. Keep in mind that this plant can be dangerous to pets and children, so choose a spot away from high traffic areas.
- Soil preparation: Prepare the soil by mixing organic matter such as compost or well-rotted manure to improve drainage and fertility. Deadly nightshade prefers slightly acidic soil with a pH range of 5.5 to 7.
- Seed collection or purchase: Obtain Atropa Belladonna seeds from a reliable source. It's essential to exercise caution when handling and storing the seeds due to their toxicity. You may opt to wear gloves or use a small ziplock bag to collect and handle the seeds.
- Seed treatment and sowing: Cold stratification is beneficial for promoting germination. Soak the seeds in water for 48 hours to enhance moisture absorption. Afterward, place the seeds in a sealed plastic bag with moist peat moss or vermiculite and refrigerate for 30 to 60 days.
- Sowing the seeds: After the cold stratification period, sow the seeds on the soil surface, as they require light to germinate. Gently press the seeds onto the soil without covering them. Keep the soil consistently moist during germination.
- Watering and maintenance: Keep the soil slightly moist, but avoid overwatering, as excessive moisture can lead to root rot. Water the plant deeply once or twice a week during dry periods. Mulching around the plant can help retain soil moisture.
- Transplanting: Once the seedlings have developed their first true leaves, carefully transplant them into individual pots or into the garden, maintaining a spacing of 2 to 3 feet apart. Handle the plants with caution, wearing gloves if desired.
- Thinning and pruning: If your plants become crowded, thin them out to provide adequate space for growth. Prune any dead or damaged parts of the plant to promote optimal health.
- Harvesting and safety precautions: Harvesting the berries should be done cautiously, wearing gloves and using utmost care, as all parts of Atropa Belladonna are toxic. It's recommended to consult a professional herbalist or botanist for appropriate handling techniques if you intend to utilize the plant.
Note: Due to its toxic nature, it is crucial to be responsible and cautious when growing Atropa Belladonna. Keep it out of reach of children and pets, and always research and follow safety guidelines.

Place in a bright room that is sun drenched almost all day. Or directly in a south-facing window.

The plant in question requires a regular watering schedule, which involves providing enough water to keep the soil moist but not waterlogged. This can be achieved by either watering the plant deeply but infrequently or using a drip irrigation system. It is important to avoid getting water on the foliage of the plant as this can increase the risk of fungal diseases. Adequate drainage should also be ensured to prevent root rot. Additionally, it is advisable to water the plant in the morning or evening to reduce water loss through evaporation during the heat of the day.
To successfully fertilize this plant, use a balanced fertilizer with equal amounts of nitrogen, phosphorus, and potassium. Apply the fertilizer once every two weeks during the growing season, or from late spring to early autumn. Be careful not to over-fertilize, as this can lead to poor growth and lower potency in the plant's desirable parts. Water the plant thoroughly before applying fertilizer, and make sure the soil is moist but not waterlogged. Avoid fertilizing during the plant's dormant period in winter.
Atropa Belladjsonna plants prefer well-draining soil that is rich in organic matter. A loamy soil mix with a slightly acidic pH level of around 6.0 to 7.5 is ideal for optimal growth. Additionally, adding perlite or sand to the soil mix can improve drainage and prevent waterlogged conditions that may lead to root rot. It is important to avoid heavy clay soils that can suffocate the roots of the plant. A balanced fertilizer can also be added to the soil during the growing season to provide essential nutrients for healthy growth.
To propagate this plant, first obtain a mature specimen with healthy foliage and well-established roots. Next, gently remove several stem cuttings at a length of approximately four inches, ensuring that each cutting has at least one pair of leaves intact. Remove the lower pair of leaves from each cutting and dip the cut end of the stem into rooting hormone. Place the cuttings into moist potting soil and cover them with plastic wrap to retain moisture. Set the pot in a warm, bright location but out of direct sunlight. Ensure that the soil remains consistently moist but not water-logged. After a few weeks, new shoots should appear at the base of the cutting, indicating that rooting has taken place. After several months, the new plants can be transplanted into individual containers or into the garden.
Common pests of the deadly nightshade include Spider mites, aphids, whiteflies, larvae. Make a habit of checking your deadly nightshade frequently for pests so that any infestations can be caught and managed early.


