Plant Overview
Often called the Creeping Begonia, this lush native of Central and South American rainforests is a rare gem among its more famous, upright cousins. Unlike the bushy begonias on your windowsill, this plant acts more like a vine, using its flexible stems to scramble over mossy rocks or scale tropical tree trunks. It’s an ideal choice for a "living wall" or a hanging basket where its emerald foliage can cascade gracefully.
🔍 How to Identify
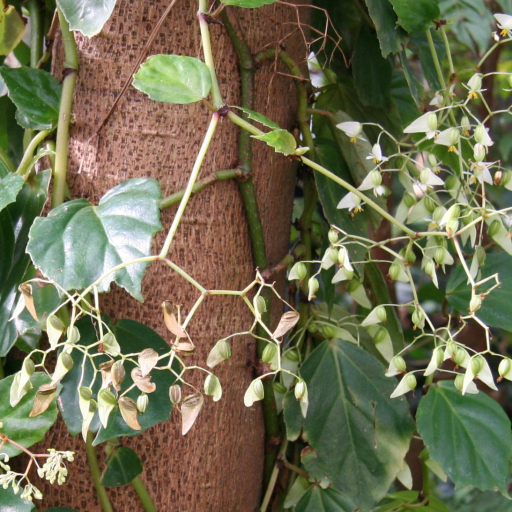
- 🍃 Lush Foliage: The leaves are small, heart-shaped, and remarkably glossy. They have a vibrant, lime-to-forest green color and a slightly succulent, "snap-able" texture.
- 🧗 Adventurous Stems: It features long, trailing stems that produce tiny adventitious roots at the nodes. These "rootlets" allow the plant to grip onto surfaces like bark or moss.
- 🌸 Delicate Blooms: It produces airy clusters of tiny, star-shaped white or pale pink flowers. While not as showy as tuberous begonias, they add a delicate, misty look to the plant.
🏡 In Your Garden
- ☁️ Humidity is Key: This species is a true child of the jungle. It thrives in high humidity; if the tips of the leaves turn brown and crispy, it’s a clear signal that the air is too dry. It is a superstar in closed terrariums where the air stays moist.
- 🪟 Gentle Light: Because its leaves are thin and adapted to the forest floor, direct afternoon sun will scorch them. It prefers "dappled" light—think of the sun filtering through a sheer curtain.
- 🚿 Thirsty but Breathable: It hates "wet feet" but loves consistent moisture. It performs best in a chunky, airy mix (like orchid bark and peat) that stays damp but allows the roots to breathe.
⚠️ Safety & Toxicity
- 🐾 Toxic to Pets: Begonia glabra contains soluble calcium oxalate crystals, which are toxic to cats and dogs.
- 👄 Symptoms: If nibbled, it can cause intense oral irritation, drooling, and swelling of the mouth. It is best displayed in a hanging planter, safely out of reach of curious paws or toddlers.
✨ Fun Fact
While most begonias are ground-dwellers, Begonia glabra is one of the few species that is truly epiphytic. In its natural habitat, it is often found growing high up on tree branches without any soil at all, drinking purely from the rain and the humid tropical air!

Detailed Care Instructions
To grow a Begonia Glabra plant, you can follow these steps:
- Choosing a suitable location: Begonia Glabra prefers bright, indirect light. Place the plant near a window that receives filtered sunlight or in a spot with bright, but indirect, light.
- Soil and container: Use well-draining soil for Begonia Glabra. A mixture of equal parts potting soil, peat moss, and perlite or sand works well. Select a container with drainage holes to prevent waterlogging.
- Watering: Begonia Glabra prefers moderately moist soil. Water the plant when the top 1-2 inches of soil feel dry. Avoid overwatering, as it can lead to root rot. Ensure the excess water drains out of the container.
- Humidity: Begonia Glabra thrives in high humidity. To increase humidity, you can place a tray filled with water beside the plant or use a humidifier. Alternatively, mist the leaves regularly with water.
- Temperature: Begonia Glabra prefers a moderate temperature range of around 60-75°F (15-24°C). Avoid exposing the plant to extreme cold or heat.
- Fertilizer: Feed Begonia Glabra with a balanced houseplant fertilizer every 2-4 weeks during the growing season (spring and summer). Follow the instructions on the fertilizer packaging for the correct dosage.
- Pruning: Prune the plant regularly to remove dead or yellow leaves. This will encourage healthy growth and prevent disease.
- Propagation: You can propagate Begonia Glabra through stem or leaf cuttings. Place the cuttings in a container with moist soil, keep them warm and humid, and they will develop new roots in a few weeks.
- Pests and diseases: Watch out for pests like mealybugs, aphids, and spider mites. If necessary, use appropriate insecticidal soaps or oils to control them. Ensure good air circulation around the plant to prevent diseases.
By following these guidelines, you can successfully grow a Begonia Glabra plant and enjoy its beautiful foliage.

Place in a window with dappled sun or a spot in the middle of a room. Or directly in a window facing west or east.

To water this plant, it is important to first check the soil moisture level by inserting your finger a few inches into the soil. If the soil feels dry, the plant should be watered. Place the plant in a sink or bathtub and water it until it runs out of the drainage holes in the bottom of its pot. Allow the plant to drain for several minutes before returning it to its saucer or decorative container. Be sure not to let the plant sit in standing water, as this can cause root rot. In general, this plant prefers to be kept evenly moist but not waterlogged, so it is important to monitor its soil moisture regularly.
To fertilize the Begonia Glabra plant, mix a balanced, water-soluble fertilizer with water according to the package instructions. Apply the fertilizer to the soil around the base of the plant every two weeks during the growing season. Avoid over-fertilizing, as this can damage the plant. Always water the plant thoroughly after fertilizing to prevent burning the roots.
The best type of soil for the Begonia Glabra plant is a well-draining soil that is rich in organic matter. It should have a pH level between 6 and 7.5 and should be moist but not too wet. A mixture of peat moss, perlite, and sand can provide the ideal environment for this plant to thrive. The soil should be kept consistently moist but not waterlogged. Adding a slow-release fertilizer to the soil can also be beneficial. It is important to avoid using heavy, clay soils as they can lead to root rot and other problems for the plant.
To propagate this type of plant, start by taking several stem cuttings from a mature, healthy plant. Use a clean, sharp knife or scissors to make a cut just below a node (where a leaf meets the stem). Remove any leaves from the bottom 2 inches of the stem.
Dip the cut end of each stem into rooting hormone powder and plant it into a pot of moist potting soil. Make sure the cutting is buried at least 1 inch into the soil. Cover the pot with a clear plastic bag and place it in a bright, but indirect light location.
Check the pot every few days and mist the cuttings with water to keep the soil moist. After several weeks, new roots should start to grow from the cuttings. Once the cuttings have established roots and have started to grow new leaves, remove the plastic bag and transplant them into individual pots filled with potting soil.
Keep the new plants watered and placed in bright, but indirect light until they have fully established themselves.
Common pests of the climbing sorrel include Mealybugs, spider mites, aphids, whiteflies. Make a habit of checking your climbing sorrel frequently for pests so that any infestations can be caught and managed early.


