Plant Overview
Hailing from the lush tropical forests of Colombia and Panama, Begonia guaduensis is a sophisticated "cane-type" begonia that brings a touch of the rainforest to any indoor collection. Often admired for its architectural, bamboo-like stems and glossy foliage, it is named after the Colombian town of Guaduas. Unlike its showier, hybrid cousins, this species offers a refined, natural elegance that thrives in humid, shaded corners.
🔍 How to Identify
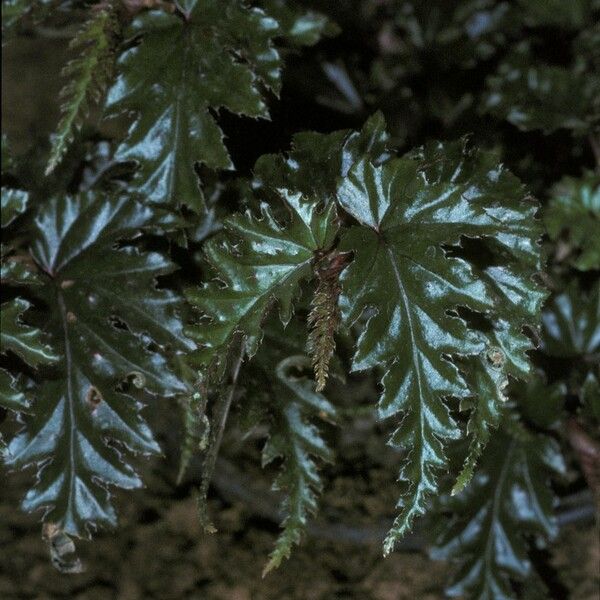
- 🌿 The Foliage: Leaves are asymmetrical and elongated (often called "angel-wing" shaped), featuring a deep, waxy green color with a smooth, polished finish.
- 🎋 The Stems: It grows on thick, upright, jointed stems that strongly resemble bamboo canes, giving the plant a sturdy and tall structural habit.
- 🌸 The Blooms: Produces delicate, pendulous clusters of small white or pale pink flowers that hang gracefully from the leaf axils during the growing season.
🏡 In Your Garden
- 💧 Humidity is Key: Because of its rainforest origins, this Begonia is prone to "crispy edges" if the air is too dry; it thrives best in a bathroom, near a humidifier, or grouped with other plants.
- ✂️ Shape Management: Left to its own devices, it can become quite "leggy." To encourage a bushier, more compact look, gardeners should pinch back the growing tips in early spring.
- 🪴 Root Sensitivity: It prefers a well-draining, airy potting mix. It is sensitive to "wet feet," so while it loves moisture, the soil must never stay soggy, or the thick canes may rot at the base.
⚠️ Safety & Toxicity
- 🐾 Toxic to Pets: Like most members of the Begoniaceae family, this plant contains calcium oxalate crystals.
- 🚫 Risk Level: If ingested, it can cause significant mouth irritation, drooling, and vomiting in cats and dogs. The most toxic parts of the plant are actually the roots, which are usually hidden underground but should be kept away from "diggers."
✨ Fun Fact
Begonias are one of the few plant groups that have been "fashionable" for centuries; Begonia guaduensis was first described by scientists in the mid-1800s, making it a true Victorian-era botanical treasure that has survived the test of time!

Detailed Care Instructions
Growing Begonia guaduensis can be a rewarding experience, but it's important to provide the right conditions for this plant to thrive. Here's a step-by-step guide to help you grow Begonia guaduensis successfully:
1. Choose the Right Location
- Light: Begonias generally prefer indirect, filtered light. An east or north-facing window is ideal. Direct sunlight can scorch the leaves, while too little light can affect growth and flowering.
- Temperature: Begonias thrive in temperatures between 60-75°F (15-24°C). Avoid exposing them to drafts or sudden temperature changes.
2. Soil Requirements
- Use a well-draining, light soil mix. A mix designed for African violets or a homemade blend of peat moss, perlite, and vermiculite works well.
- Ensure the pot has adequate drainage holes to prevent waterlogging, which can lead to root rot.
3. Watering
- Water your Begonia guaduensis when the top inch of the soil feels dry. Over-watering can be a common mistake, so it's better to err on the side of caution.
- Water the soil directly to keep the leaves dry, as wet leaves can lead to mildew or fungal diseases.
4. Humidity
- Begonias enjoy a humid environment, ideally around 50-60% humidity.
- If your home is dry, consider using a humidity tray, a room humidifier, or grouping plants together to create a microenvironment.
5. Fertilization
- Feed your Begonia guaduensis with a balanced, water-soluble fertilizer every 2-4 weeks during the growing season (spring and summer).
- Reduce feeding in the fall and winter when the plant's growth slows down.
6. Pruning and Maintenance
- Remove any dead or yellowing leaves to maintain the health of the plant.
- Pinch back the stems to encourage bushier growth and more flowers.
7. Repotting
- Repot your begonia every 1-2 years in the spring to give it fresh soil and more room to grow.
- Choose a pot that is only slightly larger than the current one to prevent waterlogging.
8. Propagation
- Begonia guaduensis can be propagated through leaf cuttings, stem cuttings, or division.
- Leaf Cuttings: Cut a healthy leaf with a good stem, place it in water or moist soil, and wait for roots to develop.
- Stem Cuttings: Cut a segment of stem with at least one node, and plant it in a small pot with moist soil.
- Division: When repotting, you can divide the plant by gently separating the root ball into smaller sections and planting them individually.
9. Pest and Disease Management
- Leaf Cuttings: Cut a healthy leaf with a good stem, place it in water or moist soil, and wait for roots to develop.
- Watch out for common pests like aphids, spider mites, and mealybugs. Treat with insecticidal soap or neem oil if needed.
- Ensure proper airflow and avoid overwatering to prevent fungal diseases.
By following these care instructions, your Begonia guaduensis should thrive and bring beauty to your home. Enjoy growing your plant!
Watering Begonia guaduensis requires careful attention to maintain its health and vibrant appearance. Here are detailed steps to follow:
- Watering Frequency: Water this plant when the top inch of soil feels dry to the touch. Depending on the climate and indoor conditions, this could range from every few days to once a week. In warmer, drier settings, it may need more frequent watering.
- Water Amount: Ensure that the plant receives a thorough watering each time. Water until it begins to flow out from the drainage holes at the bottom of the pot. This helps prevent salt build-up and ensures that the entire root system gets moisture.
- Water Quality: Use room temperature water. Avoid softened water as it contains salts that can be harmful to the plant. If possible, use rainwater or distilled water.
- Soil Drainage: Make sure the potting mix is well-draining. A mixture of peat moss, perlite, and vermiculite works well, allowing excess water to escape easily and preventing root rot.
- Humidity Requirements: This plant prefers high humidity. Place the pot on a pebble tray filled with water, ensuring the pot isn’t directly sitting in the water, or use a room humidifier to maintain humidity levels.
- Monitoring: Regularly check the moisture level of the soil. Use your finger or a moisture meter to gauge when the next watering is needed.
- Avoid Overwatering: One of the common issues with this plant is overwatering. Signs of overwatering include yellowing leaves, wilting, or root rot. If these symptoms appear, reduce the watering frequency and ensure the pot has good drainage.
- Watering Technique: Water the plant at the base rather than from above to avoid wetting the leaves which can lead to mildew and other fungal diseases.
- Adjusting for Seasons: During the growing season (spring and summer), the plant may need more frequent watering as it actively grows. In its dormant period (fall and winter), reduce watering but do not let the soil completely dry out.
By adhering to these guidelines, you can ensure that your Begonia guaduensis remains healthy and thrives in its environment.
Here's a guide on how to fertilize Begonia guaduensis:
- Frequency: Fertilize your plant every 2-4 weeks during its active growing season, which generally spans from spring to late summer.
- Type of Fertilizer: Use a balanced, water-soluble fertilizer with a 20-20-20 N-P-K ratio. Alternatively, you can use a fertilizer formulated specifically for flowering plants to promote better blooms.
- Dilution: It's important to dilute the fertilizer to half the recommended strength on the package to avoid over-fertilizing, which can damage the plant.
- Application:
- Water your plant thoroughly before applying the fertilizer to prevent root burn.
- Apply the diluted fertilizer solution directly to the soil around the base of the plant. Avoid getting the fertilizer on the leaves, as this can cause burning.
- Water your plant thoroughly before applying the fertilizer to prevent root burn.
- Winter Months: Reduce fertilization to once a month or stop entirely during the plant’s dormant period in fall and winter.
- Signs of Over-fertilizing: Watch out for yellowing leaves, stunted growth, or white, crusty deposits on the soil surface, which can indicate fertilizer buildup. If you notice these signs, flush the soil with water to remove excess fertilizer.
Following these guidelines will help ensure your plant receives the nutrients it needs to thrive without the risk of over-fertilization.
Begonia guaduensis thrives best in a well-draining, loose, and airy soil mix. The ideal growing medium should retain some moisture without becoming waterlogged. Here are some detailed tips for creating the perfect soil mix for this plant:
- Base Composition:
- Peat Moss or Coco Coir: These materials are excellent for moisture retention while maintaining good aeration. Peat moss is slightly acidic, which can be beneficial for the plant.
- Peat Moss or Coco Coir: These materials are excellent for moisture retention while maintaining good aeration. Peat moss is slightly acidic, which can be beneficial for the plant.
- Drainage:
- Perlite or Vermiculite: Including perlite or vermiculite in the mix enhances drainage and prevents compacting, ensuring that the roots have adequate air circulation.
- Perlite or Vermiculite: Including perlite or vermiculite in the mix enhances drainage and prevents compacting, ensuring that the roots have adequate air circulation.
- Organic Matter:
- Compost or Leaf Mold: Adding a small amount of compost or leaf mold provides essential nutrients and encourages a healthy soil microbiome.
- Compost or Leaf Mold: Adding a small amount of compost or leaf mold provides essential nutrients and encourages a healthy soil microbiome.
- Looseness:
- Pine Bark or Orchid Bark: These components increase the soil's porosity and further improve drainage, mimicking the plant's natural habitat where organic debris is common.
Soil Mix Recipe:
A balanced mix for this plant could be:
- Pine Bark or Orchid Bark: These components increase the soil's porosity and further improve drainage, mimicking the plant's natural habitat where organic debris is common.
- 40% Peat Moss (or Coco Coir)
- 30% Perlite or Vermiculite
- 20% Pine Bark or Orchid Bark
- 10% Compost or Leaf Mold
Acidity Levels: - The soil pH should ideally be slightly acidic to neutral, ranging from 6.0 to 7.0.
Care Tips: - Watering: The soil should be kept consistently moist but not soggy. Allow the top inch of soil to dry out slightly between watering to prevent root rot.
- Repotting: Consider repotting the plant every 1-2 years to refresh the soil and provide room for growth. Ensure the new pot has adequate drainage holes.
Using this tailored soil mix will support the plant's health and vigor, providing an environment that encourages robust growth and vibrant foliage.
Propagating Begonia guaduensis can be an immensely rewarding process. To propagate this distinctive plant, you can use either stem cuttings or leaf cuttings. Below, I'll explain both methods in detail:
Propagation via Stem Cuttings
- Selection of Cutting: Choose a healthy, robust stem that is neither too young nor too old. The stem should be about 4-6 inches long and have several leaves.
- Cutting the Stem: Using a clean, sharp knife or pair of scissors, cut the stem just below a node (the point where a leaf joins the stem). Ensure that the cutting tool is sterilized to prevent infection.
- Preparing the Cutting: Remove the lower leaves, leaving only the top two or three leaves on the stem cutting. This reduces water loss and encourages rooting.
- Optional - Use Rooting Hormone: Dipping the cut end in rooting hormone can increase the chances of successful rooting, but this step is optional.
- Planting the Cutting: Place the cut end of the stem in a small pot filled with a well-draining potting mix, ideally a mix designed for begonias or a combination of peat moss and perlite.
- Watering: Water the cutting well, ensuring the potting medium is moist but not waterlogged.
- Creating a Humid Environment: To maintain humidity, cover the pot with a clear plastic bag. Ensure that the bag doesn't touch the leaves by using stakes or a small frame.
- Place in Indirect Light: Position the cutting in a location with bright, indirect light. Direct sunlight can be too harsh.
- Monitor and Care: Check the moisture level of the potting medium regularly and mist the cutting if needed. It generally takes a few weeks for roots to develop.
- Transplanting: Once roots are well established and new growth appears, you can transplant the new plant into a larger pot with standard begonia potting mix.
Propagation via Leaf Cuttings
- Selecting a Leaf: Choose a healthy, mature leaf from the plant.
- Cutting the Leaf: Using a clean knife or scissors, cut the leaf along its main veins, so you have several sections of leaf. Each section should include a part of the main vein.
- Preparation of Cuttings: If desired, you can dip the cut edges in rooting hormone to promote root development.
- Planting the Leaf Sections: Lay the sections flat on a tray filled with a well-draining potting mix. You can also plant them upright with the vein end inserted into the potting medium.
- Watering and Covering: Water the potting mix lightly and cover the tray with a clear plastic lid or bag to maintain humidity.
- Providing Light and Humidity: Place the setup in a location with bright, indirect light. The high humidity within the cover will aid in root formation.
- Monitoring Growth: Ensure that the medium remains moist but not waterlogged. New plantlets will form at the edges of the leaf sections, usually within a few weeks.
- Separating and Potting: Once the new plantlets have developed their own roots and leaves, gently separate them from the parent leaf and transplant them into individual pots.
Both methods require patience and careful monitoring, as begonias can be sensitive to overwatering and inadequate light. With proper care, you'll soon have new, thriving plants.


