Plant Overview
Often called the "Waterfall Begonia" or "Trailing Begonia," these botanical beauties are the undisputed stars of the hanging basket world. Originally derived from species found in the humid forests of South America, they bring a touch of tropical elegance to shady patios. Their soft, arching stems create a living curtain of vibrant blooms that seem to defy gravity, making them a favorite for vertical gardening.
🔍 How to Identify
- 🌸 Floral Display: Features pendulous, often double-petaled flowers that hang downward like delicate bells in vivid shades of scarlet, apricot, pink, or white.
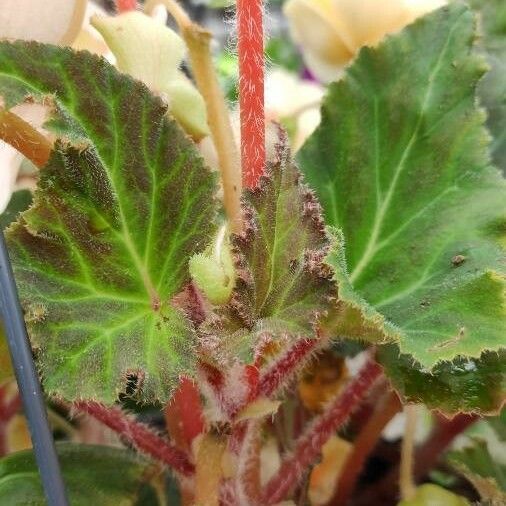
- 🍃 Asymmetrical Foliage: The leaves are heart-shaped but famously "lopsided" or wing-like, often with jagged edges and a rich, waxy green texture.
- 🌿 Cascading Habit: Unlike upright begonias, these stems naturally trail downward, reaching lengths of 12 to 18 inches as they spill over the edges of containers.
🏡 In Your Garden
- 🌤️ Shadow Dwellers: These plants are specialists in indirect light. Harsh afternoon sun will quickly scorch their thin leaves, so they prefer the "dappled" light of a north-facing porch or the shade of a large tree.
- 💧 Thirst Management: Because their stems are succulent and hold water, they are highly sensitive to "wet feet." They require a light, airy potting mix and a container with excellent drainage to prevent the tuber from rotting.
- 🥣 Energy Needs: To keep the "waterfall" of flowers flowing all summer, they appreciate regular feeding. Producing such a high volume of blooms is energy-intensive, so a liquid fertilizer every few weeks keeps them vibrant.
⚠️ Safety & Toxicity
- 🐾 Pet Warning: Begonia Pendula is considered toxic to dogs and cats. The plant contains calcium oxalate crystals, which are most concentrated in the tubers but present throughout the stems and leaves.
- 👄 Symptoms: If ingested, it can cause intense oral irritation, excessive drooling, and vomiting. It is best to utilize their trailing nature by hanging them high and out of reach of furry friends.
✨ Fun Fact
Begonia tubers are biological "batteries." In colder climates, gardeners can dig up the tubers in the autumn, store them in a cool, dry place over winter, and "wake them up" in the spring to grow the exact same plant again year after year!

Detailed Care Instructions
To grow a Begonia Pendula plant, you can follow these steps:
- Choose the right location: Begonia Pendula plants prefer bright but indirect sunlight. They thrive in temperatures between 65-80°F (18-27°C). Place them in a spot with good air circulation but protect them from strong winds.
- Select the right soil: Begonia Pendula plants prefer well-draining soil that retains moisture but doesn't become waterlogged. Use a mixture of peat moss, perlite, and organic compost.
- Planting: Dig a hole in the soil that is slightly larger than the root ball of the plant. Place the plant in the hole and gently cover the roots with soil. Leave a 1-inch space between the soil surface and the rim of the pot to allow for proper watering.
- Watering: Water the Begonia Pendula plant regularly and keep the soil consistently moist. However, avoid overwatering as it can lead to root rot. Allow the top inch of the soil to dry out slightly before watering again.
- Fertilizing: Feed your Begonia Pendula plant with a balanced water-soluble fertilizer every four to six weeks during the growing season (spring to fall). Follow the instructions on the fertilizer packaging for the correct dilution ratio.
- Pruning: Trim back any leggy or overgrown stems to maintain a compact and bushy shape. Regularly remove any dead or yellowing leaves to promote healthy growth.
- Pests and diseases: Keep an eye out for common pests like mealybugs, aphids, and spider mites. Treat any infestations promptly with insecticidal soap or a homemade solution. Also, prevent diseases by avoiding overwatering and providing proper air circulation.
- Propagation: You can propagate Begonia Pendula plants through stem or leaf cuttings. Take a healthy cutting with a few leaves and place it in a pot with moist soil or water. Keep it in a warm, humid environment until roots develop.
Remember to monitor the plant's growth and adjust care accordingly. With proper care, your Begonia Pendula plant will grow and add a colorful touch to your indoor or outdoor space!

Place in a window with dappled sun or a spot in the middle of a room. Or directly in a window facing west or east.

To water this particular plant, you must first determine the moisture level of the soil by gently probing your finger into it. If the soil feels dry to the touch, you may water the plant thoroughly, making sure to saturate the soil until it begins to drain from the bottom of the pot. It is important not to allow the soil to become too soggy or waterlogged, as this can lead to root rot. It is also advisable to avoid letting the plant sit in standing water, as this can cause fungal growth and other complications. This plant typically prefers a moderate level of moisture, so aim to water it every few days or when the top layer of soil appears dry.
To fertilize this type of plant, use a balanced fertilizer with equal amounts of nitrogen, phosphorus, and potassium. Apply the fertilizer every two weeks during the growing season, which is typically from spring to fall. Dilute the fertilizer to half strength and water the plant thoroughly before and after application. Be careful not to over-fertilize as this can damage the plant.
Begonia Pendula plant prefers a well-draining soil with good moisture retention capacity. The soil should be slightly acidic with a pH of around 6.0 to 6.5. The best soil mix for this plant is a blend of peat moss, perlite, and vermiculite. This mix provides good drainage, aeration, and moisture retention.
It is important to avoid using heavy or compacted soils that can hinder water and nutrient uptake by the roots. The soil should also be rich in organic matter to support healthy plant growth. Adding compost or well-rotted manure to the soil can help improve its fertility and structure.
When planting Begonia Pendula, make sure to loosen the soil to a depth of at least 6 inches and mix in some organic matter before planting. Water the plant thoroughly after planting and maintain adequate moisture levels throughout the growing season.
Begonia Pendula is a type of flowering plant that can be propagated from stem cuttings. To do this, you will need to select a healthy stem that is approximately 10-15cm in length and has at least two leaves. Using a sharp pair of scissors or pruning shears, cut the stem at a 45-degree angle just below a node (a small bump on the stem where a leaf is attached).
Remove the lower leaves from the stem, leaving only one or two leaves at the top. This will prevent the cutting from losing too much moisture as it starts to root. If the leaves are particularly large, you can also trim them down to reduce water loss.
Next, dip the cut end of the stem into rooting hormone powder. This will help to stimulate root growth and improve the chances of successful propagation. If you don't have rooting hormone powder, you can still proceed without it, but the success rate may be lower.
Prepare a small pot or container with well-draining potting soil. Make a hole in the soil using a pencil or similar tool and gently insert the cutting into the hole. Firm the soil around the stem to hold it in place.
Water the cutting lightly, being careful not to overwater and saturate the soil. You can cover the pot with a clear plastic bag to create a mini greenhouse and help retain moisture. Place the pot in a warm, bright location (but out of direct sunlight) and monitor the cutting regularly for signs of growth.
After a few weeks, you should start to see new growth on the cutting, which is a sign that roots are forming. You can remove the plastic bag and gradually increase the amount of light and water the plant receives as it grows. Once the cutting has established roots and is growing well, you can transplant it into a larger pot or container, or even plant it outside in a suitable location in the garden.


