Plant Overview
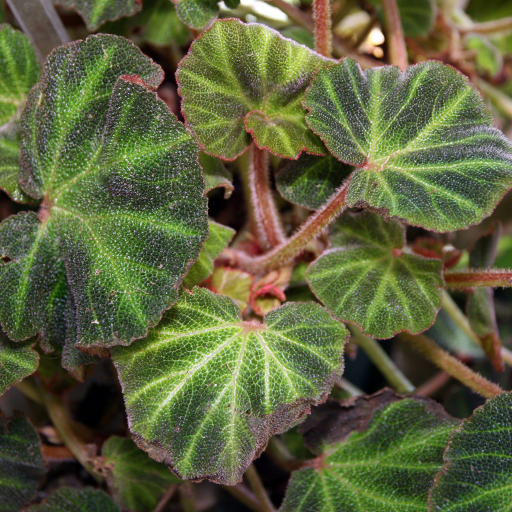
Known as the "Sun-changing Begonia," this Brazilian beauty is a living mood ring for your home. Its name, solimutata, literally translates to "sun-changed," referring to its incredible ability to darken its foliage in low light and lighten it under brighter conditions. Originating from the shaded rainforest floors of Brazil, it is beloved by collectors for its prehistoric, "pebbled" texture and dramatic neon veins.
🔍 How to Identify
- 🍃 Bullate Texture: The leaves are not smooth; they are covered in hundreds of tiny, raised bumps (bullae) that give the plant a rugged, three-dimensional look similar to lizard skin.
- 🎨 Contrast Veining: Each heart-shaped leaf features a dark forest-green base contrasted by a striking, lime-green "lightning bolt" pattern that follows the primary veins.
- 🩸 Burgundy Undersides: When viewed from below or in backlight, the leaves reveal a rich, deep red underside, which helps the plant capture extra light in the dim forest understory.
🏡 In Your Garden
- ☁️ Humidity is King: Because it hails from the humid Mata Atlântica, this Begonia is a humidity lover. If the air is too dry, the leaf edges will quickly become crispy and brown. It thrives best in a terrarium or near a humidifier.
- 💡 Light Sensitivity: Unlike many plants that simply "burn" in the sun, the Solimutata actually alters its chlorophyll density. It prefers bright, indirect light; too much direct sun will bleach the deep green colors and damage the delicate, textured surface.
- 🏺 Breathable Soil: It has a very fine, fibrous root system that is prone to rot. It’s best to use a chunky, airy potting mix (think orchid bark and perlite) to ensure the roots never sit in stagnant water.
⚠️ Safety & Toxicity
- 🐾 Toxic to Pets: Like almost all Begonias, this species contains soluble calcium oxalate crystals.
- 🚫 Irritant: If leaves or stems are chewed, it can cause immediate oral irritation, drooling, and swelling of the throat in cats, dogs, and horses. It is best kept on high shelves away from curious nibblers.
✨ Fun Fact
The "pebbled" surface of the Begonia solimutata isn't just for looks—the bumps act like tiny magnifying lenses! They help the plant focus the very limited light found on the dark rainforest floor toward its internal cells, allowing it to photosynthesize more efficiently than plants with flat leaves.

Detailed Care Instructions
To successfully grow a Begonia Solimutata plant, you need to follow some general care instructions. Here's a step-by-step guide:
- Choose the right location: Begonia Solimutata prefers bright, indirect light. Find a location in your home or garden with filtered sunlight or partial shade.
- Provide the ideal temperature: This plant thrives in temperatures between 60°F (15°C) and 75°F (24°C). Protect it from extreme hot or cold conditions.
- Use well-draining soil: Choose a well-draining potting mix that retains some moisture but doesn't get overly soggy. A mixture of peat moss, vermiculite, and perlite works well.
- Watering routine: Begonia Solimutata prefers moist soil. Water the plant when the top inch of soil feels dry to the touch. Avoid overwatering, as it can lead to root rot. Also, ensure that the pot or container has drainage holes to prevent waterlogging.
- Humidity requirements: Begonias appreciate high humidity levels. Mist the leaves regularly with water or place a humidity tray nearby. You can create a humidity tray by filling a shallow tray with water and placing pebbles or stones in it. Put the potted Begonia on top of the pebbles without letting it touch the water.
- Fertilize regularly: Use a balanced, water-soluble fertilizer diluted to half strength during the growing season (spring and summer). Apply it every 2-3 weeks. In fall and winter, reduce the frequency of fertilization to once a month or stop entirely.
- Pruning: Regularly pinch or trim the plant to encourage bushiness and maintain the desired shape. Remove dead or damaged leaves to promote optimal growth.
- Potting and repotting: Begonia Solimutata prefers slightly crowded roots, so repot only when necessary and choose a pot one size up. Spring or early summer is the best time for repotting.
- Pests and diseases: Keep an eye out for common pests such as aphids, spider mites, and mealybugs. If detected, treat the plant with a suitable insecticide or a homemade remedy like neem oil. Also, avoid overwatering to prevent root rot and fungal diseases.
Remember to regularly inspect your Begonia Solimutata plant, provide proper care, and adjust the conditions based on the specific needs of your plant.

Place in a window with dappled sun or a spot in the middle of a room. Or directly in a window facing west or east.

1. First, you need to select an appropriate container for the plant. Depending on the plant size, choose a pot which can hold the soil and take up water without leaking.
2. Begonia Solimutata likes to be kept moist but not wet. Thus, you will need to water the plant regularly, but you have to be careful not to over-water it. During the growing season, water the plant at least once a week. In the winter season, when the plant is dormant, reduce the frequency of watering.
3. The best time to water the plant is in the morning or late afternoon. This will give the plant the time it needs to absorb the water without drying out too quick or losing too much moisture.
4. Before watering the plant, check the topsoil with your finger. If it feels dry, then it is time to water the plant. If the topsoil still feels moist, wait for a few more days before watering the plant.
5. When watering the plant, pour water slowly and evenly over the soil surface until you see water coming out of the drainage holes. This will ensure that the soil is evenly moistened and the roots get enough water.
6. Always check the drainage holes in the container to avoid waterlogging. If the bottom of the pot is soaked, it might lead to root rot and other fungal diseases.
7. During the hot summer days, increase the frequency of watering to keep the soil moist enough.
8. Remember to check the soil moisture level regularly and adjust watering accordingly. Overwatering or underwatering can cause various issues to the plant health.
To fertilize this plant, use a balanced fertilizer with an N-P-K ratio of 20-20-20. Apply every 2-3 weeks throughout the growing season, which is typically spring and summer. Dilute the fertilizer to half the recommended strength and water the soil around the plant, taking care not to get any on the leaves. After fertilizing, water lightly to help the nutrients reach the roots. Avoid fertilizing during the dormant season, which is usually fall and winter.
The best soil to use with this plant is a well-draining mix made of loam, peat, and perlite. It should have a slightly acidic pH level (around 6.0-6.5) and good moisture retention capabilities. The soil should be rich in organic matter and nutrients to provide the plant with sufficient nourishment for healthy growth. It is also important to ensure that the soil doesn't become waterlogged as this can lead to root rot.
To propagate this plant, you will first need to gather some stem cuttings from a healthy, mature plant. Use a sharp, clean pair of garden scissors or pruning shears to take a cutting that is about 4-6 inches long.
Remove any leaves from the bottom 2-3 inches of the stem, and make a clean cut below a node (where a leaf was attached). Dip the cut end of the stem into rooting hormone powder (optional), and then plant it into a container filled with well-draining potting soil.
Water the soil thoroughly, and cover the container with a clear plastic bag or wrap to create a mini greenhouse. Place the container in a bright, shaded area where it will receive indirect sunlight.
Keep the soil moist but not waterlogged, and check on the cutting regularly to make sure it is not wilting or drying out. After several weeks, the cutting should begin to produce new growth and roots.
Once the new plant has grown a few inches and is well-established, you can transplant it into a larger pot or directly in the ground if you live in a warm climate. It is important to keep the soil moist and to fertilize the plant regularly to help it grow strong and healthy.


