Plant Overview
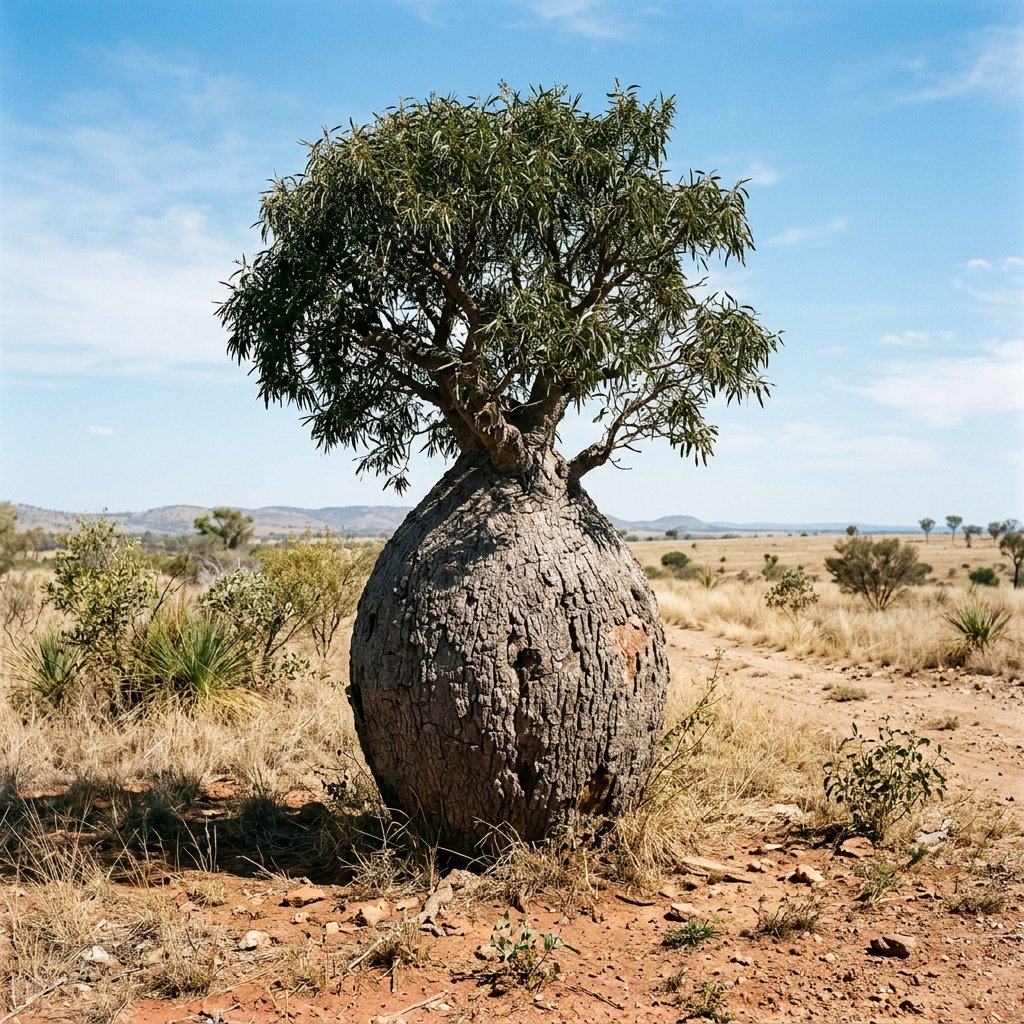
Standing like a proud, ancient guardian of the Australian outback, the Brachychiton rupestris—better known as the Queensland Bottle Tree—is a whimsical marvel of nature. It is famous for its distinct, swollen trunk that looks like it was plucked straight from a storybook or a prehistoric landscape. This "living canteen" evolved its unique shape to store massive amounts of water, allowing it to survive in some of the harshest, driest environments on Earth.
🔍 How to Identify
- 🫙 The "Bottle" Trunk: The most iconic feature is the trunk, which starts out slender but gradually swells as the tree matures, eventually taking on a bulbous, bottle-like silhouette.
- 🍃 Variable Foliage: The leaves are fascinatingly inconsistent; young trees often have deeply lobed, finger-like leaves, while mature trees transition to narrow, lance-shaped green leaves.
- 🔔 Bell-Shaped Blooms: In late spring, the tree produces clusters of small, inconspicuous flowers that are creamy-yellow with delicate red markings hidden inside.
🏡 In Your Garden
- 🏜️ Drainage is Non-Negotiable: Because the trunk is essentially a giant water storage tank, this tree is highly susceptible to root rot. It requires gritty, fast-draining soil and hates having "wet feet."
- ⏳ A Lesson in Patience: This is a slow-growing "legacy plant." It can take 10 to 15 years for the trunk to begin its signature swelling, making it a prized specimen for long-term gardeners and bonsai enthusiasts alike.
- ☀️ Sun Seeker: To develop that iconic girth, the tree needs maximum light. It thrives in full sun and, once established, is incredibly hardy against both extreme heat and light frost.
⚠️ Safety & Toxicity
- ✅ Low Risk: The Brachychiton rupestris is generally considered non-toxic to humans, dogs, and cats.
- 🧤 Itchy Seed Pods: While the tree is safe, the seed pods contain fine, star-shaped hairs that can cause significant skin and eye irritation. Always wear gloves if you are handling the woody pods or collecting seeds.
✨ Fun Fact
💧 The Living Well: Indigenous Australians found many uses for the Bottle Tree; they would tap into the soft, fibrous wood to find water during droughts and even consumed the energy-rich seeds and roots of younger trees.

Detailed Care Instructions
| Humidity | Dry |
| Lighting | Full Sun |
| Toxicity | Poisonous |
| Difficulty | Medium |
| Hibernation | Cold Period |
| Temperature | 12°C - 28°C |
To grow Brachychiton Rupestris, also known as the Queensland Bottle Tree, you can follow these steps:
- Climate and soil requirements: Brachychiton Rupestris thrives in warm, subtropical, or tropical regions. It prefers well-draining soils that are slightly acidic. The tree does well in full sun, but it can tolerate partial shade.
- Seed collection and preparation: Collect fresh seeds from mature Brachychiton Rupestris trees. Soak the seeds in warm water for about 24 hours to soften the hard outer shell and improve germination.
- Potting or planting: Plant the seeds in pots or directly in the ground. If using pots, fill them with well-draining potting mix. Sow each seed about 1 inch deep and tamp down the soil gently. If planting directly in the ground, choose a suitable location and dig a hole twice the size of the root ball.
- Watering: Water the newly planted seeds or seedlings thoroughly and keep the soil consistently moist in the early stages of growth. Avoid overwatering, as it can lead to root rot.
- Fertilizing: After the seedlings have emerged or when the young trees are established, apply a balanced organic fertilizer according to the manufacturer's instructions. The frequency of fertilization will depend on the specific fertilizer used.
- Pruning: Prune Brachychiton Rupestris lightly to remove dead or crossed branches. Prune in early spring before new growth emerges. Avoid heavy pruning, as it can negatively impact the tree's natural shape.
- Protection from frost: If you live in an area prone to frost, take measures to protect young Brachychiton Rupestris trees. Use frost blankets or covers to shield them from extreme cold.
- Mulching: Apply a layer of organic mulch around the base of the tree to help retain moisture, regulate soil temperature, and suppress weed growth.
- Pests and diseases: Monitor the tree for any signs of pests or diseases such as scale insects or root rot. Treat any issues promptly using appropriate organic pest control methods or consult a professional.
- Patience: Brachychiton Rupestris is a slow-growing tree. It may take several years for it to reach maturity and display its characteristic bottle-shaped trunk. Be patient and provide the tree with consistent care.
Remember, it's always helpful to consult with local gardening experts or nursery professionals for region-specific advice on growing and caring for Brachychiton Rupestris.

Place in a window with dappled sun or a spot in the middle of a room. Or directly in a window facing west or east.

Brachychiton Rupestris plant requires regular watering to maintain its health and growth. The plant should be watered deeply but sparingly, ensuring that the soil is moist to touch but not waterlogged. The frequency of watering will vary based on the climate and soil conditions. It's important not to overwater the plant as this can lead to root rot and other diseases. Instead, wait until the soil has dried out slightly before watering again. When watering, direct the water to the base of the plant, avoiding wetting the leaves or stem. It's also recommended to water the plant early in the morning or late in the evening to reduce evaporation and allow the water to be absorbed fully. During the winter months, the plant may require less frequent watering as it goes into a dormant state.
- Use a well-balanced fertilizer that contains equal amounts of nitrogen, phosphorus, and potassium.
- Apply the fertilizer during the active growing season of the plant.
- Dilute the fertilizer according to the manufacturer's instructions.
- Apply the fertilizer evenly around the base of the plant.
- Water the plant after applying the fertilizer to help it absorb the nutrients.
- Repeat the process every four to six weeks during the growing season.
- Avoid over-fertilizing as it can damage the plant.
Brachychiton Rupestris prefers well-draining soil that is rich in organic matter. A soil mixture that consists of equal parts of sand, loam, and peat or compost is ideal. This type of soil provides good drainage and allows air to circulate around the roots, which is important for the overall health of the plant. Additionally, it's best to avoid using soil that is heavy in clay or compacted, as this can restrict root growth and cause waterlogging. It's also important to ensure that the soil is slightly acidic with a pH range of 6.0-7.5. This can be achieved by adding some acidic organic matter such as pine needles or using a soil acidifier. Overall, using the right soil type for Brachychiton Rupestris is essential to ensure optimal growth and health of the plant.
To propagate this plant, start by taking a cutting from a healthy and mature specimen. Choose a stem that is several inches long and has a few sets of leaves. Make a clean, diagonal cut at the base of the stem using a sharp and sterilized pruning tool.
Next, remove the leaves from the lower half of the stem, leaving only a few at the top. Dip the cut end of the stem into a rooting hormone powder to encourage root growth.
Fill a small pot with a well-draining potting mix and make a hole in the center of the soil. Insert the stem into the hole and gently press the soil around it to hold it in place. Water the cutting thoroughly and place it in a bright location with indirect sunlight.
Cover the pot with a clear plastic bag or a propagation dome to retain moisture and create a humid environment. Mist the cutting with water daily to keep it moist but not waterlogged.
After a few weeks, check for signs of new growth or roots growing out of the bottom of the pot. When the cutting has established roots and new leaves, it can be gradually acclimated to less humid conditions and eventually transplanted into a larger container or planted outdoors in a suitable location.
Common pests of the kurrajong include Scale insect, mealybugs, spider mites. Make a habit of checking your kurrajong frequently for pests so that any infestations can be caught and managed early.


