Plant Overview
Known as the "Brown Mustard" or "Leaf Mustard," Brassica juncea is a culinary powerhouse that packs a punch. Whether you're enjoying the peppery kick of its ruffled leaves in a stir-fry or using its seeds to create gourmet condiments, this ancient vegetable has been a staple in Asian and Indian kitchens for millennia. It is a resilient, fast-growing member of the cabbage family that bridges the gap between a nutritious green and a pungent spice.
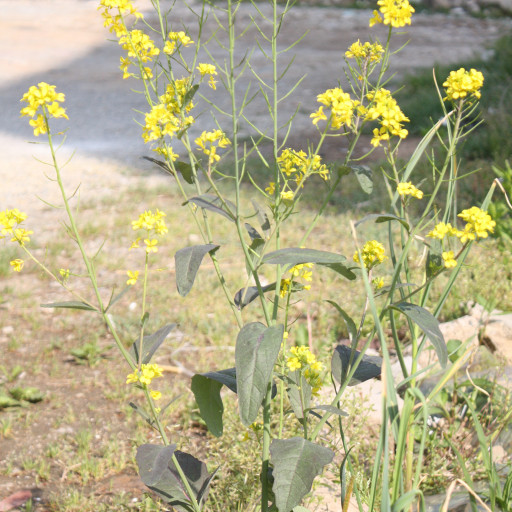
🔍 How to Identify
- 🍃 The Foliage: Look for broad, deep green leaves that often feature ruffled or serrated edges. Some varieties, like 'Giant Red,' may even display deep purple or burgundy marbling.
- 🌼 The Flowers: Like its cousins in the broccoli family, it produces clusters of small, bright yellow flowers with four petals arranged in a cross shape.
- 🌱 The Seed Pods: After flowering, it develops thin, upright green pods (called siliques) that eventually turn brown and contain dozens of tiny, spherical, spicy seeds.
🏡 In Your Garden
- ❄️ Cool Season King: This plant thrives in the crisp air of spring and autumn. If the weather gets too hot, the plant will "bolt" (send up a flower stalk), which makes the leaves taste incredibly bitter and tough.
- 🍴 Flavor Profile: The younger the leaf, the milder the taste. If you want that signature "wasabi-like" nasal burn, let the plant mature, but harvest before the flowers open for the best culinary texture.
- 🪴 Space & Soil: It is a nitrogen-hungry plant that loves rich soil. Because it grows a deep taproot quickly, it doesn't like being moved; it’s best to sow seeds directly into the spot where you want them to stay.
⚠️ Safety & Toxicity
- 🍽️ Edibility: Completely safe and highly nutritious for humans. It is packed with Vitamins A, C, and K, though its intense spiciness can occasionally cause mild heartburn in sensitive individuals.
- 🐾 Pet Caution: While not strictly "toxic," grazing on large amounts of mustard greens can cause digestive upset in dogs and cats due to the presence of isothiocyanates (the chemicals that provide the spicy flavor).
✨ Fun Fact
- 🧪 Soil Cleaner: Brassica juncea is a hero of "phytoremediation." It is so efficient at sucking nutrients from the earth that scientists use it to pull heavy metals like lead and cadmium out of contaminated soil to help heal the environment!

Detailed Care Instructions
| Humidity | Dry |
| Lighting | Full Sun |
| Difficulty | Medium |
| Hibernation | Cold Period |
| Temperature | 18°C - 27°C |
| Hardiness Zones | 2 - 11 |
To grow Brassica Juncea (mustard greens) plants, follow these steps:
- Choose a suitable location: Pick a spot in your garden or balcony that receives at least 6-8 hours of direct sunlight daily. Mustard greens also tolerate partial shade.
- Prepare the soil: Mustard greens prefer well-draining soil with a slightly acidic pH level (around 6.0-6.8). Amend the soil with compost or well-rotted manure to enrich it and ensure good drainage.
- Sow the seeds: Brassica Juncea can be directly sown in the ground or started indoors and later transplanted. If sowing directly, plant the seeds about ¼ inch deep and 1 inch apart. Space rows around 12-18 inches apart. Thin the seedlings to provide enough space for growth.
- Watering: Keep the soil consistently moist but not waterlogged. Water the plants deeply whenever the top inch of soil feels dry. Avoid overhead watering as it can encourage fungal diseases. Drip irrigation or watering at the base of the plants is preferable.
- Fertilization: Mustard greens benefit from regular feeding. Apply a balanced organic fertilizer once a month to provide essential nutrients for healthy growth. Diluted fish emulsion or compost tea can also be used as a natural liquid fertilizer.
- Mulching: Spread a layer of mulch around the plants to retain soil moisture, suppress weeds, and regulate soil temperature.
- Pest and disease control: Monitor the plants regularly for pests such as aphids, flea beetles, and cabbage worms. Handpick them if the infestation is minor, or use organic insecticidal soaps or neem oil spray. Prevent fungal diseases by providing good air circulation and avoiding overhead watering.
- Harvesting: Harvest mustard greens when they reach your desired size. You can pick individual leaves or cut the whole plant a few inches above the base. Regular harvesting promotes continuous growth and prolongs the harvest season.
- Storage: Brassica Juncea leaves are best used fresh but can be stored in the refrigerator for a few days. To extend their shelf life, wrap them in a damp cloth or store them in a plastic bag with some air circulation.
By following these guidelines, you can successfully grow Brassica Juncea and enjoy fresh, nutritious mustard greens.

Place in a window with dappled sun or a spot in the middle of a room. Or directly in a window facing west or east.

To water this plant, you should avoid getting the leaves wet and instead direct the water towards the soil. It is important to water thoroughly, but allow the top layer of soil to dry out slightly between watering. Overwatering can lead to root rot, so be cautious and ensure proper drainage. It is also recommended to water in the morning or evening to prevent evaporation during the hottest parts of the day.
To properly fertilize this plant, use a balanced fertilizer with equal amounts of nitrogen, phosphorus, and potassium. Apply the fertilizer evenly around the base of the plant and water thoroughly after application. The optimal time to fertilize is during the plant's active growing season and avoid fertilizing when the soil is dry or the plant is experiencing stress. Be careful not to over-fertilize as this can lead to foliage burn or plant death.
The ideal soil for cultivating the Brassica Juncea plant is a rich yet well-drained soil that is slightly acidic, with a pH ranging from 6.0 to 6.5. The soil should be loose and friable, with good organic matter content, as the plant has a deep root system that requires ample space for growth and nutrient uptake. It should also contain adequate amounts of nitrogen, phosphorus, and potassium, as these are critical nutrients for the plant's growth and development. Additionally, a well-draining soil is important, as overly wet soil can cause root rot and other issues. It is also vital to ensure that the soil is free from pests, disease pathogens, and weeds, as these can harm the plant and reduce its yield.
One way to propagate this plant is by taking stem cuttings. Select a healthy stem with at least three nodes, making sure it is free from any damage or disease. Cut the stem at a 45-degree angle just above a node using a sterile, sharp knife or pruning shears. Remove the leaves from the lower two-thirds of the stem, leaving only a few leaves at the top. Dip the cut end of the stem into rooting hormone powder and gently tap off any excess powder.
Prepare a pot filled with well-draining soil. Create a hole in the soil using a stick or pencil and carefully insert the stem cutting into the soil, making sure the bottom node is buried. Press the soil lightly around the stem to ensure it is firmly in place. Water the cutting well but avoid overwatering as this can cause rotting.
Place the pot in a warm and bright location but avoid direct sunlight. Cover the pot with a plastic bag or a clear plastic container to create a humid environment for the cutting. Ventilate the bag or container occasionally to prevent moisture build-up and mold growth.
After a few weeks, check if the cutting has developed roots by gently tugging on it. If it resists, it means roots have formed and it can be transitioned to a larger container or planted in the ground. Gradually acclimate the plant to direct sunlight by exposing it to a few hours of sunlight each day until it is fully adapted.
Common pests of the chinese mustard include Aphids, larvae. Make a habit of checking your chinese mustard frequently for pests so that any infestations can be caught and managed early.


