Plant Overview
Known as the Sahara Mustard or African Mustard, this resilient traveler is a desert pioneer that has trekked far from its Mediterranean and North African roots. While it may look like a humble weed, it is a master of survival, often being the first plant to turn a barren sandy patch green after a light rain. In many parts of the southwestern United States, it is viewed as a formidable "invader" that can transform entire landscapes with its rapid growth.
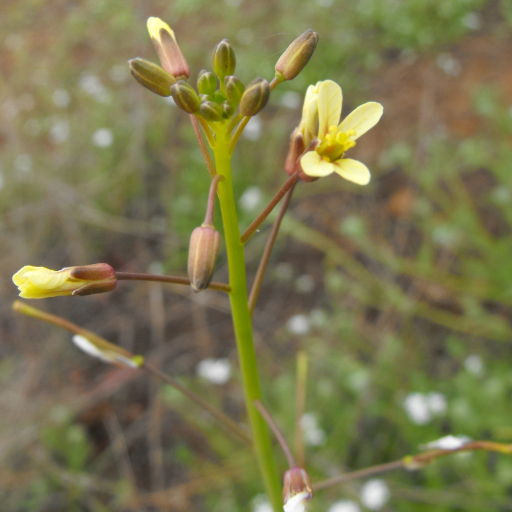
🔍 How to Identify
- 🍃 The Basal Rosette: At the base, you’ll find a dense circle of large, deeply lobed leaves that can grow up to a foot long. These leaves are covered in stiff, prickly hairs that give them a rough, sandpaper-like texture.
- 🌼 Tiny Flowers: Unlike the bold yellow of common mustard, these flowers are small, pale yellow, or almost translucent. They have four petals arranged in a cross shape, sitting atop thin, wiry stems.
- 🧪 Long Seed Pods: Once the flowers fade, they are replaced by "siliques"—narrow, upward-pointing pods that contain dozens of tiny seeds, ready to be scattered by the wind.
🏡 In Your Garden
- 🌵 The Ultimate Competitor: If you find this in your garden, it’s likely because of its love for sandy, disturbed soil. It is an "early riser," germinating in late winter and drinking up all the available moisture before native plants even wake up.
- 🌾 A Thirsty Neighbor: It produces a massive amount of biomass very quickly. While it might look like a lush groundcover, it’s actually a "water thief" that can stress out your intentional desert plantings or succulents by drying out the surrounding soil.
⚠️ Safety & Toxicity
- 🐾 Mild Caution: Sahara Mustard is generally not considered highly toxic to humans or pets. However, like many members of the mustard family, it contains glucosinolates which can cause digestive upset if eaten in large quantities by livestock or curious pets.
- 🚫 Ecological Hazard: The primary danger of this plant isn't chemical—it’s fire. When the plant dies back in the heat of summer, it leaves behind a thick carpet of dry tinder that can fuel intense desert wildfires, threatening local ecosystems.
✨ Fun Fact
Sahara Mustard is a "tumbleweed" in disguise! When the plant dries out, the stem often snaps at the base, allowing the entire skeleton to roll across the desert floor, shaking out thousands of seeds as it travels—a clever way to colonize new territory.

Detailed Care Instructions
To grow Brassica Tournefortii (aka Sahara Mustard) plant, follow these steps:
- Climate and soil conditions: Brassica Tournefortii is an invasive plant species native to the Saharan regions, so it requires hot, dry climates. Ensure that the location where you want to grow it has full sun exposure and well-drained, sandy soil.
- Sowing seeds: Collect seeds from existing Brassica Tournefortii plants or purchase them from a reputable supplier. In the early spring or fall, scatter the seeds on the soil surface and gently press them down. The plant does not require deep planting.
- Watering: Initially, the seeds need to be evenly moistened to aid germination. However, once the plants are established, reduce watering as they are adapted to arid conditions and can withstand drought.
- Weed control: As an invasive species, Brassica Tournefortii can outcompete native plants. Regularly monitor the area and remove any unwanted plants that may be growing nearby.
- Pruning: To promote bushier growth, you can pinch or prune the top growth of young plants. It will encourage lateral branching and a denser plant structure.
- Pest control: Brassica Tournefortii has few pests or diseases that affect it. However, occasional aphid infestation can occur. Inspect the plants regularly, and if infestation is noticed, you can use organic pest control methods like neem oil or insecticidal soap.
- Harvesting: Brassica Tournefortii produces seed pods that eventually turn brown and dry out. To collect the seeds, harvest the pods when they are completely dry. Simply shake the seeds out and collect them for future planting or disposal.
Remember, Brassica Tournefortii is an invasive plant species in many regions, so before planting it, make sure it's legal and does not pose a risk to your local environment.

Place in a bright room that is sun drenched almost all day. Or directly in a south-facing window.

Brassica Tournefortii plant requires regular watering to thrive. To water this plant, you need to follow a few steps. First, check the soil around the plant to see if it is dry or moist. If the soil is dry, it is time to water the plant.
Secondly, ensure that the water is applied to the base of the plant, avoiding wetting the leaves as much as possible. This helps to prevent fungal diseases from developing on the plant. You can use a watering can or hose with a gentle shower nozzle to apply water to the soil.
Thirdly, water the plant thoroughly, ensuring that the soil is evenly moist. Avoid over-watering the plant, as this can lead to root rot.
Finally, the frequency of watering should also depend on the plant's environment, the weather, and its stage of growth. In general, the Brassica Tournefortii plant should be watered once or twice a week, or when the soil is dry to the touch. However, during hot weather or when the plant is in its growth phase, it may require more frequent watering.
To fertilize the Brassica Tournefortii plant, follow these instructions:
- Choose a well-draining soil mix suitable for the plant's growth requirements.
- Before planting, prepare the soil by loosening it with a garden fork or tiller.
- Apply a balanced slow-release fertilizer, following the specific instructions mentioned on the packaging. This will ensure a steady release of nutrients over time.
- Alternatively, you can use a liquid fertilizer with a nutrient ratio suitable for the plant. Dilute it according to the instructions provided on the product label.
- When the plant is established, apply the fertilizer around the base of the plant, avoiding direct contact with the stems or leaves.
- Gently work the fertilizer into the soil using a garden rake or by lightly watering the area.
- Water the plant thoroughly after fertilizing to assist with nutrient absorption.
- Monitor the plant's growth and health during the growing season, looking for any signs of nutrient deficiencies or excesses.
- As the plant continues to grow, repeat the fertilization process based on the recommended frequency for the specific fertilizer used and the plant's needs.
- Always follow the manufacturer's instructions regarding the application rate and frequency of the fertilizer to avoid overfeeding the plant.
The ideal soil for the Brassica Tournefortii plant should be well-drained and have a pH level in the range of 6.0 to 7.5. The soil should also have a high organic matter content, as this will aid in the retention of moisture and nutrients, which are important for the plant's growth. Additionally, the soil should be rich in nitrogen, potassium, and phosphorus, which are essential nutrients required for healthy plant growth. The soil should also be free of any contaminants or pollutants, as these can negatively impact the plant's health and growth. It is recommended to regularly test the soil's nutrient levels to ensure that the plant is receiving the necessary nutrients for optimal growth and development.
To propagate this plant, the first step is to choose healthy and mature plants with strong stems and green foliage. The next step is to take cuttings from the plant, making sure to cut at a 45-degree angle to increase the surface area for rooting. Remove any leaves from the lower portion of the stem that will be inserted into the soil to prevent them from rotting and to encourage root growth.
Dip the cuttings into a rooting hormone powder or gel to enhance the rooting process. Place the cuttings in a potting mix that is well-draining and moist. Ensure that the soil is deep enough to cover the cuttings with at least an inch of soil. Water the soil and cover the pot with a plastic bag or clear plastic wrap to increase humidity levels.
Place the pot in an area with bright, indirect sunlight and maintain a consistent moisture level in the soil by watering regularly. Within 2-4 weeks, roots will start to form, and new growth will be visible. Once the cuttings have rooted, the plastic covering can be removed, and the plants can be transplanted into individual pots.


