Plant Overview
Known widely as "Katuk" or the "Sweet Leaf Bush," this tropical perennial is a staple in Southeast Asian kitchen gardens. Often referred to as the "Multivitamin Plant," it is prized for its nutrient-dense foliage that tastes remarkably like fresh peas or nutty spinach. While it looks like a delicate, fern-like ornamental, it is a vigorous grower that thrives in the heat and humidity of the tropics.
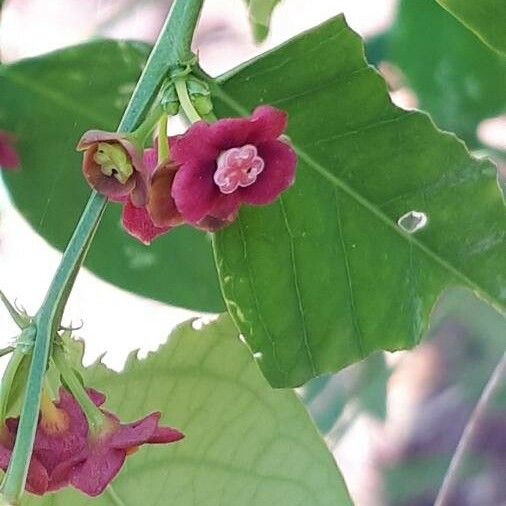
🔍 How to Identify
- 🌿 Leaf Pattern: The leaves are small, oval, and dark green, arranged in two neat rows along the stems. This gives the branches a flat, feather-like appearance that many people mistake for compound leaves.
- 🌸 Hidden Blooms: You have to look underneath the foliage to see the flowers. They are tiny, disk-shaped, and hang like little ornaments, ranging in color from pale yellow to a deep, dusky red.
- ⚪ The Fruit: It produces small, white, marble-like capsules. When ripe, these berries can have a faint purple or pink "star" at the base, which eventually split open to reveal small black seeds.
🏡 In Your Garden
- 💧 Thirsty & Hungry: Katuk is not a "set it and forget it" plant. It craves "jungle conditions"—think high humidity, consistent moisture, and rich, organic soil. If the soil dries out completely, the plant will quickly drop its leaves in protest.
- ✂️ Pruning Power: This shrub can become "leggy" and tall if left to its own devices. To keep it productive and bushy, you should prune it back regularly. In fact, frequent harvesting of the tender tips actually stimulates the plant to produce more succulent growth.
⚠️ Safety & Toxicity
- 🥗 Status: Edible with strict caveats. While it is a common food source in Asia, it must be approached with knowledge.
- 🚨 Consumption Warning: Do not consume large quantities of raw Katuk. While delicious when sautéed or boiled, eating excessive amounts of raw leaves or drinking raw Katuk juice has been linked to permanent lung damage (bronchiolitis obliterans). Cooking the leaves thoroughly appears to mitigate this risk.
- 🐾 Pets & Children: Because of the potential for respiratory issues if eaten raw in large amounts, it is best kept away from curious pets and toddlers who might graze on the low-hanging branches.
✨ Fun Fact
- 💪 Katuk is a nutritional powerhouse; it is one of the few leafy greens that contains a significant amount of protein—nearly 7% by weight—earning it the nickname "The Meat of the Garden" in rural Southeast Asia.

Detailed Care Instructions
To grow a Breynia Androgyna plant, also known as the Snow Bush, you can follow these steps:
- Choose the right location: The Snow Bush plant prefers bright, indirect sunlight. It can tolerate some morning sun, but avoid placing it in direct afternoon sunlight as it can burn the leaves. Indoors, place it near a window with filtered light.
- Provide the right temperature and humidity: The ideal temperature range for Snow Bush is between 60-75°F (15-24°C). It prefers a slightly higher humidity level, so mist the leaves regularly or place a humidifier nearby.
- Watering: Keep the soil consistently moist but not overly saturated. Allow the top inch of soil to dry out slightly before watering again. Use room-temperature water to avoid shocking the roots.
- Soil and potting: Choose a well-draining potting mix with good aeration. A mixture of peat moss, perlite, and sand works well. Make sure the pot you choose has drainage holes to prevent waterlogging.
- Fertilization: Feed your Snow Bush every two weeks during the growing season (spring and summer) with a balanced, water-soluble fertilizer. Dilute the fertilizer to half strength and apply according to the package instructions.
- Pruning and shaping: Snow Bush can be pruned to maintain its shape and size. If you want a bushier plant, pinch off the growing tips to encourage branching. Trim any leggy or damaged growth.
- Propagation: Snow Bush can be propagated through stem cuttings. Take a 4-6 inch cutting with at least two sets of leaves. Remove the lower leaves and dip the end in a rooting hormone. Place the cutting in a pot with a moist mix of peat moss and perlite. Keep it in a warm, humid area until roots develop.
Remember to regularly check for pests, such as aphids or spider mites, and treat them promptly if found. Overall, with proper care and attention to its needs, your Breynia Androgyna plant should thrive and grow successfully.

Place in a window with dappled sun or a spot in the middle of a room. Or directly in a window facing west or east.

Breynia Androgyna is a tropical plant that requires regular watering to thrive. Here's a step-by-step guide on how to water this plant effectively:
1. Check the soil moisture: Before watering, check the moisture level of the soil by sticking your finger about an inch deep into the soil. If it feels dry, it's time to water the plant.
2. Use room temperature water: Fill a watering can or container with room temperature water. Using cold water can shock the plant's roots, so it's important to avoid extremes in temperature.
3. Water at the base: Directly pour water onto the soil around the base of the plant, avoiding the leaves as much as possible. Wet leaves can be prone to diseases or pests, so it's best to keep them dry.
4. Slow and steady watering: It's important to water the plant slowly to allow the soil to absorb the water properly. Pour water in a slow and steady stream, allowing it to penetrate the soil without causing any runoff.
5. Deep watering: Ensure that you water deeply enough to reach the roots of the plant. Shallow watering can cause the roots to grow closer to the surface, making the plant susceptible to drying out more quickly.
6. Drainage: Verify that the pot or planting area has proper drainage to prevent waterlogging. If excess water accumulates in the saucer or container bottom, remove it to prevent the roots from sitting in water for too long.
7. Monitor the soil: After watering, monitor the soil's moisture level. It's essential to avoid overwatering, as it can lead to root rot. Wait until the top inch or so of soil feels dry before watering again.
8. Adhere to plant requirements: Be aware that specific factors like temperature, humidity, and light levels can influence the plant's watering needs. Adjust your watering frequency accordingly to maintain the optimal moisture balance.
Remember, every plant is unique, so it's important to observe your Breynia Androgyna plant closely. By carefully monitoring the soil moisture and adapting your watering routine to suit its specific needs, you can help ensure the plant's health and vitality.
- Choose a well-balanced fertilizer with a ratio of nitrogen (N), phosphorus (P), and potassium (K) labeled on the packaging.
- Dilute the fertilizer according to the instructions on the package, adjusting the concentration to half the recommended dosage.
- Water the Breynia Androgyna plant thoroughly before applying the fertilizer to ensure the soil is moist.
- Pour the diluted fertilizer solution carefully around the base of the plant, avoiding contact with the leaves or stems.
- Use the appropriate quantity of fertilizer solution based on the plant's size and the manufacturer's instructions.
- Gently work the soil around the Breynia Androgyna plant to help the fertilizer penetrate the root zone.
- After application, continue to water the plant regularly to help distribute the nutrients evenly throughout the soil.
- Repeat the fertilization process every four to six weeks during the growing season (spring and summer) to promote healthy growth.
- During the dormant period (fall and winter), reduce fertilization frequency to once every two to three months.
- Monitor the plant's growth and adjust the fertilization schedule or concentration if necessary, based on any signs of nutrient deficiencies or excesses.
When selecting soil for Breynia Androgyna plants, it is important to consider the natural habitat of the plant and replicate its preferred growing conditions. The soil should be well-draining to prevent waterlogging, as excessive moisture can lead to root rot.
A suitable soil mixture for Breynia Androgyna would contain a combination of organic matter, such as compost or well-rotted manure, and a mineral component, such as perlite or sand. This mixture ensures proper aeration and moisture retention, creating an ideal environment for root growth.
The pH level of the soil should be slightly acidic to neutral, ranging between 5.5 and 7.0. This range promotes nutrient availability and optimal plant growth.
It is advised to avoid using heavy clay soils, as they tend to hold water and may cause root suffocation. Sandy soils, on the other hand, may not retain enough moisture for this plant's needs unless supplemented with organic matter.
Regularly amending the soil with organic matter will not only improve its structure but also provide essential nutrients for the Breynia Androgyna plant. This can be achieved by adding compost or well-balanced organic fertilizers during the planting process.
Additionally, ensuring proper drainage by incorporating materials like perlite or coarse sand into the soil will help prevent waterlogged conditions, which can lead to root diseases. It is important to monitor the moisture levels in the soil and avoid overwatering, as this can also negatively affect the plant's health.
Overall, providing a well-draining, slightly acidic to neutral soil mixture enriched with organic matter will create a favorable growing environment for the Breynia Androgyna plant, supporting its overall health and vitality.
Propagation of Breynia androgyna can be achieved through various methods such as stem cuttings and seed propagation.
- Stem Cuttings:
- Select a healthy and mature stem from the parent plant. It should ideally be around 4-6 inches in length and contain few leaves.
- Using sterilized pruners, make a clean, diagonal cut just below a leaf node. This is where the roots will develop.
- Remove any leaves on the lower half of the cutting, leaving a few at the top.
- Optional: Dip the cut end of the stem in a rooting hormone to promote root growth.
- Prepare a well-draining potting mix for the cuttings by combining equal parts of peat moss and perlite or vermiculite.
- Insert the lower end of the cutting into the potting mix, making sure it is secure and the leaves are above the soil surface.
- Water the cutting thoroughly, allowing the excess water to drain away.
- Place the pot in a warm and well-lit area, avoiding direct sunlight, which can harm the cutting.
- Maintain a moist but not waterlogged soil by watering the cutting when the top inch of soil feels dry.
- After a few weeks, roots should start to develop, and new growth will appear. This indicates that the cutting has successfully rooted.
- Seed Propagation:
- Collect mature seeds from the parent plant. These may be small, round, or capsule-like structures.
- Soak the seeds in warm water for 24 hours to soften the seed coat and increase germination rates.
- Prepare a seed tray or potting container with a well-draining seed starting mix.
- Sow the seeds on the surface of the soil, lightly pressing them in, and cover them with a thin layer of soil or vermiculite.
- Mist the soil surface with water to moisten it without causing waterlogging.
- Place the seed tray in a warm and well-lit location with indirect sunlight.
- Maintain consistent moisture by misting the soil surface regularly or covering the tray with a plastic dome to retain humidity.
- Germination should occur within a few weeks to a month, and once the seedlings are large enough to handle, they can be transplanted into individual pots.
Remember to provide proper care, including adequate sunlight, regular watering, and occasional fertilization, to ensure healthy growth and development of the propagated Breynia androgyna plant.
Common pests of the katuk include Mealybugs, spider mites, thrips, larvae. Make a habit of checking your katuk frequently for pests so that any infestations can be caught and managed early.


