Plant Overview
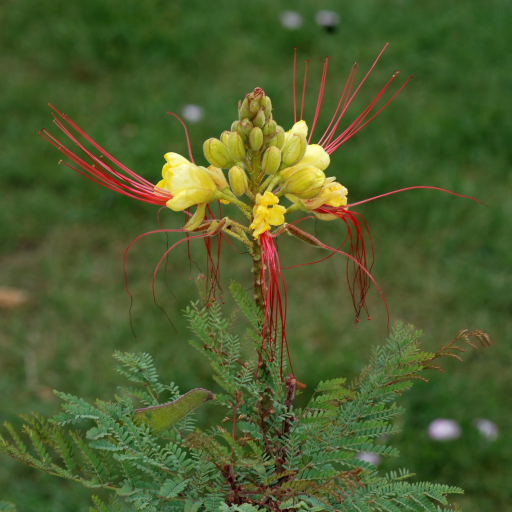
The Yellow Bird of Paradise (Caesalpinia gilliesii) is often called the "Desert Bird of Paradise" to distinguish it from its unrelated tropical namesake. Originating from the plains of Argentina and Uruguay, this hardy shrub looks like a burst of fireworks in the landscape. Its most striking feature is the long, wispy red "whiskers" that emerge from its pale yellow blooms, making it a favorite for gardeners who want a tropical look without the high water bill.
🔍 How to Identify
- 🌿 Feathery Foliage: It features delicate, bipinnate leaves that resemble a fern or a mimosa tree, giving the plant a light, airy texture even when it isn't in bloom.
- 🏮 Exotic Blooms: Clusters of 5-petaled, pale yellow flowers emerge at the branch tips. These are dominated by long, protruding crimson stamens that can reach up to 3-4 inches in length.
- 🫛 Flat Seed Pods: After the flowers fade, the plant produces flattened, leathery, brownish seed pods that are covered in fine, glandular hairs.
🏡 In Your Garden
- ☀️ Sun-Worshipper: This plant thrives in intense heat and full, direct sun. It is highly drought-tolerant once established, making it a "star performer" for xeriscaping, rock gardens, or Mediterranean-style landscapes.
- 💧 Drainage is Key: While it isn't picky about soil quality, it absolutely demands well-draining soil. Because it develops a deep taproot to find water, it is notoriously difficult to transplant once it has settled into its home.
- ✂️ Growth Habit: It can grow rapidly into a large, somewhat "leggy" shrub. Light pruning after the flowering season helps maintain a denser, more attractive shape and encourages more blooms the following year.
⚠️ Safety & Toxicity
- 🚫 Toxic Seeds: The seeds and green pods contain irritating tannins and compounds that are considered toxic if swallowed.
- 🐕 Pet & Human Safety: Keep this plant away from curious pets and young children. Ingestion can lead to moderate to severe gastrointestinal upset, including vomiting, abdominal pain, and diarrhea.
✨ Fun Fact
Those incredibly long red stamens aren't just for show! They are perfectly evolved to brush pollen onto the undersides of hummingbirds and large sphinx moths as they hover to reach the nectar hidden deep within the flower.

Detailed Care Instructions
To grow Caesalpinia gilliesii plant, also known as bird of paradise, follow these steps:
- Climate: Choose a location with a warm climate, as Caesalpinia gilliesii thrives in full sun and is suitable for USDA hardiness zones 9-11. It prefers temperatures between 60-90°F (15-32°C) and cannot tolerate frost.
- Soil: Plant the seeds or saplings in well-draining soil that is sandy or loamy. It should be rich in organic matter and slightly acidic, with a pH between 6.0 and 7.5.
- Planting: If sowing seeds, scarify them by gently scratching the seed coat with sandpaper or a knife to enhance germination. Soak the seeds in warm water for 24 hours before planting.
- Either sow the seeds directly in the ground or start them indoors in seed trays. Plant them about ¼ inch deep and cover with soil.
- Watering: Keep the soil slightly moist but avoid overwatering, as excessive water can cause root rot. Once established, Caesalpinia gilliesii is drought-tolerant and can withstand periods of dryness.
- Mulching: Apply a layer of organic mulch around the plant to retain moisture, suppress weed growth, and protect the roots. Leave some space around the stem to prevent rotting.
- Fertilizer: Apply a slow-release balanced fertilizer in spring to promote healthy growth. Follow the manufacturer's instructions for dosage and frequency.
- Pruning: Prune Caesalpinia gilliesii to shape it, remove dead or diseased branches, and encourage new growth. Pruning should be done after its flowering cycle to avoid removing potential blossoms.
- Pests and diseases: Bird of paradise is generally resistant to pests and diseases. However, keep an eye out for aphids, scale insects, or spider mites. In case of infestation, use appropriate organic insecticides or contact a local nursery for help.
- Propagation: Caesalpinia gilliesii can also be propagated through softwood or semi-hardwood cuttings. Take 4-6 inch cuttings from healthy plants, dip the cut end in rooting hormone, and plant them in a pot filled with well-draining potting mix. Maintain humidity and water the cuttings regularly until new roots form.
Remember to research and follow any specific guidelines for your region or consult a local horticulturist for more precise advice on growing Caesalpinia gilliesii in your area.

Place in a bright room that is sun drenched almost all day. Or directly in a south-facing window.

To properly water this plant, you should first consider the specific needs of its growing environment. It prefers well-draining soil and is typically grown in a dry climate. When watering, it is important to avoid over-watering as this can lead to root rot and other issues. Instead, water thoroughly but infrequently, allowing the soil to dry out between watering sessions. Monitor the plant closely for signs of dehydration, such as wilting or yellowing leaves, and adjust your watering routine accordingly. Additionally, avoid getting water on the leaves or flowers to prevent damage or disease.
To fertilize this plant, use a balanced fertilizer with equal amounts of nitrogen, phosphorous, and potassium. Apply the fertilizer once every four weeks during the growing season, which is typically from spring to fall. Be sure to follow the instructions on the fertilizer package for the proper amount to use. Spread the fertilizer evenly around the base of the plant and water thoroughly afterward. Avoid fertilizing during the winter months as the plant is dormant.
Caesalpinia Gilliesii plant requires well-draining and nutrient-rich soil that is mildly acidic to neutral in pH level. The soil should have a good texture and structure that promotes adequate air and water movement. A loamy or sandy loam soil mixture with compost or peat moss added is ideal for this plant. The soil should be moist but not soggy, as excessive moisture can lead to root rot. It is important to ensure that the soil does not become waterlogged, especially during the winter months. The plant prefers full to partial sunlight and should be watered regularly during the growing season. Fertilize the plant with a balanced fertilizer every three to four weeks during the growing season.
To propagate this plant, you will need to collect mature seeds from the parent plant. Once you have gathered the seeds, you will need to remove any debris or husks from them and scarify them by nicking or scratching the seed coat. This will help to improve germination rates.
Next, you will need to plant the seeds in well-draining soil that is moist but not waterlogged. Cover the seeds with a light layer of soil and keep them in a warm, bright location. Water the soil regularly, but be careful not to overwater as this can cause the seeds to rot.
After a few weeks, you should start to see the seeds germinate and small seedlings emerge from the soil. At this stage, you will need to make sure the plants receive plenty of light and keep the soil moist.
Once the seedlings have become established and have formed a few true leaves, you can transplant them into larger pots or directly into the ground in a sunny location. Be sure to water them regularly and provide them with some protection from strong winds until they have become established.
Common pests of the caesalpinia include Scale insect, mealybugs, spider mites, aphids. Make a habit of checking your caesalpinia frequently for pests so that any infestations can be caught and managed early.


