Plant Overview
Often called the "Pocketbook Plant" or "Slipper Flower," Calceolaria looks like something plucked straight from a whimsical Victorian storybook. Native to the cool mountain regions of Central and South America, these quirky blooms are famous for their inflated, pouch-like petals that resemble tiny, ornate slippers or antique purses. Whether they are bright neon yellow or fiery red with chocolate freckles, they bring a sense of theatrical charm to any windowsill or shaded garden bed.
🔍 How to Identify
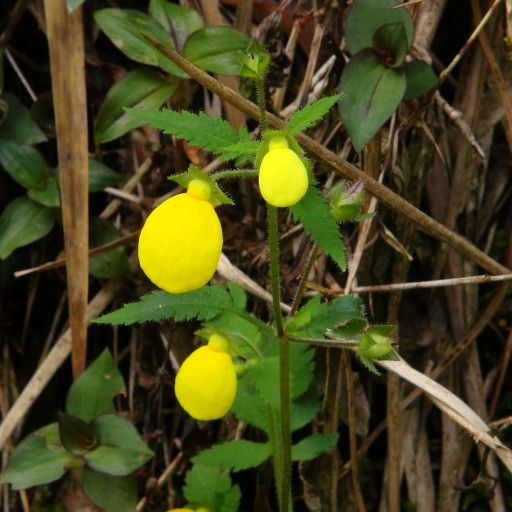
- 👡 The "Slipper" Bloom: The most striking feature is the two-lipped flower, where the lower lip is dramatically inflated into a large, hollow, air-filled pouch.
- 🎨 Vibrant Patterns: Flowers come in bold shades of yellow, orange, and red, and are frequently "calicoed" with dark, contrasting spots or marbled patterns.
- 🍃 Velvety Foliage: The leaves are typically bright green, soft to the touch, and often covered in fine, delicate hairs that give them a slightly fuzzy texture.
🏡 In Your Garden
- 🌡️ Coolness is Key: Unlike many tropical house plants, Calceolaria thrives in cool, bright environments. If temperatures rise too high, the plant will quickly wilt and the blooming period will be cut short.
- 💧 The Bottom-Watering Trick: These plants are highly susceptible to crown rot and leaf spots. To keep them happy, avoid getting water on the leaves and instead sit the pot in a saucer of water for 20 minutes to let it drink from the roots.
- 🪴 A Temporary Guest: Most hobbyists treat these as "gift plants" or annuals. They put so much energy into their spectacular floral display that they rarely survive for a second season indoors.
⚠️ Safety & Toxicity
- 🐾 Pet-Friendly: Calceolaria is generally considered non-toxic to cats, dogs, and horses, making it a worry-free addition to a household with curious pets.
- 🤲 Skin Sensitivity: While not poisonous, the fine hairs on the leaves can occasionally cause very mild skin irritation or "itchiness" for people with highly sensitive skin.
✨ Fun Fact
The name Calceolaria is derived from the Latin word calceolus, which means "little shoe." In their native Andean habitat, some species have evolved a unique relationship with "oil-collecting" bees; instead of offering nectar, the flowers provide a special fatty oil that the bees use to feed their larvae!

Detailed Care Instructions
| Lighting | Full Sun |
| Soil Type | Well-Drained And Loose Potting Medium |
| Sun Exposure | Diffused Sunlight |
| Hardiness Zones | 4A - 9B |
To grow Calceolaria plants, you can follow these steps:
- Select a suitable location: Choose a spot that receives partial shade, as Calceolaria plants prefer indirect sunlight. They can tolerate shade but avoid placing them in full sun.
- Prepare the soil: Calceolaria plants prefer a well-draining, fertile soil. Amend the soil with organic matter like compost to improve its fertility and drainage. The pH level of the soil should be slightly acidic to neutral (around 6.0 to 7.0).
- Start from seeds: Calceolaria plants can be grown from seeds. Sow the seeds in a seed-starting tray or pots filled with seed-starting mix. Press the seeds lightly into the soil, ensuring good contact. Cover the seeds with a thin layer of soil, mist the surface, and cover the container with plastic wrap or a humidity dome to maintain moisture.
- Maintain temperature and moisture: Calceolaria seeds require a consistently warm temperature of around 70-75°F (21-24°C). Keep the soil consistently moist but not waterlogged. Mist the soil surface whenever it starts to dry out.
- Transplant seedlings: Once the seedlings are a few inches tall, they can be transplanted into individual pots or containers. Gently loosen the soil around each seedling and carefully lift it out, taking care not to damage the delicate roots. Plant the seedling in a slightly larger pot, ensuring the roots are covered with soil but leaving some space at the top for future growth.
- Watering and feeding: Water the plants regularly, aiming to keep the soil evenly moist. Avoid overwatering, as it can lead to root rot. Fertilize the Calceolaria plants every 2-3 weeks with a balanced liquid fertilizer, following the package instructions.
- Pruning and pinching: To encourage bushy growth and more blooms, pinch back the tips of the young plants when they are around 4-6 inches tall. This will promote branching and result in a fuller, compact plant.
- Protect from extreme weather: Calceolaria plants are sensitive to both heat and cold. Protect them from extreme temperatures. If grown outdoors, provide shade during hot summer afternoons or bring them indoors during extreme cold spells.
- Pests and diseases: Calceolaria plants can be susceptible to aphids, whiteflies, and powdery mildew. Monitor the plants regularly and take appropriate measures, such as using insecticidal soap or neem oil for pests, and fungicides for diseases.
- Enjoy the blooms: Calceolaria plants typically bloom in late spring or early summer, producing vibrant and unique flowers. Enjoy their colorful display and keep up with regular maintenance to ensure their continued growth and bloom.

Place in a window with dappled sun or a spot in the middle of a room. Or directly in a window facing west or east.

The best way to water this plant is to keep the soil evenly moist but not waterlogged. One way to achieve this is to water the plant from the bottom - place the pot in a shallow dish of water and allow the soil to soak up the water from the drainage holes. Alternatively, you can water the plant from the top, being careful not to wet the foliage too much. Water only when the top inch of soil feels dry to the touch, and avoid letting the plant sit in standing water. Finally, make sure the plant has good drainage, as it is sensitive to waterlogged soils.
Fertilize the plant once a month using a balanced liquid fertilizer during the growing season. Dilute the fertilizer to half-strength and water the plant thoroughly after application. Avoid over-fertilizing as it can harm the plant.
It is recommended to use a well-draining soil with good aeration for this particular plant. The soil should also have a slightly acidic pH range, between 5.5-6.5. It is important to avoid using heavy clay soils, as they can lead to root rot and other issues with the plant's growth and health. Organic matter can be added to the soil to improve its structure, but it is important to ensure that it is well decomposed and free of pathogens. Additionally, it is recommended to avoid using fertilizers that are high in nitrogen, as they can cause the plant to become leggy and susceptible to disease. Overall, it is important to choose a soil that provides the right balance of nutrients, drainage, and aeration to support the healthy growth of the Calceolaria plant.
To propagate this plant, you will need to take stem cuttings. Select healthy stems that are at least 3 inches long and have a few leaves attached. Using a sharp and clean pair of scissors or pruning shears, cut the chosen stems just below the node. Remove the lower leaves from the cuttings, leaving only a few on the top.
Fill a small pot or seed tray with a well-draining potting mix. Moisten the soil and make a small hole in the center. Dip the cut end of the stem into rooting hormone powder, ensuring it is coated evenly. Insert the cutting into the hole and gently press the soil around it. Repeat the same process for other cuttings.
Cover the pot or tray with a clear plastic bag or wrap to create a humid environment. Place it in a bright and warm location, but away from direct sunlight. Check the soil moisture daily and mist the cuttings if necessary.
After a couple of weeks, check the cuttings for signs of new growth. Once new roots and leaves have developed, the propagules can be transferred into individual pots with fresh potting soil and grown as per normal care.


