Plant Overview
Known commonly as the Purple-beard Orchid or Broad-lipped Beard Orchid, this Australian native is a true master of botanical disguise. Found tucked away in open woodlands and heathlands, it features one of the most unique floral structures in the orchid world: a dense, feathery "beard" that gives it a whimsical, almost alien appearance. It is a seasonal treasure that captures the imagination of hikers and orchid enthusiasts alike during the spring bloom.
🔍 How to Identify
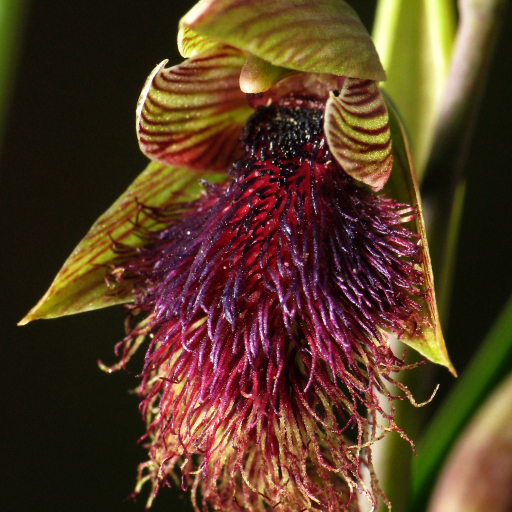
- 🧔♂️ The "Beard" (Labellum): The most striking feature is the lower petal, which is covered in a dense carpet of long, purple or reddish-brown hairs that shimmer in the sunlight.
- 🍃 The Single Leaf: Unlike many plants with lush foliage, this orchid produces just one long, fleshy, V-shaped leaf that grows upright from the base of the stem.
- 🌸 Striped Hood: The upper petals and sepals form a small, protective "hood" over the center of the flower, often marked with delicate reddish-brown or purple veins.
🏡 In Your Garden & Nature
- 🪵 Wild Symbiosis: These orchids are extremely difficult to grow in home gardens because they rely on a complex relationship with specific underground fungi to survive. They are best admired in their natural habitat rather than being transplanted.
- 💤 Seasonal Vanishing Act: As a terrestrial orchid, it spends a large portion of the year dormant underground as a fleshy tuber. It only emerges when the conditions are just right in late winter and spring, seemingly appearing out of nowhere.
⚠️ Safety & Toxicity
- ✅ Status: Non-toxic and safe.
- 🐾 Pet & Human Safety: There are no known toxic effects for humans or domestic pets. However, because many wild orchids are rare or protected by law, they should never be picked or consumed. Touching the delicate beard won't hurt you, but it might prevent the plant from being successfully pollinated.
✨ Fun Fact
The Purple-beard Orchid is a "trickster." It uses a tactic called pseudocopulation, where its fuzzy labellum and pheromone-like scents mimic a female flower-wasp. Male wasps are fooled into trying to mate with the flower, accidentally picking up or dropping off pollen in the process!

Detailed Care Instructions
To grow Calochilus platychilus, also known as the Pink Fairy Orchid, follow these steps:
- Obtain seeds or rhizomes: Calochilus platychilus can be grown from seeds or rhizomes. Seeds can be purchased from specialty seed vendors or collected from mature plants in the wild (if allowed in your area). Rhizomes can be obtained from nurseries specializing in orchids.
- Prepare the growing medium: Calochilus platychilus prefers a well-draining medium. You can use a mix of sphagnum moss, orchid bark, and perlite or a specialized orchid mix available in the market.
- Planting the seeds or rhizomes: If using seeds, sow them directly on the surface of the growing medium without covering them. If using rhizomes, place them on top of the growing medium, making sure they have some room to grow and expand. Do not bury them.
- Provide appropriate lighting: Calochilus platychilus requires bright, indirect light. Place the plant near a window with filtered sunlight or use artificial grow lights for at least 6-8 hours a day.
- Maintain the right temperature and humidity: Calochilus platychilus prefers cool to warm temperatures, roughly between 60-80°F (15-27°C) during the day and slightly cooler at night. Maintain a humidity level of around 50-70% by misting the plant regularly or using a humidifier.
- Watering and fertilizing: Water the plant when the top inch of the growing medium feels dry. Avoid overwatering, as it may cause the rhizomes to rot. Use a balanced orchid fertilizer diluted to half-strength every two weeks during the growing season (spring and summer) to provide adequate nutrients.
- Provide good air circulation: Calochilus platychilus benefits from good air movement. Use a fan or slightly open windows to ensure proper air circulation.
- Monitor and prevent pests: Keep an eye out for common orchid pests such as aphids, spider mites, and mealybugs. If spotted, take appropriate measures to control and eliminate the pests.
- Allow for dormancy: Calochilus platychilus may enter a dormant phase during the winter months. Reduce watering and provide slightly cooler temperatures during this period. Avoid disturbing the plant while it is dormant.
- Regularly divide and repot: As the plant grows, it may outgrow its pot or become crowded. Divide and repot the rhizomes every 2-3 years to ensure healthy growth.
With patience and consistency in care, your Calochilus platychilus should thrive and produce beautiful pink flowers.

Calochilus Platychilus is a plant that requires proper watering techniques to thrive. Here are detailed instructions on how to water this plant effectively:
1. Understand watering needs: Calochilus Platychilus plant prefers moderate watering, as excessive moisture can lead to root rot and other issues. It is important to find the right balance to keep the plant adequately hydrated without overwatering.
2. Observe soil moisture: Before watering, check the moisture level in the soil. Stick your finger about an inch into the soil; if it feels slightly dry, it's an indication that the plant needs watering. If the soil feels moist, delay watering and check again in a day or two.
3. Watering frequency: Calochilus Platychilus plants don't have a specific watering schedule, as it can vary depending on factors like climate and season. Generally, watering once a week during the growing season should be sufficient. However, during hot summer months, you may need to water more frequently to prevent the soil from drying out completely.
4. Watering technique: When watering, use a gentle hand to avoid over-saturating the soil. A good rule of thumb is to water slowly and evenly around the base of the plant, allowing the water to penetrate the soil to the root level.
5. Deep watering: Instead of just giving a light sprinkle, aim to provide deep watering sessions. This means watering until the water seeps out from the drainage holes at the bottom of the pot. Deep watering encourages the roots to grow deeper into the soil, promoting a healthier and more resilient plant.
6. Consistent moisture level: While it is important to water Calochilus Platychilus whenever the soil starts to dry out, ensure you aren't constantly keeping the soil wet. Allow the top layer of soil to dry out between watering to prevent waterlogging, which can be detrimental to the plant's health.
7. Container drainage: If growing the plant in a container, ensure it has adequate drainage holes at the bottom. This allows excess water to escape, preventing water accumulation and potential root rot.
8. Rainwater use: If possible, collect rainwater for watering Calochilus Platychilus. Rainwater is free from chemicals found in tap water and provides beneficial nutrients for the plant. However, if rainwater is unavailable, tap water can still be used as long as it's at room temperature and not cold from the tap.
Remember, these watering instructions are general guidelines, and it's important to assess the specific needs of your Calochilus Platychilus plant based on its location, climate, and how it responds to your watering practices. Regularly monitoring the plant's moisture levels and adjusting your watering routine accordingly will help ensure its health and vitality.
To effectively fertilize Calochilus Platychilus plants, follow these instructions:
- Assess the stage of growth: Determine the developmental stage of the plant, such as whether it is in its active growth phase or dormant phase. This information will help in determining the appropriate timing for fertilization.
- Choose suitable fertilizer: Select a balanced water-soluble fertilizer with a ratio like 10-10-10 or 20-20-20, which indicates the percentage of nitrogen (N), phosphorus (P), and potassium (K) respectively. Avoid fertilizers high in nitrogen, as excessive nitrogen can lead to excessive leaf growth at the expense of flowering.
- Dilute the fertilizer: Mix the fertilizer as per the manufacturer's instructions, ensuring it is properly diluted before applying.
- Fertilizer application: Apply the diluted fertilizer to the soil around the base of the plant, avoiding direct contact with leaves or flowers. Take care not to over-fertilize, as it may cause burns or damage the roots.
- Watering after fertilization: After applying the fertilizer, thoroughly water the plant to help distribute the nutrients throughout the soil and prevent any potential damage to the roots.
- Follow a fertilization schedule: Typically, fertilizing every 4-6 weeks during the active growing season is sufficient. Adjust the frequency and dosage based on the plant's response and any specific recommendations for Calochilus Platychilus plants.
- Monitor plant health: Keep an eye on the overall health of the plant, including the growth rate, foliage color, and flowering. If any signs of nutrient deficiencies or excesses are observed (e.g., yellowing leaves, stunted growth, or lack of blooming), consider adjusting the fertilization routine accordingly.
Remember to always refer to the specific requirements of Calochilus Platychilus plants, as it may have additional preferences or nutrient requirements specific to its species.
Calochilus Platychilus plant thrives best in a specific type of soil that suits its growth requirements. Ideally, it is recommended to use a well-draining soil mix for this plant. The soil should be loosely packed, allowing air circulation and preventing waterlogging.
A suitable soil mixture for Calochilus Platychilus plant consists of a combination of organic matter and a mineral component. The organic matter component can be a mixture of sphagnum moss, compost, or well-decomposed organic materials. This aids in moisture retention and nutrient availability within the soil.
In addition to organic matter, a mineral component is essential for this plant's growth. Adding perlite or coarse sand to the soil mix helps improve drainage and prevents the soil from becoming compacted. It creates airspace within the soil, which allows the roots to access oxygen easily.
The soil pH for Calochilus Platychilus plant should ideally be slightly acidic to neutral, ranging from 6.0 to 7.0. This pH range ensures optimal nutrient availability for the plant's roots.
Overall, using a well-draining soil mix that combines organic matter and a mineral component, with a slightly acidic to neutral pH, is highly recommended for the successful cultivation of Calochilus Platychilus plant.
Calochilus Platychilus is a terrestrial orchid native to Australia. In order to propagate this plant successfully, the following steps can be followed:
- Seed collection: Wait until the seed capsules have matured and turned brown on the parent plant. Collect these capsules by gently snipping them off using sterilized pruning shears or scissors. Place the capsules in a clean container.
- Seed preparation: Open the seed capsules and collect the fine dust-like seeds. Avoid any moisture as it can cause the seeds to rot. It is best to work with the seeds immediately or store them in a cool, dry place in an airtight container until ready for sowing.
- Seed sowing: Sterilize a small container or seed tray to prevent any potential contamination. Fill it with a well-draining medium such as a mixture of sphagnum moss and perlite or a commercial orchid potting mix. Lightly sprinkle the seeds over the surface of the medium, ensuring they are evenly distributed.
- Covering the seeds: To aid germination, lightly dust the surface with a layer of finely chopped sphagnum moss or vermiculite. This layer will help to retain moisture around the seeds, ensuring better germination rates. Avoid burying the seeds too deeply, as they require light to germinate.
- Providing ideal conditions: Place the container in a warm, well-lit area with indirect sunlight. The temperature should be kept around 70-80°F (21-27°C) during the day and slightly cooler at night. Orchid seeds require consistent warmth to germinate successfully.
- Maintaining moisture levels: Keep the growing medium consistently moist but not waterlogged. Mist the surface gently with water or use a spray bottle to prevent excessive drying out. Be careful not to overwater, as this can lead to fungal growth and rot.
- Germination: The seeds of Calochilus Platychilus can take several weeks to months to germinate. Patience is key during this phase. Once germination occurs, small seedlings will develop, and they can continue to grow in the container until they are large enough to transplant.
- Transplanting: When the seedlings have developed several well-established leaves and roots, they can be carefully transplanted into individual pots or containers using a well-draining orchid potting mix. Provide them with appropriate care, including bright but indirect light, high humidity, and adequate water.
It is important to note that propagating orchids from seeds can be a challenging process, requiring specific conditions and careful attention. Those with experience in orchid propagation may have better success rates.


