Plant Overview
Meet the Birch-leaved Bellflower, a resilient mountaineer hailing from the craggy peaks of Turkey and the Caucasus. Often nicknamed the "Birch Bell" due to its distinctive foliage, this hardy perennial transforms rocky outcroppings into a sea of delicate, porcelain-like blossoms. It is a favorite for rock garden enthusiasts who want a plant that looks fragile but possesses the toughness of a cliffside survivor.
🔍 How to Identify
- 🍃 Foliage: The leaves are the star identifier—heart-shaped or ovate with jagged, serrated edges that closely mimic the leaves of a Birch tree.
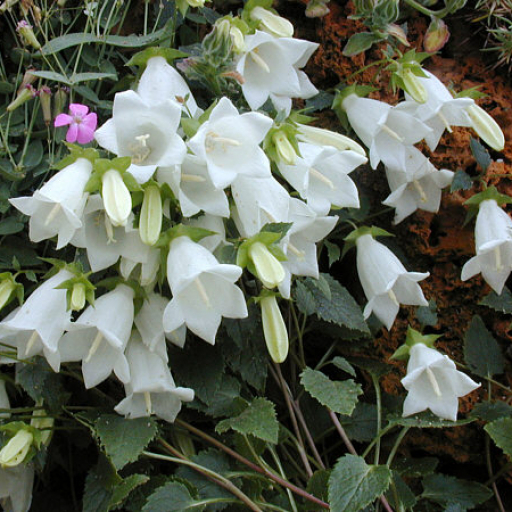
- 🔔 Flowers: Narrow, bell-shaped flowers emerge in clusters. They are usually a creamy white or very pale pink, often showing a darker rosy-pink flush while still in the bud stage.
- 🌱 Growth Habit: This is a low-growing, tufted plant that rarely exceeds 8 inches in height, forming a neat mound that spills beautifully over edges.
🏡 In Your Garden
- 🪨 The Crevice Specialist: In the wild, this plant thrives in vertical rock fissures. In your garden, it performs best in rockeries, alpine troughs, or dry stone walls where its roots can stay cool while the foliage basks in the sun.
- 💧 Drainage is Vital: While it appreciates consistent moisture during the growing season, stagnant water is its nemesis. It requires gritty, sharply-draining soil to prevent crown rot, especially during wet winters.
⚠️ Safety & Toxicity
- 🐾 Pet Friendly: Like most members of the Campanula family, the Birch-leaved Bellflower is generally considered non-toxic to cats, dogs, and horses.
- 👶 Child Safe: It possesses no thorns, stinging hairs, or irritating saps, making it an excellent choice for accessible garden borders and sensory gardens.
✨ Fun Fact
- 🏔️ Lithophytic Life: Campanula betulifolia is a specialist "lithophyte," meaning it is biologically designed to grow directly on or in rocks. It has evolved to squeeze its roots into tiny cracks where almost no other plant can survive, effectively claiming "unoccupied" real estate on sheer mountain faces.

Detailed Care Instructions
To grow Campanula betulifolia (Birchleaf Bellflower) plants, follow these steps:
- Climate and location: Campanula betulifolia prefers a cool, temperate climate. Choose a location that receives partial shade to full sun. Ensure the soil is well-drained.
- Soil preparation: Before planting, prepare the soil by removing any weeds, rocks, or debris. Work in organic matter like compost to improve soil fertility and drainage.
- Planting: Plant the Campanula betulifolia seeds or seedlings in early spring or early fall. Sow the seeds directly in the ground at a depth of ¼ inch (0.6 cm). Space the plants about 8-12 inches (20-30 cm) apart. Gently press the seeds or seedlings into the soil.
- Watering: Keep the soil consistently moist but not waterlogged during the growing season. Water deeply once or twice a week, depending on rainfall and weather conditions. Avoid overhead watering as it can cause foliar diseases.
- Mulching: Apply a layer of organic mulch such as wood chips or straw around the plants to retain moisture, suppress weed growth, and protect the roots from extreme temperatures.
- Fertilization: Campanula betulifolia typically doesn't require heavy fertilization. However, you can apply a balanced slow-release fertilizer in early spring to promote healthy growth. Follow the instructions on the fertilizer packaging.
- Support: Some varieties of Campanula betulifolia may require support as they grow taller. Use stakes or a trellis to keep the plants upright and prevent them from bending or breaking under their weight.
- Pruning: After the initial spring growth, you can lightly prune Campanula betulifolia to encourage branching and bushier growth. Remove any dead or damaged stems throughout the growing season.
- Pests and diseases: Watch for slugs, snails, and aphids, which can damage the plants. Treat any pest infestations promptly and follow appropriate pest control methods. Campanula betulifolia is generally resistant to diseases but keep an eye out for powdery mildew or leaf spots.
- Overwintering: In areas with harsh winters, the plants may benefit from protective measures like mulching or covering with a layer of straw to insulate the roots. Campanula betulifolia is generally hardy and can withstand cold temperatures.
Remember to observe the specific requirements of your Campanula betulifolia cultivar, as growing conditions can vary slightly between different varieties.

Place in a bright room that is sun drenched almost all day. Or directly in a south-facing window.

One way to water this plant is to check the soil moisture level regularly by inserting your finger about one inch into the soil. If the soil feels dry, it's time to water. When watering, use room-temperature water to avoid shocking the roots. Slowly pour water around the base of the plant until the soil is moist, but not waterlogged. Avoid watering the leaves to prevent fungal diseases. The frequency of watering depends on the environmental conditions such as temperature, humidity, and sunlight. It's important to maintain consistent moisture levels in the soil to prevent over or under-watering. If the leaves start to wilt or turn yellow, it may be a sign of inadequate or excessive watering. In this case, adjust the watering schedule accordingly.
To fertilize the Campanula Betulifolia plant, mix a water-soluble fertilizer with water according to the package instructions. Water the plant thoroughly with the fertilizer solution once every 4-6 weeks during the growing season (spring and summer). Be careful not to over-fertilize, as this can lead to salt buildup in the soil and damage to the roots. Limit fertilizer application to once per season to avoid overfertilization.
Campanula Betulifolia prefers well-draining, neutral to slightly alkaline soil with a pH range of 6.0-7.5. The soil should be fertile and enriched with organic matter. It is recommended to use loamy soil that is a mixture of sand, silt, and clay. The soil should be moist but not waterlogged to avoid root rot. It is also important to ensure that the soil is airy and does not compact easily. This can be achieved by adding perlite or vermiculite to the soil mix. When planting Campanula Betulifolia, make sure the soil is well-prepared with enough drainage holes to allow water to drain easily.
Campanula betulifolia can be propagated through stem cuttings. Take a stem that is approximately 4-5 inches long and has healthy leaves on it. Cut the stem just below a node and remove the leaves from the bottom half of the stem. Dip the cut end of the stem in rooting hormone powder and insert it into a pot filled with moistened potting soil. Make sure that the soil is well-draining.
Place the pot in a warm, bright area but away from direct sunlight. Cover the pot with a plastic bag or a clear plastic dome to create a humid environment. Mist the cutting with water every day to keep the soil moist.
After about 3-4 weeks, the cutting should have rooted. You can check by gently tugging on the stem. If you feel resistance, there are roots growing. Once the plant has developed roots, remove the plastic cover and move the pot to a location with bright, indirect sunlight.
After the plant has become established, you can transplant it into a larger pot or into your garden. Give it plenty of water and watch it grow!


