Plant Overview
Often called the Mont Cenis Bellflower, this resilient alpine beauty is a true mountain specialist. It hails from the high-altitude scree slopes of the European Alps, where it tucks itself into rocky crevices and shifting gravel. Unlike its taller garden cousins, this "Jewel of the Scree" stays incredibly low to the ground, forming a defiant cushion of color against the grey mountain stone.
🔍 How to Identify
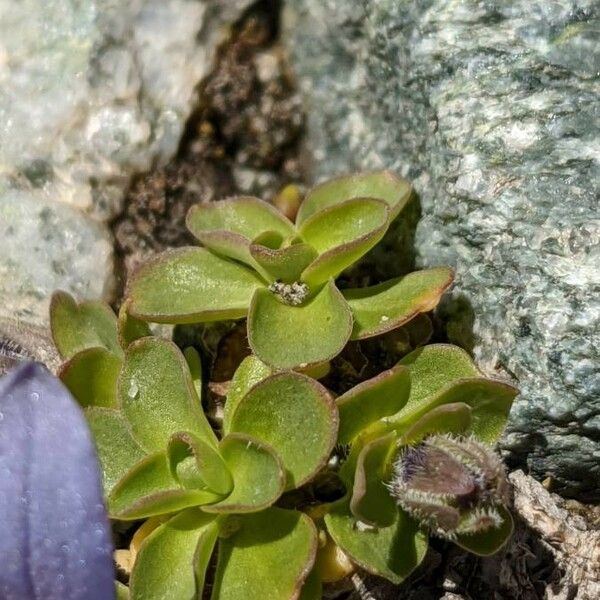
- ⭐ Star-Shaped Blooms: Unlike the typical "bell" shape of other Campanulas, these flowers are deeply divided into five pointed lobes, looking more like tiny fallen stars.
- 🍃 Compact Foliage: The leaves are tiny, oval, and slightly hairy, forming a tight, ground-hugging rosette or mat that rarely rises more than an inch or two.
- 🎨 Soft Palette: The flowers typically display a delicate shade of lavender-blue or pale violet, often appearing somewhat translucent in the bright mountain sun.
🏡 In Your Garden
- ⛰️ The Drainage Obsession: In a home setting, this plant is a "scree specialist." It hates having "wet feet" and will quickly rot if planted in standard potting soil. It requires a gritty, stony mix of limestone or granite chips to mimic its alpine home.
- ❄️ Cold Over Heat: It is extremely frost-hardy but can be quite temperamental in humid or hot climates. It thrives on cool nights and high-intensity light, making it a favorite for alpine houses or dedicated rock gardens.
⚠️ Safety & Toxicity
- 🛡️ Non-Toxic: Like most members of the Campanula family, the Mont Cenis Bellflower is considered safe and non-toxic to humans and common household pets.
- 🌸 Delicate Nature: While safe to touch, it is physically fragile. Its brittle stems and tiny leaves are easily damaged by heavy-handed weeding or curious paws, so it is best kept in a protected "look-but-don't-touch" spot.
✨ Fun Fact
The species name cenisia specifically refers to the Mont Cenis pass between France and Italy, a historic crossing point where this tiny plant has watched travelers and armies (including possibly Napoleon's) pass by for centuries.

Detailed Care Instructions
To grow a Campanula Cenisia plant, follow these steps:
- Choose the right location: Campanula Cenisia prefers full sun to partial shade. Ensure that the location has well-draining soil.
- Soil preparation: Before planting, improve the soil by adding organic matter like compost or well-rotted manure. This will provide nutrients and improve drainage.
- Sowing seeds: If starting from seeds, sow them indoors in early spring. Fill seed trays or pots with seed starting mix, press the seeds lightly onto the surface, and cover them lightly with a thin layer of soil. Keep the soil consistently moist until germination occurs.
- Transplanting: After the seedlings have developed a few sets of leaves and the risk of frost has passed, transplant them to their permanent location. Space the plants about 6 inches apart.
- Watering: Campanula Cenisia prefers slightly moist soil. Water regularly but avoid overwatering, as this can lead to root rot.
- Mulching: Apply a layer of organic mulch around the base of the plants to help retain moisture and prevent weed growth.
- Fertilization: Use a balanced, slow-release fertilizer when the plants are actively growing, following the instructions on the packaging. Alternatively, you can apply a diluted liquid fertilizer every other week during the growing season.
- Pruning: Campanula Cenisia doesn't require extensive pruning. However, you can remove any dead or damaged leaves or stalks to promote healthy growth.
- Pest and disease control: Monitor the plants regularly for pests like slugs, snails, or aphids. Use organic pest control methods or insecticidal soap if necessary. Campanula Cenisia is generally resistant to diseases.
- Winter care: In colder climates, apply a layer of mulch around the base of the plants in late fall to protect them from frost. The plants are hardy, but this extra layer of insulation can help in extreme cold conditions.
With proper care, your Campanula Cenisia plant should grow and thrive, producing beautiful blooms.

Place in a bright room that is sun drenched almost all day. Or directly in a south-facing window.

To provide adequate moisture for this plant, you should water it frequently but avoid overwatering. Before watering, check the soil's moisture level by poking your finger about an inch deep into the soil. If it feels dry to the touch, it's time to water. Use a watering can or hose with a gentle spray nozzle to water the soil around the plant's base. Be sure not to get water on the plant's leaves, which can cause damage or disease. Water until the soil is moist but not waterlogged. In hot or dry weather, give the plant extra water to prevent it from drying out.
Apply a balanced fertilizer to the soil surrounding the base of the plant during the early spring months, prior to the onset of new growth. Continue to apply fertilizer every 4-6 weeks throughout the growing season. Avoid excessive fertilization, as this can harm the plant and cause it to produce fewer blooms. Always follow the fertilizer instructions carefully, and ensure that the soil is moist prior to application.
The ideal soil for the Campanula Cenisia plant is a moderately fertile, well-draining soil with a slightly acidic to neutral pH range. The soil should have good moisture retention to provide adequate hydration to the plant without becoming waterlogged. Organic matter such as compost or leaf mold can be added to improve soil structure and nutrient availability. It is important to avoid using heavy clay soils that tend to retain moisture and may suffocate the plant's roots. Additionally, the soil should be free of any stones or debris that may hinder root growth. It is recommended to plant the Campanula Cenisia in a location with full sun to partial shade to provide the best growing environment.
To propagate this plant, you will need to take stem cuttings from the parent plant during the growing season. Choose a healthy stem with at least one set of leaves and a node where roots can form. Cut the stem with a clean, sharp pair of scissors or pruning shears.
Remove the leaves from the bottom half of the stem, making sure to leave at least two or three leaves at the top. Dip the cut end of the stem into rooting hormone powder, which will help stimulate root growth.
Place the stem cutting into a pot filled with moist, well-draining soil. You can also use a mixture of peat moss and perlite or vermiculite. Make sure the soil is moist but not waterlogged.
Cover the pot with a clear plastic bag or use a propagation tray with a clear plastic lid to create a humid environment for the cutting. Place the pot in a warm, bright location, but avoid direct sunlight.
Check the cutting regularly to make sure the soil stays moist. After a few weeks, you should see roots starting to form. Once the cutting has established roots, you can remove the plastic cover and transplant it to a larger pot or into your garden.


