Plant Overview
Known affectionately as Canterbury Bells or the Cup and Saucer plant, this charming biennial is the quintessential star of the English cottage garden. Native to Southern Europe, it has been a favorite since the 16th century, prized for its showy, bell-shaped blossoms that look like they were plucked straight from a Victorian greeting card. These flowers don't just bloom; they put on a theatrical display of elegance in shades of violet, pink, and white.
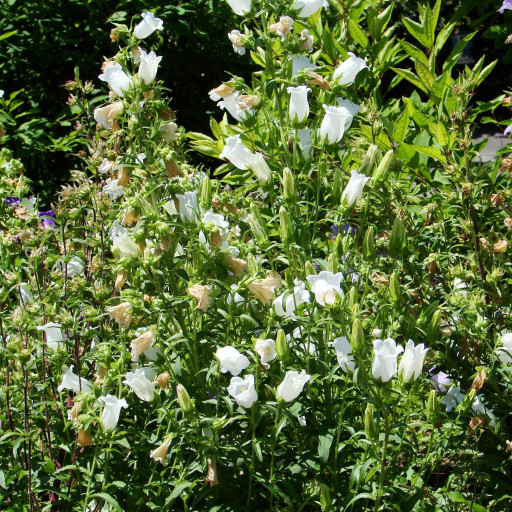
🔍 How to Identify
- 🔔 The Blossom: Large, pendulous bell-shaped flowers that hang in clusters. Some varieties feature a unique "cup and saucer" look where the outer sepals form a flat plate beneath the main bell.
- 🍃 The Foliage: Long, lance-shaped leaves with a slightly ruffled edge and a fuzzy, hairy texture that feels rough to the touch.
- 📏 The Stature: A tall, upright plant that can reach heights of 2 to 3 feet, with sturdy central stems that carry multiple blooms.
🏡 In Your Garden
- ⏳ The Biennial Cycle: Unlike perennials that bloom every year, Campanula medium is a biennial. This means it spends its first year growing a lush green rosette of leaves and saves all its energy to produce its spectacular floral show in the second year.
- 🌬️ Wind Protection: Because these plants grow tall and top-heavy with flowers, they appreciate a spot sheltered from strong winds. You may need to provide "pea sticks" or light staking to keep them from flopping over after a summer rain.
- 🥣 The "Cup and Saucer" Nuance: If you see a version where the flower seems to be sitting on a tiny plate, you’ve found the Calycanthema variety—a popular mutation that adds an extra layer of fairy-tale charm to the garden.
⚠️ Safety & Toxicity
- ✅ Safe Status: Canterbury Bells are generally considered non-toxic to humans, cats, and dogs. They are a "worry-free" addition to family gardens.
- 🐝 Pollinator Friendly: While safe for pets, they are highly attractive to bumblebees, who love to crawl deep inside the "bells" to collect nectar. If you have curious children, teach them to watch the bells from a distance to avoid accidental stings!
✨ Fun Fact
In the "Language of Flowers" (Floriography) popular during the Victorian era, gifting someone Canterbury Bells was a silent message of gratitude and unchanging constancy. It was also said that the flowers resembled the small bells worn by pilgrims traveling to the shrine of Thomas Becket in Canterbury.

Detailed Care Instructions
| Color | Pink, White, Purple, And Blue |
| Soil Ph | Neutral To Slightly Acidic Or Slightly Alkaline |
| Humidity | Normal |
| Lighting | Full Sun |
| Soil Type | Rich, Well-Drained, And Kept Evenly Moist |
| Bloom Time | Early Summer, On Average |
| Difficulty | Medium |
| Plant Type | Biennial |
| Mature Size | 20 To 26 Inches Tall And 12 To 18 Inches Wide |
| Native Area | Southern Europe |
| Temperature | 15°C - 35°C |
| Sun Exposure | Full Sun To Partial Shade |
| Hardiness Zones | 5 To 8 |
To grow Campanula Medium, also known as Canterbury bells, follow these steps:
- Choose a suitable location: Canterbury bells prefer full sun or partial shade. Ensure the soil is well-draining and rich in organic matter.
- Start seeds indoors: Sow the seeds indoors about 8-10 weeks before the last expected frost date. Use a seed tray filled with moist seed-starting mix. Cover the seeds lightly with soil and keep the tray in a warm area, around 70°F (21°C).
- Transplant outdoors: After the risk of frost has passed, transplant the seedlings outdoors. Choose a spot with good air circulation. Keep in mind the mature height of Canterbury bells and space the plants accordingly.
- Prepare the soil: Before transplanting, enrich the soil with compost or well-rotted manure. Dig a hole slightly larger than the root ball of the seedling.
- Plant the seedlings: Gently remove the seedlings from the tray and place them in the prepared holes. Backfill with soil and firm it gently around the base of the plants. Water thoroughly after planting to settle the soil.
- Watering and care: Keep the soil consistently moist, but not waterlogged. Canterbury bells prefer regular watering, especially during dry periods. Mulching around the base of the plants will help retain moisture and discourage weed growth.
- Support and staking: Canterbury bells can grow quite tall and may require staking to prevent them from falling over in strong winds. Install stakes around the plants and gently tie the stems to the stakes as they grow.
- Deadheading and pruning: Remove faded flowers regularly to encourage continuous blooming. Pruning is generally not necessary for Canterbury bells unless they become overgrown or you want to maintain a certain shape.
- Fertilization: Apply a balanced, slow-release fertilizer in the spring or use a liquid fertilizer diluted according to package instructions every couple of weeks during the growing season.
- Overwintering: In colder climates, Canterbury bells may require protection during winter. Apply a layer of mulch around the base of the plants to insulate the roots from freezing temperatures.
By following these steps, you should be able to successfully grow Campanula Medium plants.

Place in a bright room that is sun drenched almost all day. Or directly in a south-facing window.

The plant requires a consistent watering schedule, ensuring the soil remains consistently moist but not waterlogged. Water should be applied at the base of the plant to avoid wetting the foliage. Use well-draining soil to avoid waterlogging, and if watering with a container, ensure it has good drainage. The plant's watering needs vary depending on the environment, such as humidity levels, air temperature, and sunlight exposure. Generally, the frequency of watering should be reduced during the colder months as the plant's growth slows down. While watering, it's important not to let the soil dry out completely as this can negatively impact the plant's health.
For optimal growth of the aforementioned plant, you should fertilize it during the growing season with a balanced, slow-release fertilizer, such as a 10-10-10. Apply the fertilizer according to the manufacturer's instructions, being careful not to over-fertilize, which may cause damage to the plant. Fertilizing once every four weeks should be sufficient. Additionally, remember to water the plant regularly to prevent drying out.
The ideal soil for the plant with the scientific name Campanula medium is loose, well-drained, and rich in organic matter. It should have a slightly acidic to neutral pH level, ranging from 5.5 to 7.0. The plant also prefers soils that are moist but not waterlogged, as excessive moisture can lead to root rot. The soil should be prepared before planting, with any clumps broken up and any debris removed. Adding compost or aged manure to the soil can provide additional nutrients for the plant. Additionally, the plant benefits from regular fertilization throughout the growing season with a balanced, all-purpose fertilizer.
To propagate this plant, take stem cuttings from a healthy and mature plant during the growing season. Make sure the cutting is about 4-6 inches long and has at least two sets of leaves.
Remove the leaves from the bottom half of the cutting and dip the cut end in rooting hormone. Place the cutting in a container with well-draining soil and keep it moist but not waterlogged. Cover the container with a clear plastic bag to create a humid environment.
Place the container in a bright but indirect light location, and monitor the soil moisture regularly to ensure it stays moist. After a few weeks, you should notice new growth on the cutting, which means it has successfully rooted.
Once the new growth is a few inches tall, you can transfer it to a larger pot or into the ground. Give the new plant plenty of light and regular watering to help it establish in its new environment.
Common pests of the canterbury bells include Spider mites, larvae. Make a habit of checking your canterbury bells frequently for pests so that any infestations can be caught and managed early.


