Plant Overview
Often called the Spreading Bellflower, this airy wildflower looks like it was plucked straight from a storybook meadow. Its stems are so fine they often seem to vanish in the tall grass, leaving its lilac stars to hover mid-air. It is a favorite for those trying to recreate a wild, "Cottagecore" aesthetic in their gardens.
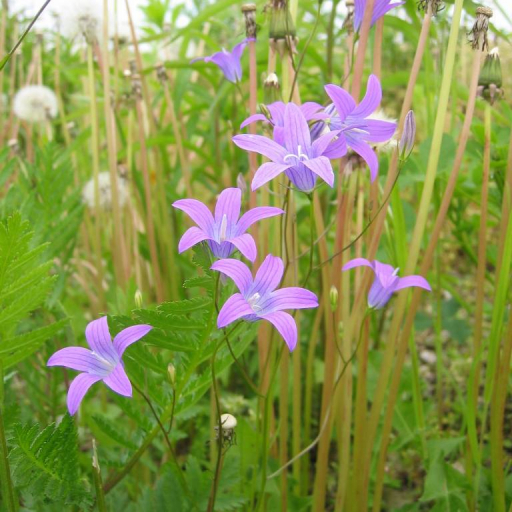
🔍 How to Identify
- 🌸 Star-Shaped Blooms: Unlike the deeper, rounded bells of its cousins, these flowers have deep, pointed lobes that spread out wide, looking more like vibrant five-pointed stars.
- 🌿 Wiry Stems: The stems are incredibly slender, angled, and branch out "patulously" (widely), giving the plant its distinctively delicate, see-through appearance.
- 🍃 Leaf Transition: It features a "basal rosette" of rounded, spoon-shaped leaves at the ground level, while the leaves higher up the stem are narrow, lance-like, and sit close to the stalk.
🏡 In Your Garden
- 🦋 Meadow Master: This plant hates being crowded in heavy, compacted, or soggy soil. It thrives in well-drained, slightly limey spots where it can dance in the wind among light grasses.
- 🌱 The Two-Year Journey: As a biennial or short-lived perennial, it spends its first year growing leaves and its second year producing those iconic flowers. Because it is short-lived, it relies on "self-seeding"—dropping its seeds to create next year’s generation. Avoid heavy mulching, or the seeds won't reach the soil!
⚠️ Safety & Toxicity
- ✅ Non-Toxic Status: Campanula patula is generally considered safe and non-toxic for humans, cats, and dogs.
- 👐 Fragility Warning: While it won't hurt you, you might hurt it! The stems are notoriously brittle. It is best enjoyed as a living plant rather than a cut flower, as the blooms tend to wilt almost the moment they are picked.
✨ Fun Fact
🔔 The Fairy Phone: The name Campanula is Latin for "little bell." In ancient European folklore, it was whispered that if you could hear the faint "chiming" of a Spreading Bellflower, you were being summoned to a meeting of the forest fairies!

Detailed Care Instructions
To grow Campanula Patula plants, also known as Fairy Thimbles or Canterbury Bells, follow these steps:
- Start seeds indoors: Start the seeds indoors about 8-10 weeks before the last frost date in your area. Use a seed starting mix or moistened potting soil and sow the seeds on the surface. Do not cover the seeds with soil, as they require light to germinate.
- Provide light and warmth: Place the seed trays in a warm and bright location, preferably near a south-facing window or under grow lights. Maintain a temperature between 60-70°F (16-21°C) for successful germination.
- Water properly: Keep the soil evenly moist but not waterlogged. Avoid overwatering, as it can lead to damping-off disease or root rot. Take care to water from below by placing the pots in a tray filled with water, allowing the soil to absorb moisture through the drainage holes.
- Transplant seedlings: Once the seedlings have developed two to three true leaves and are about 2-3 inches tall, transplant them into individual pots or containers. Use a well-draining potting mix and ensure the containers have drainage holes.
- Harden off the seedlings: Approximately two weeks before the last frost date, gradually acclimate the seedlings to outdoor conditions. Start by placing them in a sheltered location for a few hours each day, gradually increasing their exposure to direct sunlight and outdoor temperatures over the course of two weeks.
- Choose the planting spot: Select a planting site that receives at least 6 hours of direct sunlight daily. Ensure the soil is well-draining, fertile, and slightly acidic to neutral (pH 6.0-7.5). Amend the soil with compost or organic matter if needed.
- Plant the seedlings: Dig a hole slightly larger than the root ball of the seedling, and gently place it into the hole. Backfill with soil, firm it gently around the base of the plant, and water thoroughly.
- Provide adequate water and care: Campanula Patula plants prefer moist soil, so water them regularly, especially during dry periods. However, avoid overwatering to prevent waterlogged soil. Applying a layer of mulch around the plants will help retain moisture and suppress weeds.
- Support tall varieties: Some Campanula Patula varieties can grow tall, so consider staking or providing support for them to prevent bending or breaking as they grow.
- Remove spent flowers: Regularly deadhead the faded or spent flowers to encourage continuous blooming. This also prevents the plant from producing seeds and promotes energy towards new growth.
- Protect from pests and diseases: Monitor the plants for common pests, such as slugs and snails, and take appropriate measures to control them. Additionally, maintaining good air circulation and avoiding overwatering can help prevent fungal diseases.
By following these steps, you should be able to successfully grow Campanula Patula plants and enjoy their beautiful bell-shaped flowers.

Place in a bright room that is sun drenched almost all day. Or directly in a south-facing window.

The Campanula Patula plant should be watered regularly to maintain the moisture of the soil. The soil should be checked before watering and only watered if it feels dry to the touch. Overwatering can cause root rot and other issues, so it's important not to water too often. When watering, make sure to water around the base of the plant rather than over the leaves. A watering can or hose with a gentle flow should be used to avoid damaging the plant. It's also important to use well-draining soil and avoid letting the plant sit in standing water.
- Choose a well-draining pot or garden bed for your Campanula Patula plant.
- Fill the pot or bed with a nutrient-rich potting soil or organic compost.
- Prior to planting, mix a slow-release fertilizer into the soil according to the package instructions.
- Water the soil lightly to moisten it before planting your Campanula Patula plant.
- Place the root ball of the plant into the soil, ensuring it is positioned at the same depth as it was in its previous container or nursery bed.
- Gently tamp down the soil around the root ball to secure the plant in place.
- Water the plant thoroughly after planting to promote healthy root establishment.
- After the initial watering, wait until the top inch of soil feels dry before watering again to avoid overwatering.
- During the growing season, feed your Campanula Patula plant with a liquid fertilizer every 4-6 weeks. Dilute the fertilizer according to the package instructions before applying it to the soil.
- Alternatively, you can use a granular slow-release fertilizer by sprinkling it evenly around the base of the plant, ensuring it does not come into direct contact with the foliage.
- Avoid fertilizing your Campanula Patula plant during its dormant period, typically in the winter months.
- Monitor the overall health and growth of your plant, making adjustments to your fertilizing routine or fertilizer type as needed.
Remember to always read and follow the instructions provided with your specific fertilizer product for best results.
For Campanula Patula plants, it is recommended to use well-draining soil that is rich in organic matter. The soil should be slightly acidic, with a pH level around 6.5 to 7.5. It is important to ensure that the soil is able to retain moisture but does not become waterlogged, as this can lead to root rot. Adding perlite or sand to the soil can help improve drainage. Additionally, regular fertilization can help provide the necessary nutrients for healthy growth.
Campanula patula is a perennial flowering plant that can be propagated through various methods, including division, seed sowing, and stem cuttings. Here is a detailed guide on how to propagate Campanula patula without mentioning its common names:
- Division:
a. Choose a mature Campanula patula plant with healthy and well-established root systems.
b. Dig around the base of the plant, ensuring to take a large enough soil ball to preserve the roots.
c. Gently separate the plant into smaller sections, ensuring each section has a good amount of roots and foliage.
d. Replant the divided sections into prepared holes or containers filled with moist, well-draining soil.
e. Water the newly divided plants thoroughly and provide them with appropriate care, such as regular watering and sufficient sunlight.
- Seed sowing:
a. Collect mature seed capsules from a healthy Campanula patula plant.
b. Allow the seed capsules to dry and split open naturally, revealing the tiny, light-colored seeds.
c. Fill seed trays or small pots with a well-draining seed-starting mix or a mixture of peat moss and perlite.
d. Sprinkle the Campanula patula seeds evenly over the soil surface, ensuring they are not too close together.
e. Cover the seeds lightly with a thin layer of soil or vermiculite and mist them with water.
f. Place the seed trays or pots in a warm location with indirect sunlight.
g. Keep the soil consistently moist but not soggy, and mist the seeds as needed to maintain humidity.
h. The seeds should germinate within two to three weeks. Once the seedlings have grown several inches tall, transplant them into individual pots or outdoor beds.
- Stem cuttings:
a. Choose healthy stems from a mature Campanula patula plant to use as cuttings.
b. Using a clean, sharp knife or scissors, take cuttings from the plant, ensuring they are about 4-6 inches long.
c. Remove any lower leaves from the stems, leaving only a few at the top.
d. Dip the cut end of the stem into a rooting hormone powder to encourage root development (optional).
e. Fill small pots or seed trays with a well-draining rooting medium, such as vermiculite or perlite, or a mixture of peat moss and sand.
f. Make holes in the rooting medium and insert the cuttings, gently firming the soil around them.
g. Mist the cuttings with water to settle the soil and provide moisture.
h. Place the pots or trays in a warm, brightly-lit location, away from direct sunlight.
i. Maintain a consistently humid environment by covering the cuttings with a clear plastic bag or a propagator lid.
j. Check the cuttings regularly, ensuring the soil remains moist but not overly wet.
k. After a few weeks, the cuttings should develop roots. Once rooted, transplant them into individual pots or outdoor beds, and continue to care for them as mature plants.


