Plant Overview
The Chimney Bellflower is a true skyscraper of the cottage garden, famous for its dramatic, towering spikes that can reach heights of up to seven feet. Native to the rocky slopes of Italy and the Balkans, it has been a beloved ornamental plant since the 16th century. Historically, it was a favorite for decorating empty summer fireplaces, earning its quirky "Chimney" nickname.
🔍 How to Identify
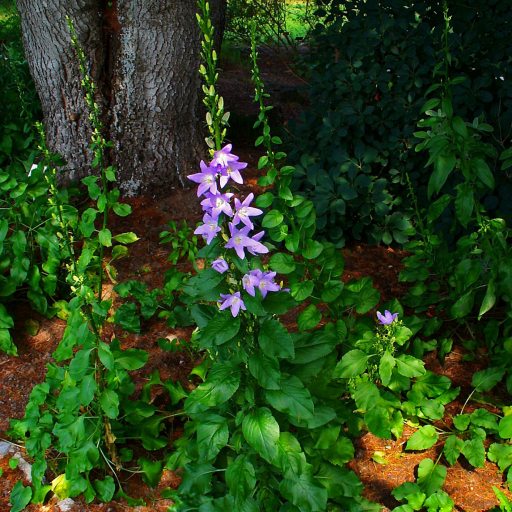
- 🔔 The Flowers: Dozens of star-shaped or shallow bell-shaped blooms crowd the upper half of the stem. They typically appear in soft lavender-blue or brilliant porcelain white.
- 📏 The Stature: Unlike shorter bellflowers, this species grows in a strictly vertical, "pyramidal" fashion, creating a narrow but massive column of color.
- 🍃 The Foliage: The base features large, heart-shaped leaves with slightly wavy edges, while the leaves higher up the stalk become much smaller and more pointed.
🏡 In Your Garden
- 🏗️ Architectural Support: Because these plants can grow taller than a human, they are prone to toppling in high winds. Staking them early in the season is essential to keep their "steeples" upright.
- ⏳ A Lesson in Patience: This is usually a short-lived perennial or a biennial. It spends its first year growing a lush green rosette of leaves and saves all its energy for the spectacular floral explosion in its second year.
- ✂️ The Deadheading Trick: To keep the display looking fresh, pinch off individual wilted flowers. This prevents the plant from putting energy into seeds too early and keeps the remaining buds opening.
⚠️ Safety & Toxicity
- ✅ Safe for Families: Campanula pyramidalis is considered non-toxic to humans. It is a safe choice for gardens where children play.
- 🐾 Pet Friendly: This plant is generally classified as non-toxic to dogs, cats, and horses, making it a "worry-free" addition to a pet-friendly landscape.
✨ Fun Fact
In Victorian times, the Chimney Bellflower was so popular as an indoor decoration that it was grown in large pots and placed inside the hearth during the summer months to hide the "black hole" of the unused fireplace.

Detailed Care Instructions
Here are some general tips for growing Campanula pyramidalis:
- Choose a suitable location: Campanula pyramidalis prefers full sun to partial shade. It can tolerate a wide range of soil types but prefers well-draining soil.
- Start from seeds: The easiest way to grow Campanula pyramidalis is from seeds. Sow the seeds indoors about 6-8 weeks before the last frost date or directly in the garden after the danger of frost has passed.
- Prepare the soil: If planting in the garden, loosen the soil and incorporate organic matter like compost to improve the drainage and fertility.
- Planting: Sow the seeds thinly on the soil surface and barely cover them with a thin layer of soil. Water gently to avoid dislodging the seeds.
- Watering: Keep the soil consistently moist but not waterlogged. Avoid over-watering as it can lead to root rot. Water at the base of the plant to avoid wetting the leaves.
- Transplanting: When the seedlings have at least 2-3 true leaves and the weather is suitable, transplant them into the garden, spacing them about 12-18 inches apart. Alternatively, you can also plant them in containers.
- Support: As Campanula pyramidalis grows quite tall, it may need support to prevent it from flopping. Install stakes or a trellis nearby to provide support.
- Mulching: Apply a layer of organic mulch around the base of the plant to retain moisture, suppress weed growth, and protect the roots during extreme temperatures.
- Maintenance: Remove any weeds that compete with the plants for nutrients and water. Monitor for pests and diseases and take appropriate measures if necessary.
- Pruning: Deadhead the faded flowers to encourage continuous blooming. Cut back the entire plant to the ground after flowering to promote healthy growth for the following year.
Remember that Campanula pyramidalis is a biennial plant, meaning it will typically flower in the second year of growth. However, with proper care, it may bloom earlier in some cases.

Place in a bright room that is sun drenched almost all day. Or directly in a south-facing window.

To water this plant, it is important to keep its soil consistently moist, but not waterlogged. The frequency of watering will depend on several factors including the temperature and humidity levels in the plant's environment, as well as the type of soil and pot used. Generally, the plant should be watered thoroughly until water begins to drain from the bottom of the pot, but avoid letting the soil dry out completely in between waterings. It's also important to avoid getting the foliage wet, as this can lead to fungal diseases. Instead, water the soil directly at the base of the plant. Always use room temperature water and avoid using hard water or water that contains chlorine or fluoride, as these can be harmful to the plant.
For optimal growth and health, feed the Campanula Pyramidalis plant a balanced fertilizer that contains equal parts nitrogen, phosphorus, and potassium. Apply the fertilizer once every two weeks during the growing season, which typically runs from spring through summer. Be sure to follow the instructions on the fertilizer package carefully to avoid over-fertilization, which can damage the plant. Water the plant thoroughly after fertilizing to help distribute the nutrients throughout the soil.
The best soil to use with this plant is a well-draining soil that is rich in organic matter. A soil pH of 6.0 to 7.5 is preferred. The plant prefers soils that are moist, but not waterlogged. Sand and perlite can be added to improve drainage. The soil should be loamy to sandy loam in texture. This plant prefers well-aerated soil that does not compact easily. It can tolerate partial shade, but grows best in full sun.
To propagate this plant, select a healthy stem with at least two nodes. Cut the stem just below the second node using a sharp, sterile knife. Remove any leaves from the bottom 1-2 inches of the stem. Dip the cut end of the stem in rooting hormone, if desired. Plant the stem in a well-draining potting mix, making sure that the bottom node is buried in the soil. Water the cutting thoroughly and cover the pot with a clear plastic bag to create a humid environment. Place the pot in a bright, indirect light and mist the cutting regularly to keep it moist. After a few weeks, roots should begin to form and the cutting can be gradually acclimated to lower humidity levels. Once the cutting has established roots and begun to grow, it can be transplanted into a larger pot or into the garden in a sunny or partially shaded location with well-drained soil.


