Plant Overview
The Canna lily is a tropical showstopper that brings an instant "jungle" vibe to any landscape with its oversized, architectural foliage. Often called "Indian Shot" because its seeds are hard enough to be used as pellets, these plants aren't actually true lilies—they are closer relatives to ginger and bananas. They are the ultimate "sun-worshippers" of the garden, standing tall and proud throughout the hottest summer months.
🔍 How to Identify
- 🍃 Foliage: Massive, paddle-shaped leaves that resemble banana plants, ranging from deep emerald green to dramatic burgundy or even variegated stripes.
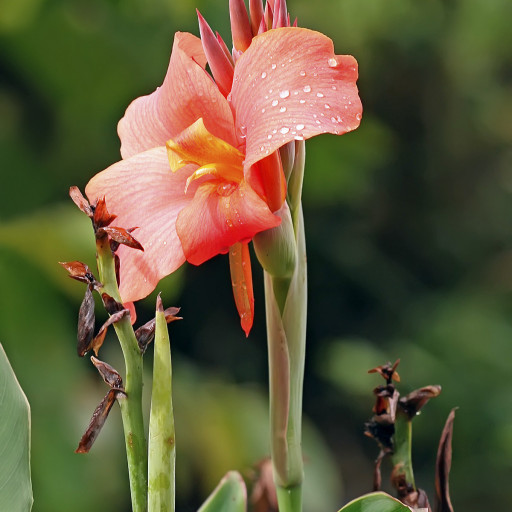
- 🌺 Blooms: Showy, asymmetric flowers clustered on thick stalks, appearing in fiery shades of red, orange, yellow, and occasionally soft pink or bi-colors.
- 🌱 Growth Habit: A vigorous grower that rises from thick, fleshy underground rhizomes, reaching heights of 2 to 8 feet depending on the specific cultivar.
🏡 In Your Garden
- ☀️ Sun & Heat: These plants are solar-powered; they require full sun to produce their vibrant colors and will become "leggy" or fail to bloom if kept in the shade.
- 💧 Thirsty Feeders: Because they grow so rapidly and produce such large leaves, they thrive in consistently moist soil and appreciate a nutrient-rich "buffet" of compost or fertilizer.
- ❄️ Winter Care: In colder climates, the rhizomes cannot survive freezing ground temperatures and must be "lifted" (dug up) and stored in a cool, dry place until spring.
⚠️ Safety & Toxicity
- ✅ Pet & Human Safe: Cannas are generally considered non-toxic to dogs, cats, and horses, making them a "worry-free" choice for family backyards.
- 🍽️ Edible Roots: Some species, specifically Canna edulis, are actually grown as a food crop in South America and Asia for their edible, starchy rhizomes, which are used similarly to potatoes.
✨ Fun Fact
The seeds of the Canna plant are so incredibly hard and perfectly round that they were reportedly used as improvised lead shot for muskets during the 19th-century Indian Rebellion! They are also frequently used as the "rattle" inside traditional African percussion instruments.

Detailed Care Instructions
You can divide canna plants by splitting the rhizomes into sections and replanting them. Each section should have two to three "eyes" or growing points.
How often should I divide canna plants?
If you live in a warm climate where you can leave the rhizomes in the ground during the winter, divide them when they begin to become overcrowded. The timing depends on how well they grow in their location but a rule of thumb is every two to three years.
How do you keep cannas blooming?
Plant them in a sunny spot, fertilize them regularly starting in the spring. water them weekly if it does not rain, and deadhead the faded flowers.
To grow a Canna plant, follow these steps:
- Obtain Canna rhizomes or seeds: You can purchase Canna rhizomes or seeds from garden centers, online nurseries, or from other gardeners.
- Choose a suitable location: Canna plants require full sun to part shade. Select a location with well-drained soil that receives at least 6-8 hours of full sun per day.
- Prepare the soil: Canna plants prefer loose, fertile soil. Amend the soil with organic matter like compost or well-rotted manure to improve drainage and nutrient content.
- Planting rhizomes: If using rhizomes, plant them horizontally, approximately 2-4 inches deep and 12-18 inches apart. Leave the bud or "eye" facing upwards.
- Planting from seeds: Sow the seeds in a seed-starting tray or small pots filled with seed-starting mix. Keep the soil consistently moist and maintain a warm temperature of around 70°F (21°C). Transplant seedlings outdoors when they have developed 3-4 sets of leaves and the danger of frost has passed.
- Watering: Keep the soil evenly moist but not waterlogged, especially during the growing season. Cannas require regular watering, particularly during dry spells.
- Fertilizing: Apply a balanced, slow-release fertilizer or a liquid fertilizer every 4-6 weeks during the growing season to promote healthy growth and flowering. Follow the packaging instructions for proper dosage.
- Mulching and weed control: Apply a layer of organic mulch around the plants to help retain moisture, suppress weed growth, and regulate soil temperature.
- Staking: Tall varieties of Cannas may need support to prevent them from falling over. Use stakes or rings to keep the plants upright.
- Overwintering: In regions with cold winters, Cannas are often dug up and stored indoors during the winter. Cut back the foliage, dig up the rhizomes, and store them in a cool, dry place (around 45°F/7°C) for winter dormancy. Replant them in spring once the danger of frost has passed.
- Pests and diseases: Watch out for common pests like aphids, slugs, and snails. Treat any pest infestations promptly using appropriate methods. Cannas are generally resistant to diseases but may occasionally be affected by fungal problems like leaf spot or rust. Apply fungicides if necessary following the instructions on the packaging.
By following these steps, you should be able to grow healthy and vibrant Canna plants. Enjoy their beautiful foliage and showy flowers throughout the growing season!

Place in a bright room that is sun drenched almost all day. Or directly in a south-facing window.

Canna plants require consistent watering to thrive. As a general rule, the soil should be kept evenly moist but not waterlogged. Overwatering can lead to root rot, which can be detrimental to the plant's health.
The frequency of watering depends on several factors such as the plant's size, the amount of sunlight it receives, and the type of soil it is planted in. Generally, Canna plants should be watered more frequently during hot weather or when they are grown in containers.
When watering, it is important to water deeply to ensure the water reaches the roots. You can test the soil's moisture level by inserting your finger into the soil up to the second knuckle. If the soil feels dry, it's time to water.
It is also beneficial to use a well-draining soil mix and to add a layer of mulch to help retain moisture. However, be cautious not to let the mulch touch the stem, as this can encourage fungal growth.
In summary, Canna plants require consistent, deep watering to ensure their health and vigor.
To fertilize this tropical plant, use a well-balanced, water-soluble fertilizer with a 1-1-1 or 2-2-2 ratio of nitrogen, phosphorus, and potassium. Apply the fertilizer every two to three weeks during the growing season and reduce the frequency to once a month during the dormant season. Dilute the fertilizer to half strength when applying it to young plants or during the hot months to prevent fertilizer burn. Avoid fertilizing when the soil is dry, and always water the plant before and after fertilizing to prevent roots from burning.
The ideal soil for this plant should be well-draining and have a good structure for root development. It should also contain a balanced mix of nutrients to support its growth and development. Additionally, the soil should have a slightly acidic pH level to prevent nutrient deficiencies. It is important to avoid using heavy soils that may compact and prevent root growth. It is recommended to use a high-quality potting mix with added perlite, vermiculite, or sand to ensure proper drainage. Adding organic matter such as compost or worm castings can provide additional nutrients and improve soil structure.
Canna plants can be propagated through division. To propagate, first choose a healthy parent plant with strong and active roots. Then, loosen the soil around the parent plant and carefully remove the whole plant from the ground. Gently remove any excess soil from the roots.
Next, using a sharp, clean knife or shears, cut the parent plant into several sections, making sure each section has at least one healthy rhizome and a few leaves. Allow the cut sections to dry for a day or two, which helps prevent rot and disease.
Once the cut sections are dry, plant them in a well-draining soil mixture in a warm and sunny location. Water the new plants regularly, but be careful not to overwater. It may take some time for the new plants to establish strong roots, so be patient and keep an eye out for signs of growth.


