Plant Overview
Often called the Hairy Sedge or Hammer Sedge, Carex hirta is a resilient and tactile member of the sedge family. Unlike many of its smooth-leaved relatives, this plant is famous for its fuzzy texture, making it easy to spot in damp meadows or garden borders. It is a pioneering species, often one of the first to colonize disturbed soil or damp hollows, spreading steadily through the landscape with its persistent underground runners.
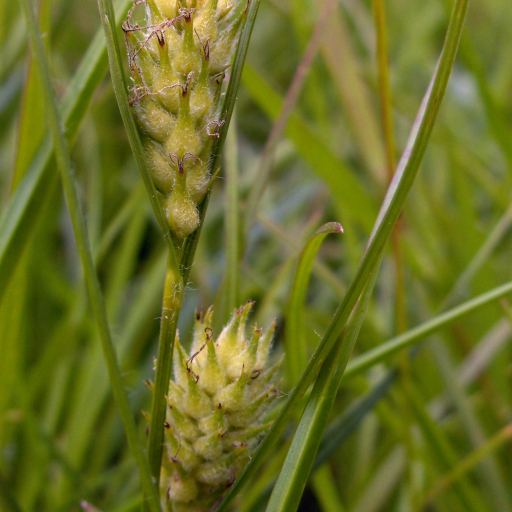
🔍 How to Identify
- 🌿 The Fuzzy Leaf: Unlike most sedges, both the leaves and the leaf sheaths are covered in fine, soft hairs. If you run your finger along the blade, it feels distinctly velvety rather than waxy.
- 📐 Triangular Stem: Following the classic rule of "sedges have edges," the base of the flowering stem is noticeably three-sided and feels sharp or angular when rolled between your fingers.
- 🔨 Hammer Spikes: The female flowering spikes are cylindrical and thick, often looking like tiny green hammers or bottlebrushes hanging off the stem.
🏡 In Your Garden
- 🌱 The Spreading Habit: This plant spreads via long, creeping rhizomes (underground stems). While this makes it an excellent choice for stabilizing soil or filling in a damp "wild" corner, it can be quite stubborn to remove once it settles into a manicured lawn.
- 💧 Moisture Lover: It thrives in heavy clay or waterlogged soils where typical lawn grasses might struggle. It’s a "tough-as-nails" groundcover that doesn't mind a bit of shade or a periodic flood, making it ideal for rain gardens or pond edges.
⚠️ Safety & Toxicity
- ✅ Status: Non-toxic and generally safe.
- 🐾 Details: This sedge is safe for pets, livestock, and children. However, like many wild grasses and sedges, the leaf edges contain silica which can be slightly abrasive; if handled roughly, they might cause very minor "paper-cut" style irritations on sensitive skin.
✨ Fun Fact
The genus name Carex is derived from the Greek word keirein, which means "to cut," referring to the sharp, saw-like edges of many sedge leaves—though Carex hirta is much softer to the touch than its relatives thanks to its hairy coat!

Detailed Care Instructions
Growing Carex hirta, commonly known as hairy sedge, involves several steps to ensure the plant thrives. Here's a guide to help you grow Carex hirta:
1. Choosing the Right Location
- Light: Carex hirta can tolerate a range of light conditions, from full sun to partial shade. However, it often performs best in partial shade, especially in hotter climates.
- Soil: This plant prefers moist, well-drained soil. It can tolerate a variety of soil types, but it thrives in rich, fertile soil.
2. Planting
- Seeds: You can grow Carex hirta from seeds. Sow the seeds in the fall for natural stratification over winter or in the spring after stratifying them in the refrigerator for a few weeks.
- Outdoor Sowing: Sow seeds directly into the ground where you want the plants to grow. Cover lightly with soil and keep the area moist.
- Indoor Sowing: Start seeds indoors if you want a head start. Plant seeds in seed trays with a soil mix, keep them moist, and place them in a cool, bright area.
- Outdoor Sowing: Sow seeds directly into the ground where you want the plants to grow. Cover lightly with soil and keep the area moist.
- Divisions: Another method of propagation is by division. In the spring or fall, dig up clumps of Carex hirta and divide them into smaller sections. Replant the divisions immediately.
3. Watering
- Carex hirta likes moist soil, so keep the soil consistently damp but not waterlogged. Water regularly, especially in dry periods.
4. Mulching
- Apply a layer of mulch around the plants to help retain soil moisture and keep the roots cool. Organic mulches like bark, compost, or straw work well.
5. Fertilizing
- Carex hirta generally doesn't require a lot of fertilization. However, you can apply a balanced, slow-release fertilizer in the spring to encourage healthy growth. Over-fertilization can lead to overly vigorous growth, which may require more maintenance.
6. Maintenance
- Pruning: Trim back dead or damaged foliage in the late winter or early spring to make way for new growth.
- Control Spread: This plant can spread by rhizomes, so if you want to control its growth, plan for regular division or install a root barrier.
- Pest and Disease Control: Carex hirta is usually pest and disease resistant, but always keep an eye out for any issues. Treat problems early to avoid spread.
7. Winter Care
- In colder climates, Carex hirta can be left standing over winter, providing structure and interest in the garden. In the spring, you can cut back any dead foliage.
Growing Carex hirta can add a beautiful, ornamental touch to your garden. Its adaptability to different light conditions and its requirement for moist soil make it ideal for various landscape settings, particularly those with consistent moisture levels.
By following these guidelines, you can enjoy a healthy and attractive Carex hirta plant in your garden!

Place in a bright room that is sun drenched almost all day. Or directly in a south-facing window.

The Carex Hirta plant should be watered regularly to ensure it remains healthy and optimized for growth. It's essential to ensure the soil is moist but not saturated. Over-watering can lead to the roots becoming waterlogged, which could cause them to rot and potentially kill the plant itself.
It's recommended to water the plant every few days, or when the soil starts to feel dry to the touch. When watering, pour water onto the soil rather than directly onto the plant's foliage. Doing so can help prevent the leaves from getting waterlogged or developing mold.
It's also important to ensure the plant is receiving adequate drainage. This can be achieved by planting the Carex Hirta in a pot with drainage holes or in a location in the garden where water can easily flow away from the plant's roots.
Additionally, it's advised to avoid watering the Carex Hirta plant during the hottest times of the day, such as midday when the sun is at its peak. Watering during these times can cause the water to evaporate too quickly, not allowing the plant to absorb it.
Overall, by ensuring the soil is consistently moist but not over-watered, providing adequate drainage, and avoiding watering during the hottest times of the day, the Carex Hirta plant can thrive and grow successfully.
Here are some fertilizing instructions for Carex hirta:
- Soil Preparation: Ensure the soil is well-draining and rich in organic matter. Compost or aged manure can be mixed into the soil before planting to improve nutrient content.
- Timing: Fertilize in early spring when new growth begins. This helps support the plant's development during the growing season.
- Type of Fertilizer: Use a balanced, slow-release granular fertilizer with an N-P-K ratio such as 10-10-10 or 14-14-14. Alternatively, you can use a well-balanced organic fertilizer.
- Application: A general guideline is to use about 1-2 pounds of fertilizer per 100 square feet of planting area. Follow the specific manufacturer’s instructions for the product you’re using.
- Method: Scatter the granular fertilizer evenly around the base of the plant. Avoid direct contact with the stems and leaves to prevent burning. Lightly work the fertilizer into the top few inches of soil with a rake or hand tool.
- Watering: After applying fertilizer, water the area thoroughly to help the nutrients penetrate the soil and reach the root system.
- Monitoring: Observe plant growth throughout the season. If the foliage appears pale or growth is slow, you may apply a second, lighter dose of fertilizer in midsummer.
- Organic Alternatives: If you prefer organic gardening, consider using compost tea, fish emulsion, or liquid seaweed as a supplement. These can be applied bi-weekly during the growing season.
By following these guidelines, you can help ensure that your Carex hirta receives the nutrients it needs to thrive.
Carex Hirta plant prefers well-drained soil that is rich in organic matter. A soil mix that is slightly acidic with a pH of 5.5-6.5 is ideal for this plant. A good potting mix for this plant would consist of peat moss, perlite, and compost. The peat moss will hold moisture and provide acidity, while the perlite will ensure good drainage, preventing waterlogging. Compost will provide nutrients that will help the plant grow and thrive. It is essential to make sure the soil is not compacted and is loose enough for the roots to establish themselves well.
Carex hirta, a perennial sedge, can be propagated primarily through division or seed germination. Here's a detailed guide on both methods:
Division
Best Time:
- Early spring or late autumn, when the plant is not actively growing.
Steps:
- Preparation:
- Choose a mature, healthy plant.
- Water the plant deeply a day before you plan to divide it to make it easier to remove.
- Choose a mature, healthy plant.
- Digging Up:
- Carefully dig around the plant, aiming to get as much of the root system as possible.
- Gently lift the plant from the ground, shaking off excess soil.
- Carefully dig around the plant, aiming to get as much of the root system as possible.
- Dividing:
- Use a sharp, sterilized knife or garden spade to divide the root clump into smaller sections. Ensure each section has a good portion of roots and shoots.
- Depending on the size of the original plant, you can create several divisions.
- Use a sharp, sterilized knife or garden spade to divide the root clump into smaller sections. Ensure each section has a good portion of roots and shoots.
- Replanting:
- Dig holes in the new location that are slightly larger than the root clumps.
- Place each division in a hole, ensuring it is at the same depth as it was originally.
- Fill the hole with soil and press gently around the roots.
- Dig holes in the new location that are slightly larger than the root clumps.
- Watering and Care:
- Water the divisions thoroughly after planting.
- Keep the soil consistently moist but not waterlogged until the plants establish themselves, typically for a few weeks.
Seed Germination
Best Time:
- Water the divisions thoroughly after planting.
- Late winter to early spring.
Steps:
- Seed Collection:
- Collect seeds from mature plants. These are usually found in the seed heads as they ripen.
- Collect seeds from mature plants. These are usually found in the seed heads as they ripen.
- Seed Preparation:
- Store the seeds in a cool, dry place if not sowing immediately.
- Soak seeds in water for 24 hours before sowing to enhance germination rates.
- Store the seeds in a cool, dry place if not sowing immediately.
- Sowing Seeds:
- Use shallow trays or pots filled with a mixture of peat and sand or a standard seed-starting mix.
- Scatter seeds on the soil surface and press them down lightly. Do not bury them deeply.
- Mist the surface lightly with water to settle the seeds.
- Use shallow trays or pots filled with a mixture of peat and sand or a standard seed-starting mix.
- Germination Conditions:
- Place the trays or pots in a bright location but out of direct sunlight.
- Maintain a consistent temperature between 60-75°F (15-24°C).
- Keep the soil consistently moist by misting regularly.
- Place the trays or pots in a bright location but out of direct sunlight.
- Transplanting Seedlings:
- Once seedlings are large enough to handle and have developed a few sets of true leaves, they can be transplanted.
- Transplant seedlings to larger pots or directly into the garden, ensuring they have enough space to grow.
- Once seedlings are large enough to handle and have developed a few sets of true leaves, they can be transplanted.
- Aftercare:
- Continue to water the seedlings regularly to establish strong root systems.
- Gradually acclimate them to outdoor conditions if they were started indoors by hardening them off over a week.
General Care Tips Post-Propagation
- Continue to water the seedlings regularly to establish strong root systems.
- Ensure the new plantings are in well-drained soil.
- Maintain moderate soil moisture; avoid waterlogging.
- Mulch around the plants to retain moisture and suppress weeds.
- Monitor for pests and diseases, although Carex hirta is generally low-maintenance once established.
By following these steps, you can successfully propagate Carex hirta and enhance your garden or landscape with this resilient plant.


