Plant Overview
Often called Muhlenberg's Sedge or the Sand Sedge, this resilient native of North America is the "rugged survivor" of the sedge world. Named after the pioneering Lutheran minister and botanist Gotthilf Muhlenberg, it is frequently found in dry, sandy spots where other plants might wither. It’s a favorite for naturalistic "meadow" looks and low-maintenance groundcovers.
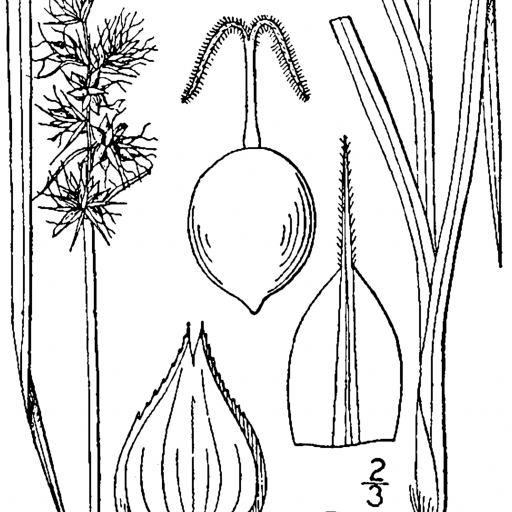
🔍 How to Identify
- 🌿 Tufted Growth: It grows in dense, tidy clumps (cespitose) rather than spreading via runners, making it look like a fountain of fine green hair.
- 📐 Triangular Stems: Like most sedges, it follows the rule "sedges have edges"—if you roll the flower stem between your fingers, you will feel three distinct sides.
- ✨ Prickly Seed Heads: In late spring, it produces distinctive, star-burst-shaped seed clusters that look like tiny, spiked maces at the top of the stems.
🏡 In Your Garden
- 🏜️ Drought Specialist: Unlike many of its moisture-loving cousins, this sedge thrives in dry, rocky, or sandy soils. It’s a perfect solution for that "difficult" corner of the yard where nothing else grows.
- 🦋 Wildlife Hub: It serves as an essential host plant for several species of Satyrid butterflies and provide cover for ground-nesting birds.
- ✂️ Low Maintenance: Because it grows slowly and stays in neat mounds, it rarely needs trimming. It prefers to be left alone once its deep root system is established.
⚠️ Safety & Toxicity
- ✅ Safe for All: Muhlenberg's Sedge is considered non-toxic to humans, dogs, cats, and horses.
- 🧤 Mild Texture: While not sharp like some saw-grasses, the edges of the leaves can be slightly abrasive, so wearing gloves during heavy cleanup is a good idea for those with sensitive skin.
✨ Fun Fact
In the world of botany, there is a famous rhyme to help tell plants apart: "Sedges have edges, rushes are round, and grasses are hollow right down to the ground." Carex muehlenbergii is the perfect example of those "edges" in action!

Detailed Care Instructions
To grow Carex muehlenbergii plant, also known as Muhly sedge, follow these steps:
- Site selection: Choose a location that receives partial shade to full sun. Muhly sedge thrives in moist, well-draining soil but can tolerate a wide range of soil conditions.
- Soil preparation: Prepare the soil by removing any weeds, rocks, or other debris. Loosen the soil with a garden fork or tiller. If the soil is heavy or clayey, amend it with organic matter like compost to improve drainage.
- Planting: Dig a hole twice the width of the plant's root ball and deep enough so the top of the root ball sits level with or slightly above the soil surface. Remove the plant from its container and gently loosen the roots if they are circling around. Place the plant in the hole, ensuring it is upright, and backfill with soil, gently firming it around the roots.
- Watering: Water the plant thoroughly after planting to settle the soil and eliminate air pockets. Keep the soil consistently moist, especially during the establishment period. Depending on the weather conditions, watering may vary from once or twice a week to once every few days.
- Mulching: Apply a 2-3 inch layer of organic mulch around the plant, leaving a small space around the stem to prevent rot. Mulch helps retain moisture, suppresses weed growth, and maintains soil temperature.
- Care: Muhly sedge is relatively low-maintenance. Trim back the plant in late winter or early spring before new growth emerges to remove any dead or damaged foliage. Divide the plant every 2-3 years to control its size and promote healthier growth.
- Fertilization: Carex muehlenbergii generally doesn't require frequent fertilization. However, you can apply a slow-release, balanced fertilizer in early spring if needed.
- Pests and diseases: Muhly sedge is relatively resistant to pests and diseases. However, occasional problems can include leaf spot, rust, or aphids. Monitor the plant regularly and treat any issues promptly with appropriate organic or chemical solutions.
Remember that Carex muehlenbergii is native to North America and may differ slightly in its specific growing requirements depending on your location. It's always recommended to consult with local garden centers or botanical experts for region-specific advice.

Place in a bright room that is sun drenched almost all day. Or directly in a south-facing window.

1. Determine the watering needs of the plant: The first step in watering Carex muehlenbergii is to determine its watering needs. This can be done by studying the plant's natural habitat and understanding how much water it requires. Generally, Carex muehlenbergii prefers consistent moisture but does not tolerate standing water.
2. Observe the soil moisture: Observation of soil moisture is a crucial step in watering any plant. Before watering, feel the soil around the base of the plant for moisture content. If the soil is dry to the touch, it's time to water.
3. Use the right watering techniques: Carex muehlenbergii prefers watering from the base of the plant to simulate natural rainfall. Pour water onto the soil around the plant rather than on its leaves to avoid damage to the foliage and to encourage healthy root growth.
4. Time of day matters: The best time to water Carex muehlenbergii is during the early hours of the morning. Watering in the morning allows the water to soak deep into the soil and evaporate naturally before the heat of the day sets in. Avoid watering during the hottest part of the day as it can scorch the foliage.
5. Watering frequency: Frequency of watering depends on the climate, soil type, and season. Carex muehlenbergii requires consistent moisture, but over-watering can lead to root rot. A general rule is to water thoroughly once a week and adjust accordingly. If the plant is located in a dry or sunny location, it may require more frequent watering.
6. Use a moisture meter: For precise watering, use a moisture meter to measure the soil's moisture content. These meters give an accurate reading of the soil moisture levels, allowing you to adjust your watering schedule accordingly.
7. Mulching: Adding a layer of mulch around the plant's base can help to retain moisture in the soil. A layer of organic material such as bark, leaves, or grass clippings can help to regulate the soil's moisture levels and minimize the need for watering.
By following these steps, you can keep your Carex muehlenbergii plant healthy and thriving.
To fertilize this plant, you should use a balanced, slow-release fertilizer in the early spring or late fall. Make sure to use a fertilizer that is specifically designed for use on native plants. Apply the fertilizer at the base of the plant, being careful not to get any on the foliage. Water the plant thoroughly after fertilizing to help the fertilizer soak into the soil. Do not over-fertilize, as this can lead to excessive growth and weakened plants.
Carex Muehlenbergii requires well-draining soil that is moist but not waterlogged. The ideal soil pH for this plant ranges from 5.5 to 7.5. It prefers soil with a high organic content and can benefit from the addition of organic matter, such as compost or peat moss. The soil should be loose and friable, allowing for easy root growth and good absorption of water and nutrients. It is important to avoid using heavy clay soils or overly sandy soils, as they can impede drainage or hold too much water respectively. The plant also benefits from regular fertilization with a balanced, slow-release fertilizer to promote healthy growth.
To propagate this plant, you will need to first identify the mature plant and select a healthy, vigorous clump to use for propagation. Take a sharp, sterile cutting tool and carefully remove a small section of the clump, making sure to include both roots and foliage.
Next, prepare a container with sterile potting soil and make a small hole in the soil for the cutting. Gently place the cutting into the hole and firm the soil around it to stabilize it. Water the cutting thoroughly and place it in a warm, humid location with indirect sunlight.
Monitor the moisture levels in the soil and keep the cutting moist but not waterlogged. Within a few weeks, the cutting should begin to show signs of new growth. Continue to care for the cutting as it grows, gradually acclimating it to brighter light and drier conditions.
Once the cutting has established itself and is producing new growth, it can be transplanted into a larger pot or planted in the ground. With proper care and maintenance, the new plant should grow to maturity and produce its own clumps of foliage and roots, providing a sustainable source for future propagation.


