Plant Overview
Often called the Kawakami Hornbeam, this elegant deciduous tree hails from the mist-shrouded mountain forests of Taiwan. It is a favorite among tree collectors and bonsai enthusiasts for its graceful, layered canopy and "muscle-wood" appearance. In the wild, it serves as a sturdy anchor for mountain slopes, while in the garden, it brings a sense of ancient, woodland serenity.
🔍 How to Identify
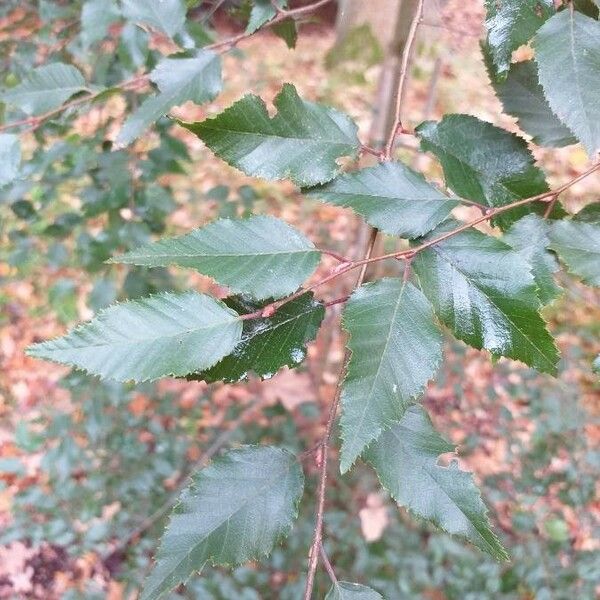
- 🍃 Pleated Foliage: The leaves are oblong and feature deeply impressed veins, giving them a distinct "corrugated" or pleated texture that catches the light beautifully.
- 🪵 Muscular Bark: As the tree matures, the smooth, silvery-grey bark develops a "fluted" or rippled look, resembling a tensed muscle or a finely sculpted stone pillar.
- 🎋 Pendulous Catkins: In spring, it produces long, drooping flower clusters known as catkins. These hang like delicate green lanterns before turning into winged nutlets that dance in the wind.
🏡 In Your Garden
- 🌱 Transplant Tendencies: Like many hornbeams, this species has a sensitive root system. It is best to plant it in its permanent "forever home" while it is young, as it dislikes being moved once its deep roots are established.
- 💧 The Drainage Balance: While it appreciates consistent moisture to mimic its native mountain habitat, it cannot stand "wet feet." Ensure the soil is loamy and rich in organic matter to allow excess water to drain away while keeping the roots cool.
⚠️ Safety & Toxicity
- ✅ Safe Profile: The Kawakami Hornbeam is generally considered non-toxic to humans, dogs, and cats. It is a "friendly" tree for family landscapes.
- 🧤 General Caution: While not chemically toxic, the wood is extremely hard. Always wear gloves when pruning to avoid minor scratches from the stiff, woody twigs.
✨ Fun Fact
The name "Hornbeam" comes from the Old English words horn (meaning hard) and beam (meaning tree). The wood of the Kawakami Hornbeam is so incredibly dense and tough that it was historically used to make ox yokes and tool handles that could withstand immense pressure without snapping!

Detailed Care Instructions
To successfully grow Carpinus kawakamii, also known as Kawakami hornbeam, you need to follow these steps:
- Climate and Location: Kawakami hornbeam is native to Taiwan and requires a climate similar to its native habitat. It thrives in USDA hardiness zones 6 to 10. The plant prefers partial shade but can tolerate full sun if given adequate moisture.
- Soil: Provide well-draining soil rich in organic matter. Carpinus kawakamii prefers slightly acidic to neutral soil pH.
- Watering: The plant needs regular watering, especially during hot and dry periods. Keep the soil consistently moist but not waterlogged. Mulching around the base of the plant can help retain moisture.
- Fertilization: Fertilize the Carpinus kawakamii plant annually in early spring using a balanced slow-release fertilizer. Follow the package instructions for the specific type and amount to use.
- Pruning: Prune the plant in late winter or early spring to maintain its shape and remove any dead, damaged, or crossing branches. It can tolerate a light pruning, but avoid heavy pruning.
- Propagation: Carpinus kawakamii can be propagated through seeds or semi-hardwood cuttings. Collect seeds from mature plants and sow them in a seed tray filled with a well-draining seed-starting mix. Keep the soil moist and provide bright, indirect light. Cuttings can be taken in summer from semi-ripe growth and rooted in a well-draining rooting medium.
- Pests and diseases: Keep an eye out for common pests like aphids, scale insects, and caterpillars. Treat any infestations promptly using organic or chemical insecticides as needed. Monitor the plant for signs of diseases such as powdery mildew and maintain good airflow around the plant to prevent fungal issues.
- Winter protection: In colder regions, protect young or newly planted Carpinus kawakamii during winter by mulching around the plant's base with a thick layer of organic mulch. This will help insulate the roots and protect against frost damage.
By following these guidelines, you can successfully grow and care for Carpinus kawakamii plants.

Place in a bright room that is sun drenched almost all day. Or directly in a south-facing window.

Water the plant deeply but less frequently, ensuring that the soil drains well after each watering. It is important to avoid over-watering, which can lead to root rot. The plant prefers moist but well-draining soil. Check the soil moisture regularly and water when the top inch of soil feels dry to the touch. Use room temperature water to avoid shocking the roots. The plant may require more frequent watering during hot, dry weather. Avoid watering the foliage as this can increase the risk of fungal diseases.
To fertilize this species of plant, begin in early spring or late winter by applying a balanced, slow-release fertilizer around the drip line of the plant. Water the fertilizer immediately and make sure to fertilize only once or twice a year to avoid overfeeding. Additionally, it's essential to choose a fertilizer with a high nitrogen to phosphorous ratio, as it will support the plant's growth. It's also crucial to avoid fertilizing during the dormant period or during hot weather, as it may cause root damage or burning of the leaves.
The Carpinus Kawakamii plant prefers well-draining soil that is rich in organic matter. It thrives in soil with a pH level between 5.5 and 7.5. The ideal soil for this plant should be a mixture of three parts loam, one part sand, and two parts organic matter, such as peat moss or compost. The soil should be moist but not waterlogged, and it should be kept consistently moist during the growing season. Adding a slow-release fertilizer to the soil at the beginning of the growing season can help promote healthy growth. It is also important to avoid compacting the soil around the roots, as this can lead to poor growth and disease.
To propagate this plant, you will need to take stem cuttings from an existing plant. The best time to do this is during the spring or summer months. Take a stem cutting that is about 4-6 inches long, and make sure that it has at least two nodes.
Next, strip off the lower leaves from the stem cutting to expose the nodes. Dip the end of the cutting into rooting hormone to encourage root growth. Then, plant the cutting in a well-draining soil mix.
You can cover the cutting with a plastic bag to create a humid environment, which will help the cutting to root. Keep the soil moist but not waterlogged.
Once the cutting has rooted, which can take anywhere from a few weeks to a few months, you can transplant it into a pot or outside into the ground. Make sure to acclimate the new plant to its new environment gradually to avoid shock.


