Plant Overview
Known as the Yellow Knapweed or Mountain Knapweed, this Mediterranean native brings a burst of sunshine to rocky, sun-drenched landscapes. While many of its cousins in the Centaurea family are known for deep purples and blues, this hardy perennial stands out with its bright, citrus-colored blooms. It is a symbol of resilience, often found thriving in poor, limestone soils where other garden favorites might struggle.
🔍 How to Identify
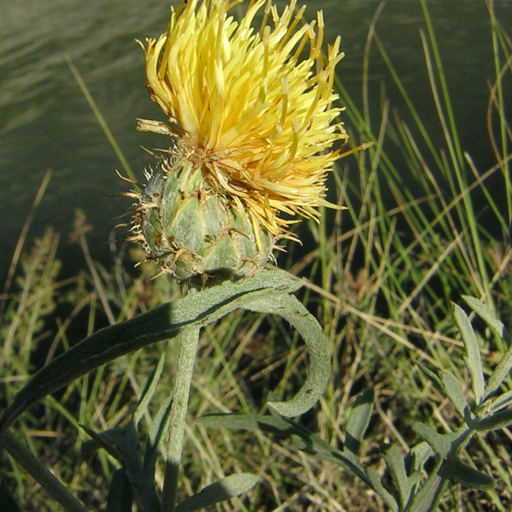
- ☀️ The Bloom: Large, thistle-like flower heads that are a vibrant, uniform yellow. The petals look feathery or "shaggy" at the edges.
- 🌿 The Foliage: Leaves are deeply lobed or "pinnatifid," meaning they look like they’ve been intricately cut into narrow segments. They often have a slightly grayish-green tint.
- 🏗️ Structure: The plant grows in an upright, branching habit, typically reaching about 15–30 inches in height. The stems are stiff and tough to help the flowers withstand wind.
🏡 In Your Garden
- 🪨 The "Lean" Life: This plant thrives on neglect. It prefers "lean" or poor soil over rich, fertilized garden beds. If the soil is too nutrient-heavy, the plant may become floppy and lose its compact shape.
- 💧 Drought Specialist: Once established, it is incredibly drought-tolerant thanks to its deep root system. It is a perfect candidate for xeriscaping or rock gardens that receive intense afternoon sun.
- 🐝 Pollinator Magnet: It is a high-value plant for biodiversity. Bees, butterflies, and hoverflies are frequently seen dancing around the yellow tufts, drawn by its plentiful nectar.
⚠️ Safety & Toxicity
- ✅ General Safety: Centaurea collina is not considered toxic to humans or common household pets like cats and dogs.
- 🧤 Skin Sensitivity: Like many plants with "hairy" or textured stems, the physical contact can cause mild mechanical skin irritation for people with very sensitive skin. Wearing gloves while pruning is a good practice.
✨ Fun Fact
The genus name Centaurea comes from Chiron the Centaur of Greek mythology. Legend says he discovered the medicinal properties of knapweeds and used them to heal a wound inflicted by a poisoned arrow.

Detailed Care Instructions
To grow Centaurea collina (Mountain knapweed), follow these steps:
- Choose a suitable location: Mountain knapweed thrives in full sun and well-drained soil. Make sure the location you choose receives at least 6-8 hours of direct sunlight per day.
- Prepare the soil: Before planting, prepare the soil by removing any weeds, rocks, or debris. Loosen the soil to a depth of about 6 inches using a garden fork or tiller. If the soil is heavy clay or poorly draining, adding organic matter like compost can improve drainage.
- Sow the seeds: Mountain knapweed seeds can either be sown indoors 6-8 weeks before the last frost or directly in the garden after the danger of frost has passed. To sow indoors, fill small pots or seed trays with a well-draining seed-starting mix and sow the seeds at a depth of about 1/8 to 1/4 inch. Keep the soil moist until germination occurs. If sowing directly outdoors, scatter the seeds over the prepared soil and cover lightly with a thin layer of soil.
- Watering and care: After sowing, water the seeds gently to keep the soil moist until germination. Once the plants are established, they are moderately drought-tolerant, but regular watering during dry spells can promote healthier growth and flowering. Water the plants deeply when the top inch of soil feels dry.
- Thin the seedlings: If you have sown the seeds in small pots or seed trays, thin the seedlings once they develop their first few true leaves. Leave only the strongest, healthiest seedlings, spacing them about 12-18 inches apart. If the seeds were sown directly in the garden, thinning might not be necessary.
- Provide support (optional): Depending on the specific Centaurea collina variety, you may consider providing support like stakes or trellises if the plants grow taller and become top-heavy. This will help keep the plants upright during heavy rainfall or strong winds.
- Mulch: Apply a layer of organic mulch around the plants to help suppress weeds and retain moisture in the soil. Use straw, wood chips, or compost as mulch, keeping it a few inches away from the plant's stems to prevent rot.
- Prune (optional): If the plants become overgrown or untidy, you can prune them lightly after they finish flowering. This will encourage compact growth and potentially extend the flowering season.
- Fertilize (optional): Mountain knapweed generally grows well without the need for additional fertilizers. However, if the plants are showing signs of nutrient deficiency or if the soil is poor, you can apply a balanced, slow-release fertilizer in early spring. Follow the package instructions for application rates.
- Pest and disease control: Mountain knapweed is generally resistant to most pests and diseases. However, keep an eye out for aphids, slugs, or snails, and address any infestations promptly using suitable organic or chemical controls.
With proper care, your Centaurea collina plants should grow and bloom beautifully. Enjoy the showy flowers and the wildlife they attract!

Place in a bright room that is sun drenched almost all day. Or directly in a south-facing window.

Centaurea collina is a herbaceous plant that requires adequate watering to thrive. The best way to water this plant is to use a watering can or a hose with a gentle spray nozzle. It is important to ensure that the water reaches the roots of the plant and not just the leaves.
The amount of water required by Centaurea collina depends on various factors such as the soil type, temperature, and humidity. In general, it is recommended to water the plant once or twice a week during the growing season. However, during periods of extreme heat or drought, the plant may require additional watering.
To determine when to water the plant, it is important to check the soil moisture level. This can be done by sticking your finger into the soil to a depth of 1-2 inches. If the soil feels dry to the touch, it is time to water the plant. On the other hand, if the soil feels moist, it is best to wait before watering.
When watering Centaurea collina, it is important to avoid overwatering as this can lead to root rot and other plant diseases. It is also important to avoid watering the leaves as this can encourage the growth of fungal diseases.
Overall, watering Centaurea collina requires care and attention to ensure that the plant receives the right amount of water at the right time. With proper watering, this plant can thrive and produce beautiful flowers throughout the growing season.
To fertilize this plant, it is recommended to use a balanced fertilizer with equal parts nitrogen, phosphorus, and potassium. Apply the fertilizer once a month during the growing season, which typically occurs during the warmer months. Be sure to water the plant thoroughly before and after fertilizing to prevent burning the roots. Avoid fertilizing during the dormant season or during prolonged periods of drought or excessive rainfall.
For optimum growth, Centaurea Collina plants require a well-draining soil with good structure, fertility, and water-holding capacity. The ideal soil for these plants would be a loamy soil that is rich in organic matter. In addition, the soil should have a slightly acidic to neutral pH of around 6.0 to 7.5. The soil should also have good drainage properties as Centaurea Collina plants do not tolerate waterlogging. It is recommended to mix coarse sand, perlite, or vermiculite with the soil to improve aeration and drainage. Overall, an ideal soil for Centaurea Collina should be nutrient-rich, well-aerated, and well-draining.
To propagate this plant, you will need to take stem cuttings from a mature and healthy plant. First, select a stem that is sturdy and has at least two nodes (where leaves emerge from the stem). Use a sharp and sterilized pair of pruning shears to make a clean cut at a 45-degree angle to avoid crushing the stem.
Next, remove any leaves that are closer to the bottom of the stem. Dip the cut end of the stem in rooting hormone powder to stimulate root growth. Then, place the stem cutting in a pot filled with a well-draining soil mix, and water it thoroughly.
Cover the pot with a plastic bag or wrap to create a humid environment. Place the pot in a bright and warm location with indirect sunlight. Mist the cutting and soil every few days to keep the humidity high.
After a few weeks, check if the cutting has developed roots by gently tugging on the stem. If you feel some resistance, it means roots have formed, and you can remove the plastic cover. Gradually acclimate the new plant to lower humidity and brighter light conditions.
Once the plant has established a sturdy root system and a few sets of leaves, you can transplant it to a larger pot or in your garden.


