Plant Overview
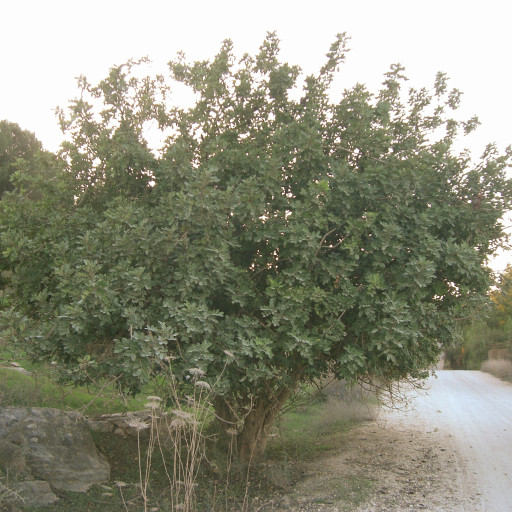
The Ceratonia siliqua, widely known as the Carob Tree or St. John’s Bread, is an ancient Mediterranean treasure. Legend says these nutritious pods sustained St. John the Baptist in the wilderness, earning the tree its biblical nickname. This hardy evergreen is cherished for its cooling shade, its extreme resilience against drought, and its sweet, chocolate-scented fruit pods.
🔍 How to Identify
- 🌿 Leathery Foliage: The leaves are pinnate, meaning they grow in pairs along a stem. They are thick, waxy, and a deep, lustrous green, designed to retain moisture in hot sun.
- 🍫 Chocolate Pods: The most distinct feature is the fruit—long, flat, leathery pods that turn from green to a dark, wrinkled brown when ripe. They emit a faint, sweet, earthy aroma.
- 🌳 Ancient Silhouette: The tree develops a broad, hemispherical crown and a thick, gnarly trunk with rough gray bark that looks more dignified and "twisted" as the tree ages.
🏡 In Your Garden
- 🌞 The Taproot Rule: Carob trees are incredibly long-lived but develop a massive, deep taproot early on. This makes them nearly impossible to transplant once they are established, so ensure you pick a "forever home" for your sapling.
- 💧 Drought Champion: Once mature, this tree is a true survivor. It thrives in poor, rocky soils and requires very little supplemental water, making it an ideal choice for xeriscaping or Mediterranean-style landscapes.
⚠️ Safety & Toxicity
- ✅ Safe & Edible: Carob pods are completely non-toxic and are a famous caffeine-free, "dog-safe" chocolate substitute. The pulp inside the pods is naturally sweet and high in fiber.
- 🐾 Pet Consideration: While the pulp is a common treat for dogs, the seeds inside the pods are incredibly hard. If your pet is a "gulper," it is best to remove the seeds to prevent any choking hazards or digestive blockages.
✨ Fun Fact
💎 The word "carat" (the unit used to measure gold and diamonds) is actually derived from the carob seed! Because carob seeds were believed to be exceptionally uniform in weight, ancient merchants used them as the standard counterweight on their scales.

Detailed Care Instructions
| Lighting | Full Sun |
To grow Ceratonia Siliqua plant, also known as the carob tree, you can follow these steps:
- Climate: Ensure that you live in a suitable climate for growing Ceratonia Siliqua. These plants thrive in warm Mediterranean or subtropical climates with mild winters and hot summers.
- Soil: Plant the seeds or young seedlings in well-draining soil. The soil should be slightly acidic to neutral pH.
- Sunlight: Provide full sunlight to the plant. Ceratonia Siliqua requires at least 6-8 hours of direct sunlight per day.
- Watering: During the first few years of growth, water the plant deeply and regularly to establish a strong root system. Once established, Ceratonia Siliqua is considered drought-tolerant.
- Pruning: Trim the plant as needed to maintain a desired size and shape. Pruning can also help improve air circulation and prevent diseases.
- Fertilization: Apply a balanced slow-release fertilizer once a year in the spring. Avoid over-fertilization, as this can lead to excessive growth and weaken the tree.
- Mulching: Apply a layer of organic mulch around the base of the plant to help conserve moisture, suppress weeds, and improve soil quality.
- Pest and disease control: Monitor the plant regularly for any signs of pests or diseases, such as aphids or fungal infections, and take appropriate measures to control them if necessary.
- Pollination: Ceratonia Siliqua is typically self-pollinating, but planting multiple trees can increase the chances of successful pollination and fruit production.
- Harvesting: Depending on your location and climate, the carob tree may take several years to start producing fruit. The edible pods can be harvested when fully mature, typically in the fall. The pods can be dried and ground into a powder for use as a natural sweetener or added to recipes.
Remember to research and adapt these guidelines to suit your specific growing conditions and climate.

Place in a bright room that is sun drenched almost all day. Or directly in a south-facing window.

1. Understand the watering needs of the plant: Before watering the plant, it’s important to understand how much water it requires and how often it should be watered. Some plants require frequent watering, while others prefer water in moderation.
2. Choose the right container: The container in which the plant is kept is important, as it affects the plant's watering needs. The container should have drainage holes to allow excess water to drain out, preventing the accumulation of water around the plant's roots.
3. Check the moisture level of the soil: Before watering the plant, it's important to check the soil's moisture level. This can be done by sticking a finger into the soil or by using a moisture meter. If the soil is dry, it's time to water the plant.
4. Water the soil, not the plant: It's important to water the soil around the plant roots and not the leaves or stem. Watering the leaves and stem can cause them to rot and attract fungal diseases. Moreover, watering the soil instead of the plant saves water, as it reaches the roots directly.
5. Water at the right time: The best time to water most plants is early in the morning or late in the evening, when the temperature is cooler and the sun isn't as strong. Watering during these times helps prevent the water from evaporating too quickly and ensures that the plant gets enough moisture.
6. Use the right amount of water: When watering the plant, it's important to avoid over-watering or under-watering. Too much water can cause root rot, while too little water can cause the plant to wilt and dry out. The amount of water needed varies depending on the size of the plant, the type of soil, and the climate.
7. Keep a watering schedule: Consistency is key when it comes to watering plants. Create a schedule based on how often the plant needs to be watered and stick to it. Adjust the schedule according to the changing weather and the plant's growth.
To properly fertilize this plant, begin by selecting a balanced fertilizer, preferably one labeled as a slow-release formula. Dilute the fertilizer according to package instructions and apply to the soil around the base of the plant. Be careful not to apply too much fertilizer, as this can burn the roots and damage the plant. It is recommended to fertilize this plant every 2-3 months during the growing season. Additionally, applying compost or well-rotted manure around the base of the plant once a year can provide added nutrients and improve soil health.
The Ceratonia Siliqua plant prefers a well-draining soil mix that is slightly acidic to neutral in pH. A mix of organic compost and sand can be used to promote drainage, while also providing necessary nutrients for the plant to grow. Additionally, adding perlite or vermiculite to the soil mix can also improve drainage. It is important to avoid over-watering the plant as this can lead to root rot and other issues. The soil should be allowed to dry out somewhat between watering to prevent any waterlogging of the roots.
Ceratonia Siliqua plant can be propagated through both sexual and asexual means.
Sexual propagation involves collecting seeds from the fruits of mature plants and sowing them in well-draining soil. The seeds should be planted at a depth equal to their size and kept in a warm, humid environment until they germinate. Once they have sprouted, the seedlings can be gradually acclimated to cooler, drier conditions over the course of several weeks or months.
Asexual propagation can be achieved through stem cuttings or layering. For stem cuttings, a healthy stem is selected and cut just below a node or leaf joint. The cutting should be several inches long and stripped of any leaves or buds. The stem is then dipped in rooting hormone and planted in a well-draining soil mixture. It should be kept in a warm, humid environment and watered regularly until it develops roots and new growth.
For layering, a low-hanging branch of the plant is selected and a slit is made in the bark. The branch is then bent downwards and secured into the soil with a U-shaped wire or stake. The area of the branch that is covered by the soil will eventually develop roots and can be cut away from the parent plant to become a new, independent plant.
Common pests of the carob include Spider mites, thrips, whiteflies, larvae. Make a habit of checking your carob frequently for pests so that any infestations can be caught and managed early.


