Plant Overview
Often called the "Bartender’s Lime" or the "Mexican Lime," Citrus x aurantiifolia is the tiny but mighty star of the citrus world. While most people associate it with the tropical breezes of the Florida Keys and world-famous pies, this zesty traveler actually traces its roots back to Southeast Asia. It is prized by home gardeners for its incredibly fragrant blossoms and thin-skinned, intensely flavored fruit that packs a much punchier acidic kick than its larger cousin, the Persian lime.
🔍 How to Identify
- 🍃 The Foliage: Small, ovate leaves that are a deep, glossy green, featuring a distinctively "winged" petiole (the small leaf-like structure where the leaf meets the stem).
- 🌸 The Blooms: Clusters of tiny, star-shaped white flowers that often show a delicate blush of purple or pink around the edges of the petals.
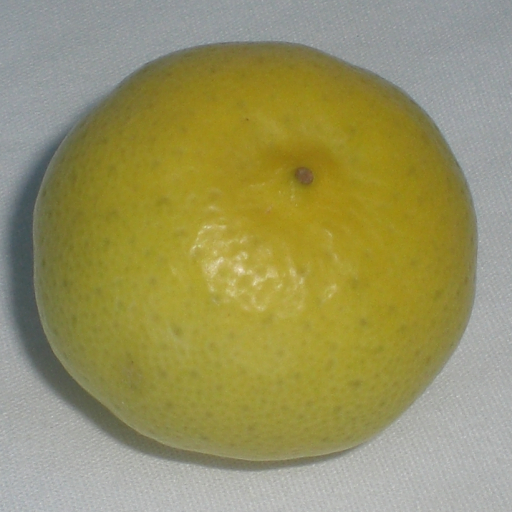
- 🍋 The Fruit: Smaller and more spherical than standard limes, turning a pale, greenish-yellow when fully ripe, with a very thin, smooth rind and many small seeds.
- ⚔️ The Defense: Sharp, stiff thorns are hidden among the branches, particularly on younger growth, requiring a cautious hand during harvest.
🏡 In Your Garden
- ☀️ Sun Seeker: This is one of the most cold-sensitive citrus varieties in existence; it craves intense heat and will begin to suffer or drop its leaves the moment temperatures approach freezing.
- 🪴 Container Queen: Because it naturally grows as a shrubby, multi-trunked small tree, it is the perfect candidate for large pots on a patio, allowing you to wheel it indoors when winter arrives.
- 💧 Drainage is Key: This plant hates "wet feet." It requires sandy, well-draining soil to flourish, as stagnant water around the roots will quickly lead to health decline.
⚠️ Safety & Toxicity
- 🐾 Pet Warning: The fruit skins, leaves, and stems contain essential oils like limonene and linalool, which are toxic to dogs, cats, and horses if chewed or ingested.
- ☀️ Skin Sensitivity: Handling the juice in bright sunlight can cause "Margarita Burn" (phytophotodermatitis), a chemical reaction on the skin that leads to redness or blistering.
- 🧤 Thorn Hazard: Always wear thick gloves when pruning or harvesting, as the thorns are sharp enough to puncture standard gardening attire.
✨ Fun Fact
Despite their name and the green slices we see in drinks, Key Limes are actually yellow when they are at their peak of ripeness! They are usually harvested and sold while still green because they have a longer shelf life and a more "classic" acidic bite at that stage.

Detailed Care Instructions
To successfully grow a Citrus X Aurantiifolia (commonly known as the Key lime or Mexican lime) plant, follow these steps:
- Choose the right location: Key lime plants thrive in warm climates. They need full sun exposure, so find a spot in your garden or patio that receives at least 6-8 hours of direct sunlight per day.
- Provide well-draining soil: Key lime plants prefer slightly acidic soil with a pH level of around 6.0-7.0. Ensure that the soil is well-draining, as waterlogged conditions can lead to root rot.
- Start with a healthy seedling or sapling: Purchase a healthy Key lime seedling or sapling from a local nursery or garden center. Alternatively, you can germinate seeds by placing them in a damp paper towel and sealing them in a plastic bag until they sprout.
- Planting: Dig a hole that is twice the size of the root ball of the seedling. Place the seedling in the hole, ensuring that the crown of the plant (where the roots meet the stem) is level with the soil surface. Fill the hole with soil, gently firming it around the roots.
- Watering: Key lime plants require regular watering, especially during the growing season. Keep the soil evenly moist but not waterlogged. Water deeply, allowing the top few inches of soil to dry out before watering again. Reduce watering during the dormant season.
- Fertilizing: Feed your Key lime plant with a balanced citrus fertilizer or a slow-release fertilizer specifically formulated for citrus plants. Follow the package instructions for application rates and frequency. Apply the fertilizer in early spring and again in midsummer.
- Pruning: Prune your Key lime plant regularly to maintain its shape and promote healthy growth. Remove dead or diseased branches and any suckers that arise from the graft point.
- Protection from frost: Key lime plants are sensitive to frost, so if you live in a region with cold winters, it's best to grow them in containers that can be moved indoors during freezing temperatures.
- Pest and disease control: Keep an eye out for common citrus pests such as aphids, scale, and citrus leaf miners. Treat infestations promptly with organic or chemical insecticides as necessary. Monitor your plant for signs of diseases like citrus canker or citrus greening, which may require professional treatment.
- Harvesting: Key limes usually take around 6-9 months to ripen. Harvest the fruit when it turns completely yellow and feels slightly soft to the touch. Twist or cut the fruit off the tree.
By following these steps, you can enjoy the bountiful harvest and tangy flavor of your own homegrown Key limes!

Place in a bright room that is sun drenched almost all day. Or directly in a south-facing window.

To efficiently provide water to a citrus plant with oval-shaped fruit that has a sour, acidic taste and is rich in vitamin C, it is essential to consider various factors. Firstly, the frequency of watering must be based on the soil moisture level and the weather conditions. The plant should be watered when the top inch of soil is dry, and the surrounding environment is warm and dry.
The second factor to consider is the amount of water required for this plant. Generally, the citrus plant will require a moderate amount of water – enough to reach the plant's roots without saturating the soil or causing waterlogging. It is recommended to water the plant thoroughly and deeply, ensuring that water reaches the roots. In addition, the potting soil should be adequately aerated to help prevent overwatering.
Lastly, the method of watering must be considered. It is better to water the plant by slowly soaking the pot's soil instead of surface watering. Surface watering will cause uneven water distribution, and some parts of the soil may be left dry. In addition, the plant should be watered early in the day to allow for adequate soil moisture and prevent the possibility of fungal growth.
To fertilize this plant, use a balanced fertilizer with a ratio of 10-10-10 or 20-20-20. Apply the fertilizer in early spring, mid-summer, and early fall. Be sure to water the plant before and after fertilizing to prevent root burn. A slow-release fertilizer can also be used, but make sure to follow the manufacturer's instructions for application rates. Avoid over-fertilizing, as this can cause the plant to produce fewer fruits and become more susceptible to disease.
For optimal growth and health, it is recommended to use a well-draining, nutrient-rich soil for this plant. You can mix your own soil or purchase a pre-made mix from a gardening store. The soil should have a pH level between 5.5 and 7.5 to ensure proper nutrient uptake. It is important to avoid soil that is too compact or heavy, as this can cause poor drainage and lead to root rot. Additionally, adding organic matter such as compost or aged manure can help improve soil structure and provide beneficial nutrients to the plant.
One way to propagate this plant is by taking a stem cutting from a healthy parent plant. Choose a young, green stem and make a clean cut just below a leaf node. Remove the lower leaves and dip the cut end in rooting hormone powder. Plant the cutting in a well-draining soil mix, keeping it moist but not waterlogged. Cover the pot with a plastic bag to create a humid environment and place it in indirect sunlight. Check for roots after a few weeks and transplant to a larger pot once roots have developed. Another way to propagate this plant is by layering. Select a low branch and remove the leaves from the bottom few inches of the stem. Bury this section in soil and anchor it with a U-shaped wire or a stone. Keep the soil moist and wait for new shoots to emerge from the buried section. Once the new plant has established roots, cut the stem connecting it to the parent plant and transplant to a new pot.
Common pests of the key lime include Scale insect, mealybugs, spider mites, aphids. Make a habit of checking your key lime frequently for pests so that any infestations can be caught and managed early.


